Some time ago I created three canvas panels with the look of battered leather or distressed wood (I’m not sure what I set out to do to be honest, but they turned out quite well).
In either case they were not supposed to end up sitting on the floor in a corner gathering dust so I decided to pick them up, dust them off, apply some finishing touches and get them on the wall where they belong!
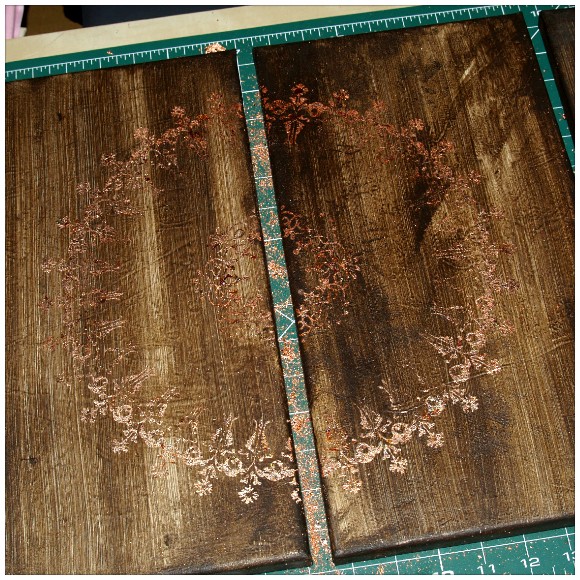
To bring you up to speed, here are the three panels as they were before the gilding flakes were applied.

To create the distressed look I used a simple combination of techniques and materials. Here is a quick run through.
- Using a kitchen sponge I dragged a patchy base coat of paint down the canvas panels.
- I then applied a layer of texture medium and whilst it was wet smothered it with a piece of crumpled plastic film. I let it set for a short while, but while there were still some wet areas I removed the plastic and let the whole thing dry. This left behind the lumps and bumps that you see.
- Next I used the kitchen sponge again to “dry brush” another patchy layer of paint down the canvas. I allowed this to dry before finally using the sponge to drag some of the paint in over the edges.
Looks good eh?
When I originally created these I did have the idea of using the gilding flakes in some way to add the finishing touches, but I never really decided whether I was going to use stencils or stamps.
At the time that these panels were created I didn’t have the Inkadinkado Stamping Gear system. Since I got it I have been talking about using the system to create this type of home décor so I decided that I would give it a go on these.
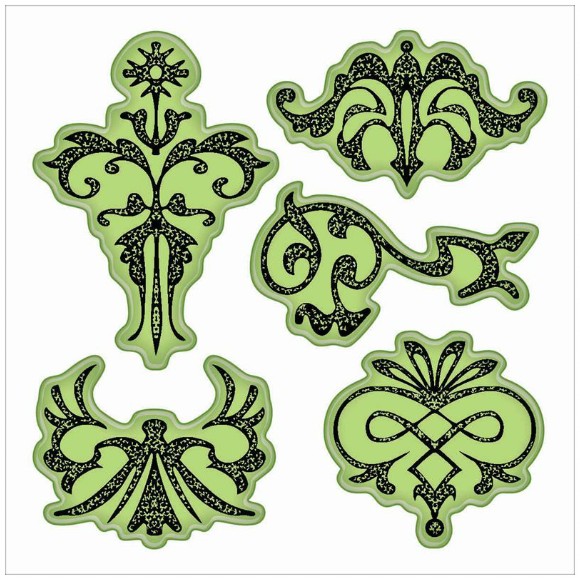
I chose a set of stamps that I thought would work well as a repeat design for this project, and something that was also going to have that weathered look. The set of stamps that I chose was the Ornament Design set.
To start stamping I chose a point in the middle of two of the canvas panels and used the wheel from the Inkadinkado Stamping Gear range to stamp out a design using the Indigo Blu gilding flake glue.
There’s not much to see on this next picture as the glue appears clear however it will give you an idea about positioning.
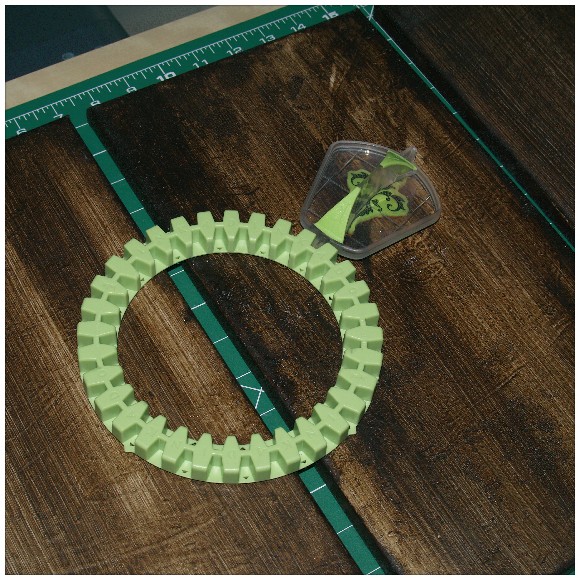
I did a circuit on the inside of the wheel with one design and then a second circuit with a different stamp around the outside of the wheel.
Following the recommended guidelines I then applied the gilding flakes and used the scoochy sponge that comes in the gilding flake starter kit to scuff away the excess flakes.
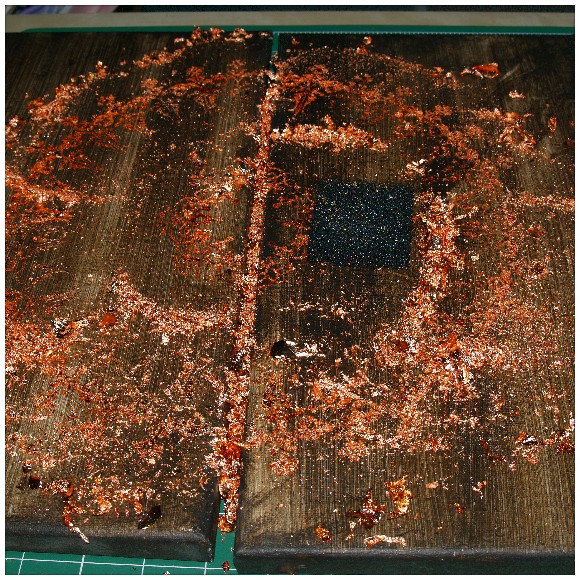
And here is what it looks like after scuffing off all of the excess flakes. Looking good!
I won’t show pics of the rest of the stages as you will be able to figure out from the final picture that I went on to do a few more mandala designs using the stamp set, gilding flakes and cog / wheel.
I tried to vary the size and positioning a little so that all three panels had interest.
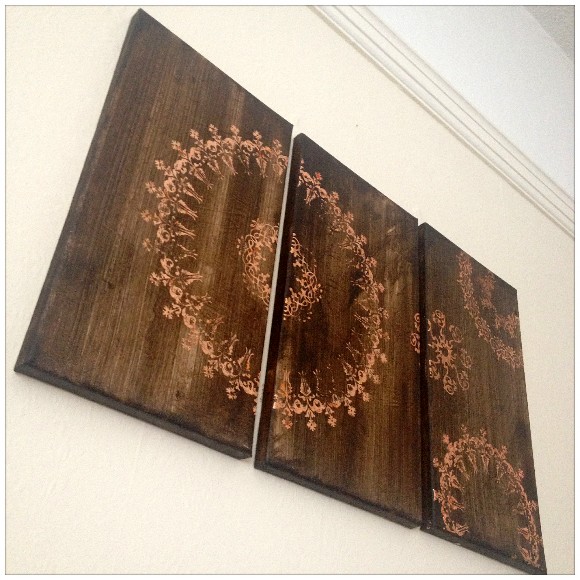
And here it is – on the wall! :)

I do like it however I think that if I did this again I would probably put some of the designs on the left, just to balance it out.
Overall I am very happy with the finished result though, especially the colour choices. I think that I am more happy that it is finished and on the wall – it’s a first!
Anyway, I would love to know what you think of it? Is this your style? Do you have any questions about how it was done?
Feel free to use the box at the end of this post to leave questions and comments.
Thanks for reading.
John :)

Hi John
This is stunning wall art you’ve created I’m so glad you put them on your wall. I hope they have pride of place they certainly deserve it. The background is amazing and effective I thought they were wood panels when I saw them on C&C the other day I’m amazed you created them yourself. I love the gilding flakes so pretty using the stamps and inkadinkado stamping gear range.
You are very clever.
LikeLike
Your a very clever man ill have to try this xx
LikeLike
Thank you Dionne. I look forward to seeing your creation :)
LikeLike
Hi John, talking to my daughter last night about your canvas post. She would like to decorate her bookcases in the same way. As they are flat packed do you know if she needs to do any preparation to the surface first or just stamp straight on the wood?
Thanks.
LikeLike
It will depend on what surface they have. Are they untreated wood or do they have a laminated surface?
LikeLike
Wow John very effective – love it
LikeLike
Great; love your technique :-) Elaine xxx
LikeLike
Stunning John love what you have created thanks for sharing hugs txx
LikeLike
O these are amazing xx
LikeLike
Really love the look of this. What a clever idea.
Just a thought, is it too late to add to the left of your design?
LikeLike
John you are one clever guy,love your work xx
LikeLike
What a brilliant effect John!! It looks amazing. I would be convinced they were wood panels
P x
LikeLike
oh I like that! jenx
LikeLike
Great idea John. Love wood effect and good use of stamp wheel. Wonderful.
LikeLike
Wow, the wood effect is really good, I love it. The whole set looks amazing x
LikeLike
Brilliant John, looks fantastic on the wall. We have all plain walls in our house so I can see a canvas, inkadinkado and gilding flakes session going on very soon!! Thank you for sharing.
Jan x
LikeLike
John you’re brilliant, thanks so much for sharing this beautiful project with us. XX
LikeLike
OMG! this is absolutely fantastic. Looks brilliant up on the wall x
LikeLike
WOWSERS!!!!! This is fantastic John, love the fabulous design and looks stunning on the wall. Thank you for sharing.
Hugs
Linda xxx
LikeLike
WoW John, this is fantabulous! It was just waiting for the Inkadinkado stamping gear. I can see endless possibilities. Thank you for sharing. XX
LikeLike