
Free Printable Design Grids for Pattern Stamping Part 1
Halloooo you. I recently highlighted a way of using a light box with some printed grids to create pattern stamping designs and had a fair few questions on where you could get those print outs.
The ones that I used were very old and I created those a long time ago and don’t have the originals so have set about creating a whole new set for you to play with.
Over the next two Stamp It Sunday posts I will be sharing printable grids and design ideas for square designs, rectangular designs, oval designs and circular designs so I hope that you will continue to ‘tune in’ and take a look at these neat little helpers.
The downloads are free and will be in a multi-page PDF format so you can print the lot out in one go, or just the one page – no muss, no fuss.
If you would like to join me in having a go at pattern stamping using printed grids then all you need to do is click here to download Gentleman Crafter’s Handy Pattern Stamping Grid eBooklet, PS, you can use these for more than just pattern stamping – think embellishments, rhinestones etc.

For my light source I have been using the light box, of which there are many options on Amazon.

To show these in action I will just gather up some other bits and then we can get stamping.

For this first post I will just be working with the first two square grids.

Some low tack tape was used to stick the grid to the light box and then the cardstock over the top of that.
Below you can see how well this grid shows up on the light-box.

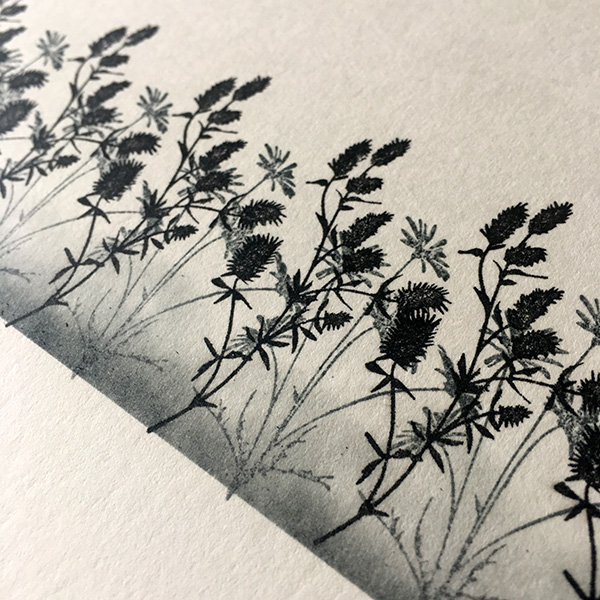
For the first go I just did a simple row of reed stems. Nice and simple. Would make a nice border.

I then used some grey ink to stamp some flowers inbetween each of the reed clusters; the grid was a real help here.


Using one of the lines on the grid I was also able to neatly position a post it note in order to mask off the lower section ready for some ink blending.


For the next idea I thought that it would be great to create a way of adding detail to corners of cards or other papercraft projects so I masked off an edge, lining the post it note up with one of the lines from the grid and stamped a floral design over the top of that.

A second post it note was added at a nineyy degree angle, easy with the grid, and additional stamps were used over the top and then a little shading was added too.

Here is what that looked like once the masks were removed. You can see how the grid helped.

Cool! Really like that one and will hopefully revisit in the future.

Next, hmmm, how about a kaleidoscopic design using some foliage…

… easy thanks to the grids.
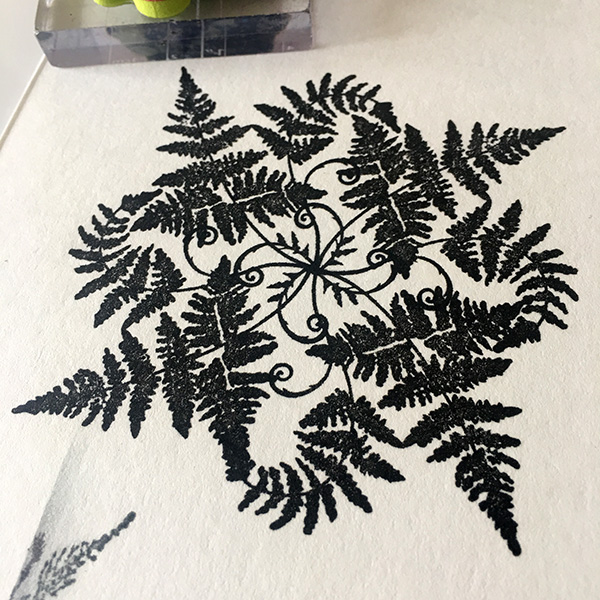
Might even look great with a die cut centre and initials placed in the middle, like a monogram.
All this brain work makes me hungry so how about a neat row of Custard Creams…?

Or a neatly arranged grid of jammy dodgers?


Hehe, all well and good but there must be more to this.
Lets add a sentiment in the middle of the biscuit grid. With the grid I can align the text and position the overall design easily.

Also get the biscuits, or cookies to neatly place themselves around the edges.


With smaller stamps the grid even helps to make really cool background patterns.

So, that was the first grid.
How about the second one with circles on it?
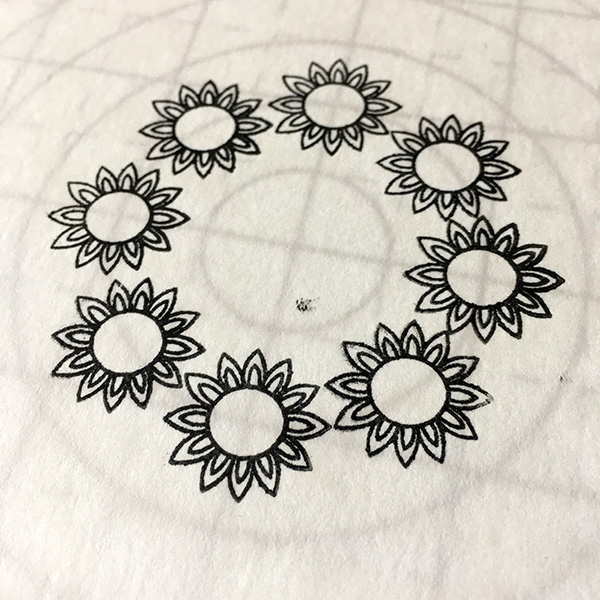
Well, a basic circular design suggests itself.
That was easier to do by plotting the North, South, Easy and West points first and then adding the inbetween bits after.
Taking a large stamp I used the third and fourth rings to help align the paisley leaf and make sure things were evenly spaced.

You could of course add doodling, zentangle and other stamps to build up a design using the grid.

Right, how about an actual project.
Back to the square grid and on with the central designs – easy to centralize them with the grid.

Time to mask off the main area and create the background. Using the grid I spaced out two different colours of ink with a leaf stamp.

In the next photo, you can see how I used the grid to line these up.

Pretty impressed with this as normally I muck things like this up.

Ok, this post was more about the grids and less about the card so here is a quick gallery overview of the rest of the process – mostly shading and colouring, then a little matting and layering.


So, what do you reckon? Not a bad set of reference sheets to have are they – and help create a whole bunch of designs.
Don’t forget to check out Part 2 in the Design Grids for Pattern Stamping series of posts.
Also, if you know anyone that would be interested in giving this a go then please do use the handy social sharing icons at the bottom of this post to let them know about these free printables.
In the meantime, thanks for popping in and I will catch you again next time.
Ciao for now.
J :)

What a wonderful idea and how generous of you to share these with everyone. I would love to see a video showing how you use each grid. Or even just photos of cards made with each grid and a little instruction about how it was done, maybe 2 or 3 photos of examples for each. I saw these mentioned on CardCutups Hero Arts June 2018 kit video. I am sure there are many more uses than I can imagine at the moment. I know asking for more information is asking for a lot in addition to you providing the grids, but thought it never hurts to ask. Thanks again for sharing!
LikeLiked by 1 person
[…] to some big bold graphics with the beach ball stamp! On a white card front, I used one of my Gentleman Crafter’s Handy Guides for Pattern Stamping to assist with hand stamping the beach balls in nine colors – all Distress Oxide inks – […]
LikeLiked by 1 person
[…] and immediately knew that I wanted to use it on one of my cards from this kit.I pulled out my ‘Gentleman Crafter’s Handy Guides for Pattern Stamping’ and used the Oval grid with eighteen sections to stamp my radiating lines of the brush, marker, and […]
LikeLike
I was directed here from Scott over at cardcutups.wordpress.com/ — so glad I came over. Great ideas. Very kind of you to share your grids with the rest of us. Love the card you shared, too.
LikeLiked by 1 person
[…] to say that the candles here were all hand-stamped – no stamp platform used! I did find The Gentleman Crafter’s handy guides for pattern stamping on-line and used the circular grid with eighteen sections on top of my light board to stamp the […]
LikeLike
Thank you so much for sharing these grids.
LikeLiked by 1 person
Thank you, John. I REALLY need these! Great idea!! x
LikeLiked by 1 person
I love this John. Thank you so much
Love and Light
Sioux x
LikeLiked by 1 person
Thank you so much John. Anything to help us enjoy our crafting is very much appreciated. My brain doesn’t have to do overtime. …lol
LikeLiked by 1 person
Thank you John, really, really helpful. x
LikeLiked by 1 person
John, you are amazing and so generous. Thank you, thank you.
LikeLiked by 1 person
I saw you using the grids on the shows and now I can’t believe I’ve now got a set to play with on my Cutterpillar Glo (love it!). The tip to run them through a laminator also is a good idea. Can’t wait for the next installment.
LikeLiked by 1 person
Thank you for this great grid
LikeLiked by 1 person
What a good idea, thanks John
LikeLiked by 1 person
Hi John,
I haven’t forgotten you, Been crazy here :-p
This grid is a very clever idea. Unfortunately I have no light box but I do have transfer paper. I can practice on a draft setting print out, try out ideas then lightly trace the markings from the grid that I need onto the surface I’ll stamp onto. It’s got to be worth a go as I doubt I’ll be getting a lightbox just yet :-( maybe I’d better be good and see if Santa brings me one- speaking of C*******s are you starting your makes in good time John? I’ve got to finish all the wedding stuff first then I’ve sworn I’ll make a better effort this year. Last 4 or 5 years have been awful on that front, I know I need more time than most but I don’t seem to start till 2nd week of December, tut tut tut… Must do better. Maybe some stamped patterned cards to start me off!
I hope you’re enjoying life John, keeping the clouds away. Same sentiment goes to everyone.
Stay crafty,
T x
LikeLiked by 1 person
Not my wedding… My brothers!
LikeLiked by 1 person
Did wonder what the C word was. Then the penny dropped. Odd as I’ll be thinking C*******s this month because of work! I’ll probably still get nothing done in time, lol!
LikeLike
Thank you for this John. I’m not very good at stamping yet. Funnily enough I have been playing today with small cards and just one stamp in the middle of die cut shapes. Then colouring them.
This looks interesting will try to keep your ideas to try later.
Have a good week and thank you for all your inspiration.
LikeLike
Thanks for this John, I see a lot of potential here :) I shall share this with my Stamp Club teacher.
LikeLiked by 1 person
This is just brilliant! Thanks so much John, you are indeed a true gentleman. Clare x
LikeLiked by 1 person
This is a brilliant idea. Thank you so much.
LikeLiked by 1 person