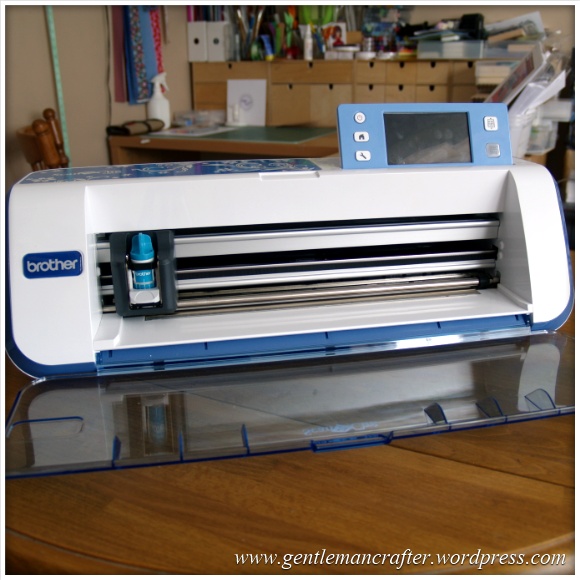
With less than a week to go until the launch of the Brother Scan N Cut machine on Create and Craft TV I thought that I would do a series of posts to explain a little more about this exciting new tool and what I have been making with it.
I have been posting pics on Facebook of things that I have been making recently but haven’t really had the chance to explain which aspects of the machine helped create them so this first post will be a closer look at some of my creations.
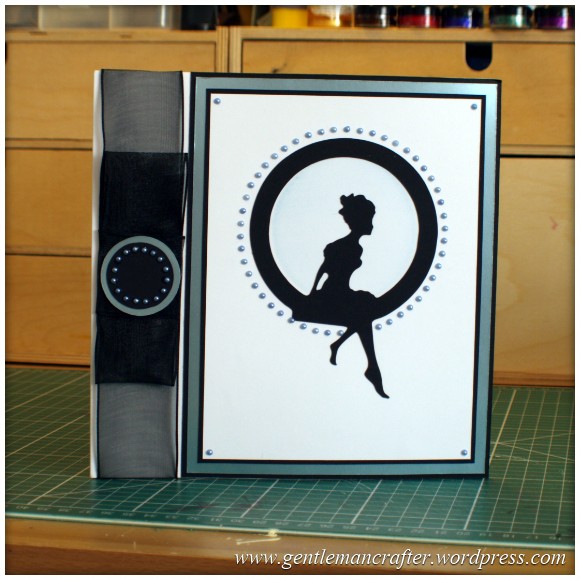
The Lacey Frame
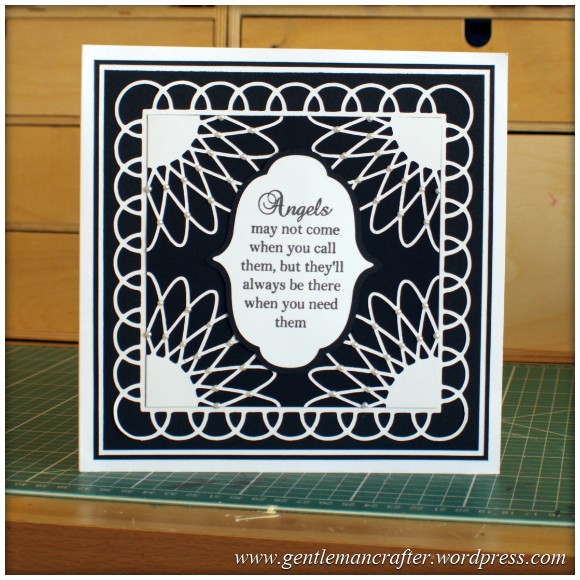
Using Serif Craft Artist, I designed a simple repeat pattern using ovals and then printed it out. This was then scanned through the Brother Scan N Cut and converted automatically into a cutting file which I then cut from white cardstock.
The same process was used to create the scalloped border.
For the sentiment panel I first stamped out the sentiment, then scanned a preview onto the screen of the Scan N Cut and then loaded one of the pre-installed shapes and cut it out. I then increased the size and cut a layer from black cardstock.
Patchwork Card
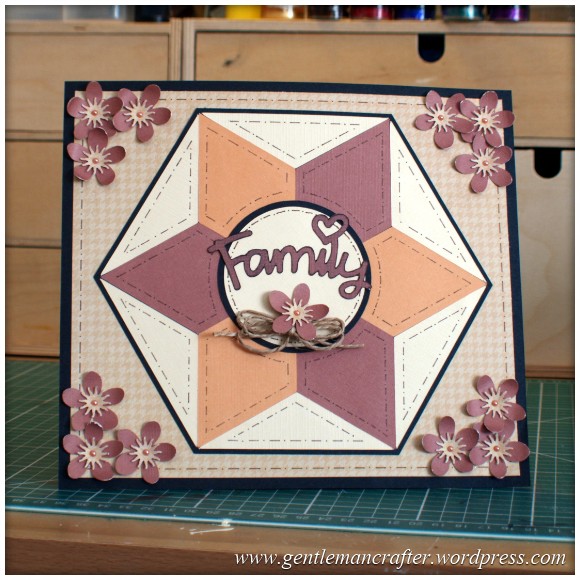
The Brother Scan N Cut machine comes pre-installed with 100 quilt block patterns. When loading these up to cut you have the choice to create the complete block at a size of your choice. The machine then automatically resizes of all of the elements and you can then cut each group of pieces from a different coloured fabric or cardstock.
After assembling the pieces on an A4 piece of cardstock I then used the Perfect Layers Rulers to add a little border to the design and then embellished it with some flowers that I cut using a pre-installed design.
Notebook
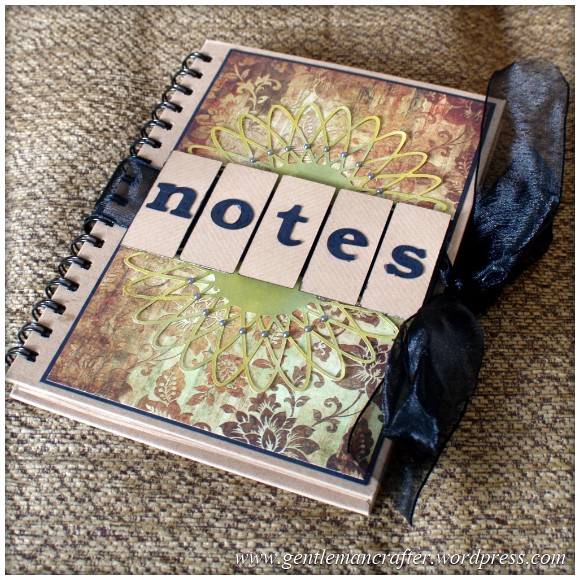
This notebook was a cheapo one from Sainsburys and was in dire need of a little decoration.
I created the lacey background design with the same design that I made the Lacey Frame from the earlier card and then cut some panels for the letters.
The letters were cut using one of the five built in fonts available on the machine.
Happy Birthday Card
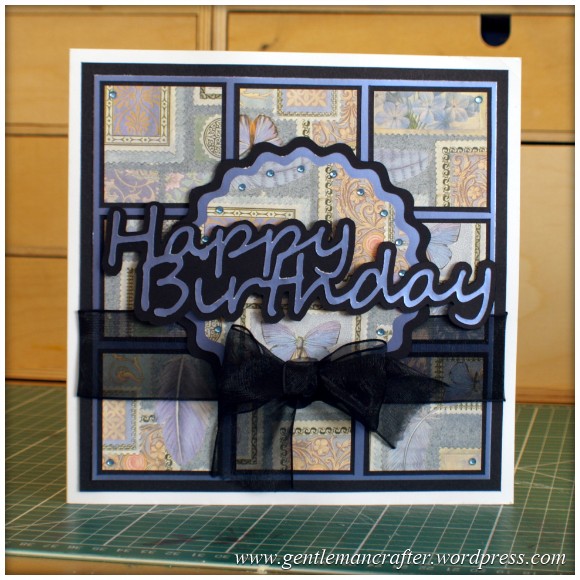
This card was mostly made with the Brother Scan N Cut machine.
The squares and layers for the squares were all cut using the machine.
The sentiment was one that I quickly put together in Serif Craft Artist, printed, scanned and converted automatically. This gave me the option to add a shadow layer aswell.
Simply Fabulous Card
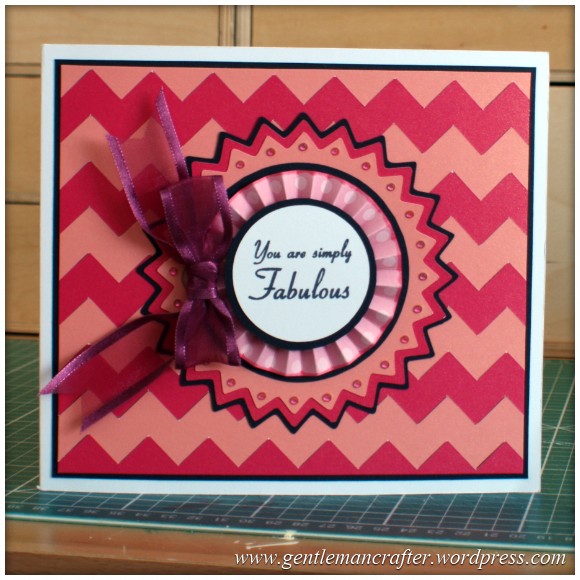
This card again used a lot of pre-installed elements.
The background was created by cutting multiple versions of the zig zag border in different coloured cardstock and then assembling them onto another piece of card.
The star topper was cut using a pre-installed shape and cut at different sizes from different cardstock.
The sentiment was stamped and then I used the “fussy cutting” feature to scan a preview of the stamped cardstock in so that I could align the circle precisely before cutting.
Home Cushion
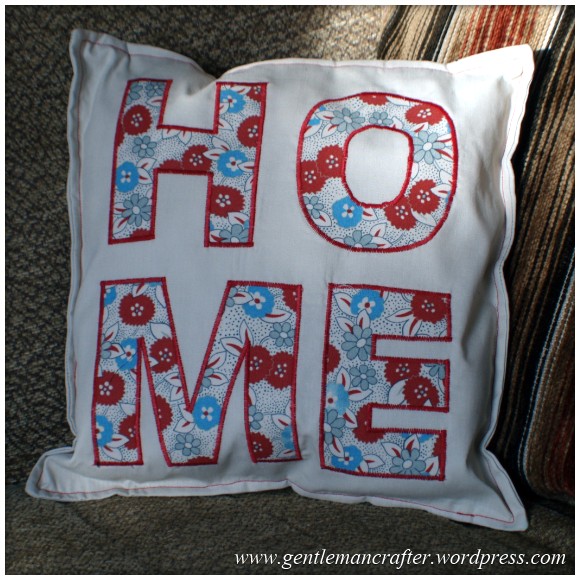
This machine has been designed with features installed that are perfect for use with fabric crafts. Creating applique letters is definately one. These letters had a heat fusible bond added to the back and then were cut using the machine.
I then adhered them to the fabric panel and did some satin stitching around the edge.
You And Me Card
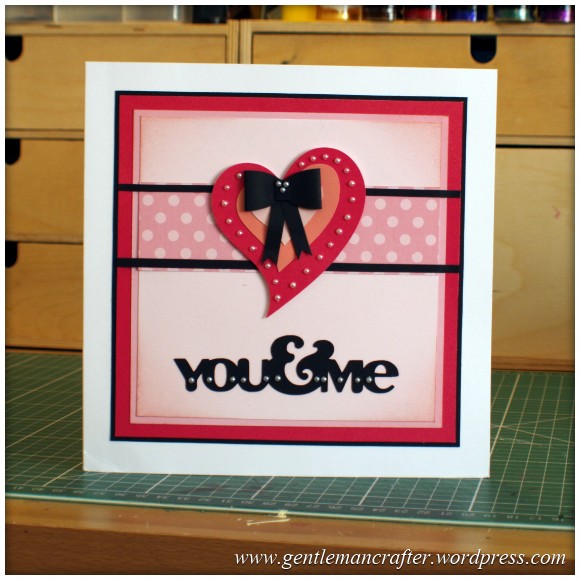
The multi-layered heart and the sentiment for this card were both pre-installed shapes. I used traditional methods to create the background layers.
Purple Patchwork Panel
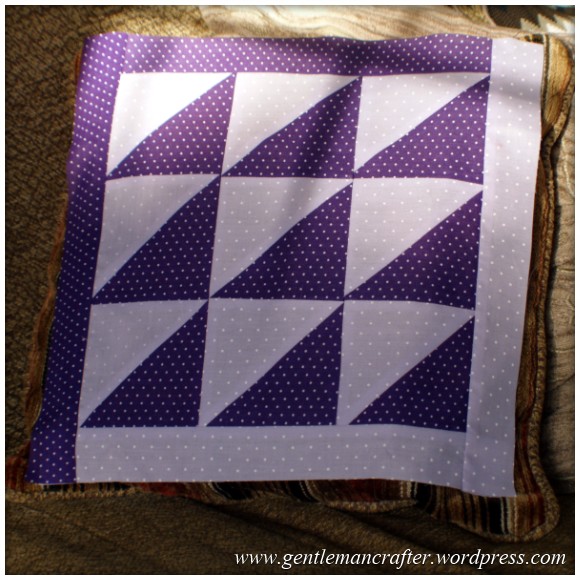
Remember I told you about those 100 built in patchwork patterns earlier? This is a version that I did with fabric. The exciting thing about the machine though is that it will draw in your seam allowance and then cut out each shape so that you don’t have to mark the seam allowance in after you have cut out the design.
Again, just as a reminder, I had the option to direct the machine to create the shapes at a size that will give me a specific block size when it was assembled.
Green Godess
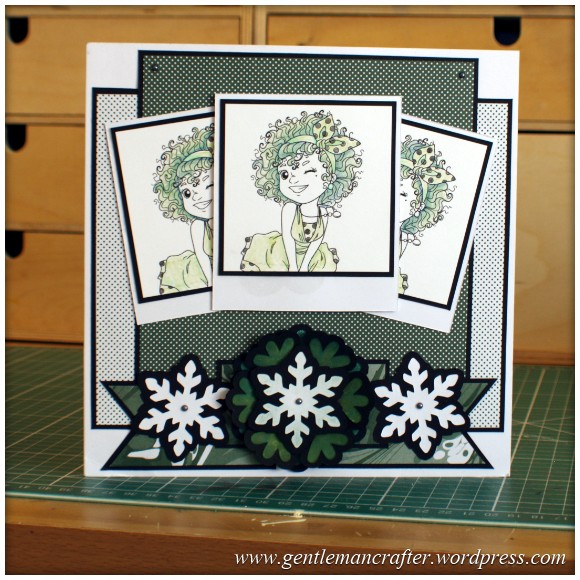
I was both please and weirded out by this card when I had finished it. The snowflake flowers were all cut using the Brother Scan N Cut. With the basic pre-installed shapes I was also able to create shadow layers.
The digi stamps were all cut with the machine using that “Fussy Cutting” feature that I talked about earlier. I did however cut the layers using the Perfect Layers Ruler so that I could free the machine up to continue cutting other items for me.
Sixties Spiral
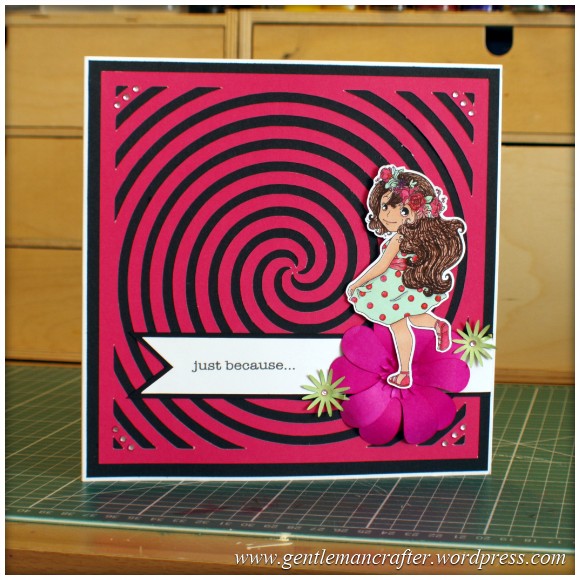
By this point I was getting a little bit more confident and was starting to look at ways of using some of the other features.
The spiral background was designed in Serif Craft Artist, scanned and converted automatically – then cut.
The flowers were cut using a combo of pre-installed designs (for the large flower) and flowers that I had designed (for the smaller flowers. I cut them from white card and coloured with Spectrum Noir pens to coordinate with the main design.
Now for the exciting bit! I cut out the digi stamp with a perfect border using the “Direct Scan” feature.
Tempting Trellis
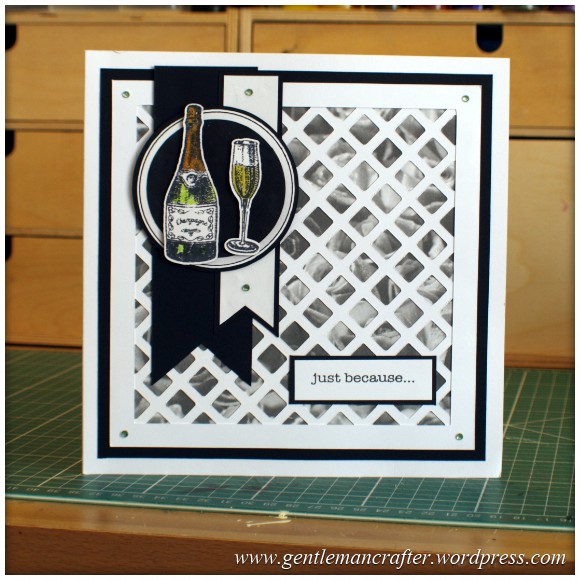
I used the same processed as in the previous card but this time to design, scan and cut the trellis background and then “Direct Cut” the stamped champange bottle and champagne flute aswell as the circular layers that went behind them.
Fairy Fancy
This design was a digital punch from Serif Craft Artist that I printed, scanned, converted and then cut.
The gems were a bit of a chore, but I think they look good.
I still think that I would change the bow next time.
Ok, anyway, that’s about it for now.
If you want to know more, please feel free to list ANY questions or comments below, and I will either try and answer them here, or on the shows.
The shows will be shared between Mel Heaton and myself and start on Create and Craft TV at 2pm on Saturday January 11th, 2014 (saying that still seems weird).
I have got more to make over the next week and will also be working on more blog posts in the near future, but I hope that you can see some of the features coming through.
Many thanks for reading.
I look forward to seeing you on the day!
J :)

Hi John. Can you please tell me where I can find the ScanNCut Gallery on the Create and Craft Website. Regards Edna
LikeLike
It’s most likely here – http://www.createandcraft.tv/ScanNCut.aspx
LikeLike
Hi John. On the Back of the Brother ScanNCut Project and Idea Book that comes with the Machine. There is “Optional Accessories” which states Use an additional USB Flash Drive to Access 55 Custom Built ” Quilt Pattern Design Collection” to further your Creative Needs also on the same Page there is a 50 Custom Bulit ” Appliquie Pattern Collection” to also put on to a USB Flash Drive. Do you know John if these Patterns are Free or do we have to Buy them. If they are Free, how can we Crafters Download Them and Add them to our ScanNCut Machine. I have heard Mel Mention them on the Shows, but was not aware of what she meant until now. Regards Edna
LikeLike
As far as I know these are optional purchases only available in America.
LikeLike
Thankyou John for your prompt reply. Hopefully soon Brother will give thier UK Customers who have Purchased the ScanNCut Machine the same advantages as thier Peers in the USA. Regards Edna
LikeLike
Hi John. If and when Brother bring more Up-dates for the ScanNCut. Will we need to use a seperate USB Stick to download them. Regards Edna
LikeLike
No Edna, just delete the last one from the USB stick and use the same stick
LikeLike
Hi John. I managed to Up-Date my Brother ScanNCut OK. It was easier than I thought. Thankyou anyway. Edna
LikeLike
Hi John. Just so that I know I have Downloaded the correct Up-Date for the Brother ScanNCut ie:- (SNC0001V110W.upf) is the one I have Downloaded onto my Memory Stick. So what do I do with it now. Your advise would be welcome. Regards Edna
LikeLike
Hi John. Is it OK to cut Glitter Card with the ScanNCut. If so which Glitter Card is the best to use. Regards Edna
LikeLike
I haven’t tested glitter card yet but I’d say encapsulated glitter would be better as there would be less risk of it shedding as it’s being cut.
LikeLike
Hello John
Could you please tell me the name and details of the USB you use on your Scan n Cut. I have tried two of the ones on the compatability list but the machine will not open the folders. Yours obviously work and I would be very grateful for the info. I have learned so much from watching your programmes that when the machine arrived I was able to cut and do other things immediately. Thank you for all the info you give out. Margaret .
LikeLike
Hi Margaret what folders are you trying to open?
LikeLike
Hi John
I have worked out a way of getting the images onto my USB by printing them off , scanning and saving them to the machine, then saving them to the USB. I can then delete them from the machine and still have space in the machines memory. Than you for replying so quickly.
I am now going to try doing the image you made on serif.
Margaret x
LikeLike
Hi I cant use Scissors as I disabled would this cut out things off cd roms if I printed them out off my home printer? Hope you can help? Thanks
LikeLike
That will depend very much on what you are trying to cut.
LikeLike
Morning John. I am really hoping to buy this machine and have been very interested in all the show I have seen. In the projects above you mentioned several times that you created a shape in Craft Artist and converted it before cutting. What do you mean by this?. Thank you
LikeLike
Serif Craft Artist is a graphic design computer programme for crafters available from Create and Craft.
J :)
LikeLike
Would it be possible to have some tutorials on how you created the trellis and the spiral in craft artist please. 😊 I have craft artist 2.
Many thanks
Hayley x
LikeLike
I am looking for some screen capture software at the mo so that I can do videos of this for YouTube.
Will announce on the blog when these are done and ready.
J :)
LikeLike
Thank john 😊
LikeLike
Hi John, do you know what the size of the machine is please the dimensions, I can not find them anywhere, I have a tight space and just hope it will fit. Thanks Lynne
LikeLike
Not to hand but as a general idea the machine is approx 15 inches wide and you will need space at front and back (about 12 inches each end) for the mat to pass through and back.
J :)
LikeLike
Thanks John, I expected to allow about 12 inches for front and back but had no idea at all for width, around 15 inches then, thanks for that. I have looked on the programs and sort of tried to guess like from you wrist to your arm but everyone’s is different.
LikeLike
Ok gone and done it mine is on will be on its way on the 10th Feb EKKKKKKK!!!!!!! cant wait.
LikeLike
Hi John, can you tell me who makes the stamp ‘Angels may be not come …..’ which is on one of your cards, or is it a saying which you have printed and cut out? Thank you
LikeLike
Mary,
I believe it is from a sheet if sentiment stamps that are made by Creative Expressions.
J :)
LikeLike
You mentioned extra quilting patterns that nosy be available can you tell me more
LikeLike
I’ll need to find out more and let you know.
J :)
LikeLike
Hi John thanks for advising on price,but I’m sure it will pay for itself with the crafts I intend to do
LikeLike
Well done you, can’t wait to see more John.
LikeLike
Hi John, love the cards that you’ve made using the machine. Any idea on price yet?
LikeLike
I have had confirmation this morning that it will be £399 for club members with 4 x flexi payments available.
LikeLike
hi john, why have they sold out of the brother cut n scan today. when they said launch day was sat 11th. that seems very unfair.like me there will be many disappointed members. thanks gill from swindon
________________________________
LikeLike
This looks a very versatile machine,good for us girls/guys that can design
LikeLike
hi john, i too have been watching you tube, and this machine sounds wonderful. i think i will buy one. but nobody seems to know what the price will be.i think they should give us a hint on price, as this would give us the chance to make sure we would have the funds ready. you certainly have done some great samples. thanks gill
LikeLike
I keep posting a question and maybe I will find the correct answer to one of youtubes. I watched your video on the use of the ENVELOPE PUNCH BOARD and the mini album you made to hold coupons,etc. I understand the video BUT what did you use for the cover? That part I could not understand. Was it chip board,this card stock or what?
LikeLike
Debra, I’m not sure what you mean. I have not done any YouTube videos. I think that you might have me confused with Jim – he is “The Gentleman Crafter” in the USA.
Many thanks,
John.
LikeLike
Roll on 11 January!! This looks like a must buy item. Lorraine x
LikeLike
Hi John, first of all, happy new year! I follow your blog with interest as I am a very new crafter just crafting cards. I have not yet purchased a die cutting machine and wondered if you could recommend one. I am in my 70s, disabled in that my mobility is impaired and hands are not as strong as they used to be! I am computer literate but my computer is in the other room which makes life a bit difficult but I have a tablet which I use all the time!!
My email address is [address edited out for your privacy] and I would really appreciate a reply using email!!
I hope you don’t mind me writing to you. Once again may you have a good 2014!!
Kind regards
Dorothy Zolkwer
LikeLike
Dorothy, I have sent you a short email as requested.
J :)
LikeLike
I’ve been looking at lots of youtube videos since your last post and I really want one now, although I expect it will be quite an expensive crafting tool. Unfortunately I’ll have to wait a little while until my back balance recovers after Christmas. I spent way too much on myself getting all the stamping gear stuff and lots of new stamps. I also want to try glass fusing sometime, so somethings got to give. Too much to do, not enough time or money. lol.
LikeLike
Hi John, can you cut thin plastic to make stencil’ s for stamped images or any kind of stencil, how thick a material can the machine cut. Mary x
LikeLike
Mary, you can cut acetate. I have tried shrink plastic and modelling plastic. Both worked to some degree.
Mel Heaton says she has managed chipboard in it.
J :)
LikeLike
Wow! this looks really exciting John. Can you please post details of any consumables that will need to be replaced and also the weight of the machine? Many thanks, really looking forward to the shows! Pat x
LikeLike
Fantastic! Can’t wait to see it in action! Love Jean x
LikeLike