As the countdown to the launch of the Brother Scan N Cut machine on Create and Craft TV continues I thought that I would dedicate a couple of blog posts to having a little delve into some of the more unique features of this machine in order to help you understand how the process works and how simple it is to do.
This post is dedicated to the “Scan To Data” function which takes your printed, traced or hand drawn images and converts them into cutting files.
So this feature is going to be very useful if you wish to create your own unique sentiments, logos, decorations and more from your own original artwork.
It differs from the Direct Scan feature (that I will be describing tomorrow) in that it gives your more options in relation to the areas that can be cut.
Here is a step by step overview of the process.
First up, you turn the machine on. The Brother logo screen will then be displayed.
You can see the power on/off button at the top left of the control panel. I think that it’s great that all of the controls are in the one place.
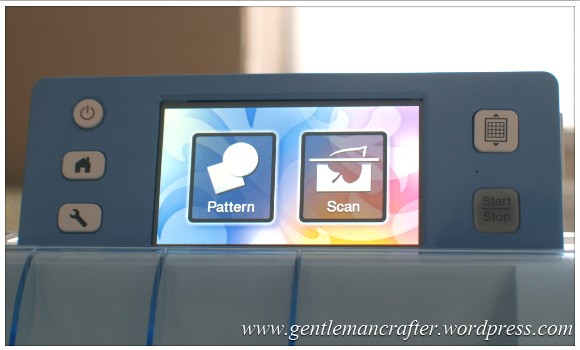
The next thing would be to press the HOME button (in the middle on the left). This will then bring up the functions menu.
As you can see in the next image, it’s not that complicated. You’re either going to choose a pre-installed pattern or to scan something.
I touched the SCAN icon as I wanted to show you how to do the SCAN TO CUT DATA method of creating a cutting file.
After pressing the icon, three more options came up. I think that you can guess which one I was going to press.
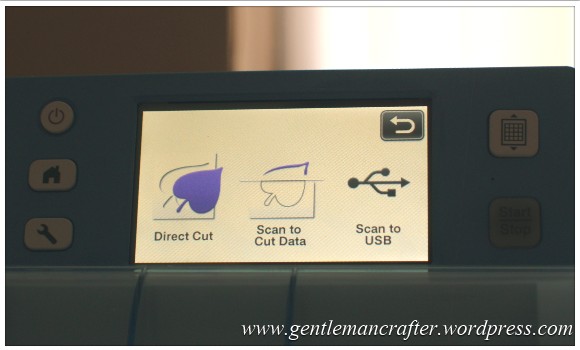
Yup, SCAN TO CUT DATA. You’ve got the hang of this already!
First “surprise” was this message after I had pressed the icon. Nice that it gives me a reminder of what it does – I will probably forget at some point.
Interestingly here I noted that it said “Press The Start/Stop” button to scan – but the start/stop button (bottom right) was not lit up. This is because I needed to load the mat (as it had suggested to me in the message).
So I chucked my print out into the scanning mat – which differs from the cutting mats as it has a nice overlay that holds your work in place and is not sticky (i.e. it is just used for scanning) – and loaded it into the machine.
I then prodded the Start/Stop button (which had now lit up).
The machine took the mat through the machine and then back out.
It then went through a recognition process to find all of the outline.
This process only took about 20 seconds.
I was then presented with this screen.
It showed the mat, a representation of my design (highlighted in red) and several options on the right.
These options are as follows.
The first one just creates an outline around the external perimeter (the outer edge). Like this.The second creates a cut line around all edges, i.e. it will also recognize the landlocked regions of my design.
The last option recognizes the internal areas only.
Once you’ve made your choice, you can then go onto to press the save button on screen. You then have two choices.
The left hand icon saves your design to the machine for use later. The icon on the right is in case you want to save the design to a USB stick and transfer it to a computer or another Scan N Cut machine.
This is a now an electronic cutting file that I can use over and over again.
Anyway, as you can see, this worked out quite well. I used this process to make the circular/square frame and also the lacey thing in the middle of this card.
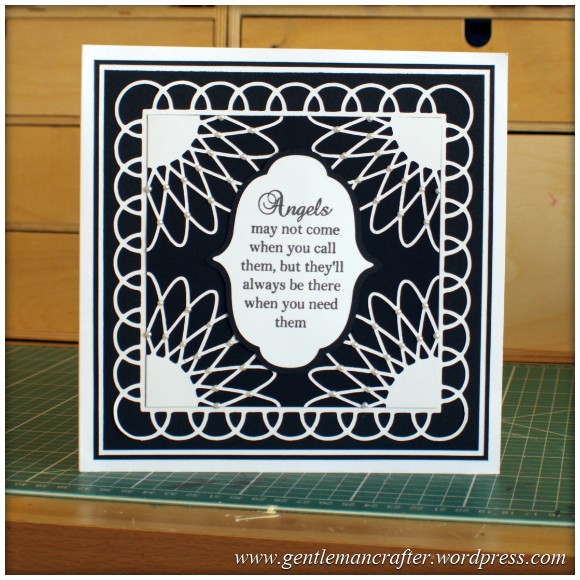
So that’s unique feature number 1.
I will aim to describe the Direct Scan feature tomorrow.
If I haven’t explained anything clearly enough for you, please do let me know and I will endeavor to get back to you as soon as possible.
Thank you for reading.
J :)
Hi John Ive had my scan n cut since last year and I love it but i have just bought a scan mat and it won’t recognize it am i doing something wrong please help as in middle of doing chrismas table placemats and thanks for all information you give as
maureen in Australia
LikeLike
Hi Maureen. Have you removed the blue strip? If so then I’m not sure what could be happening and would recommend contacting the Brother support desk for your location.
J :)
LikeLike
Thankyou John I Don’t think I have removed the blue strip where would I Find it but will also contact Brother.com.au if it continues thanks again.
LikeLike
what do I do if the machine will not recognize my mat
LikeLike
You should contact the brother help desk.
J :)
LikeLike
I also have a brother scan n cut the blue model, I notice that my blue man is loosing its tackiness, I was wondering if krylon spay would help regain some of the tackiness.
Thanks
SAMEHA
LikeLike
I haven’t tried that spray.
LikeLike
What I do now is very lightly spray my paper with stencil spray. (any kind of repositional or temporary adhesive)
LikeLike
Hey john thanks for a fast response it’s highly appreciated.
Since you haven’t tried the krylon sprayer to regain the tackiness to the blue mat, what would you recommend?
To my other question about stamping, I have tried lots of different inks and types of stamps, and I find when am stamping words in particular it’s not clear but rather abit foggy. Do you have any tips?
Thanks SAMEHA
LikeLike
I would never recommend spraying directly onto the mat as it could affect the operation of the machine.
As for the second question, have you tried a fine detail inkpad?
LikeLike
Hi I am new to card making and I am having some problems in getting a crisp clear font image can you please advise
Thanks
S.k
LikeLike
I don’t really understand your question. Please can you elaborate?
LikeLike
will scan & cut work with Decoupage sheets that are not die-cut?
LikeLike
Some will some won’t. It’s not what it was intended for but some people seem to be having some successes with it.
LikeLike
hi John and everyone………. re: decoupage I print my decoupage from disc draw round it with black fine tipped marker or black biro ,then print a copy out (which means i can keep the original for coping again) then on to my Scan N Cut machine MAGIC :) x
LikeLike
Good tip Gill! Thank you :)
LikeLike
Hi John!
You show us here on the pic that you scan a black image. After scanning its red highlighted on the screen. How is this possible – is this the scanning mat?
Thx for your help!
ToM
LikeLike
I have no idea Tom.
Yes I used the scan mat for this scan but have no idea why the machine decided to make it look red on screen. It makes no difference as far as I am aware.
J :)
LikeLike
Thx John! I´m asking ´cause a few people have probs with a printed text!! And I thought maybe the scanning mat makes the differents!
XoX
ToM
LikeLike
I don’t think that that would be the difference. I have used the sticky mats and scan mat. Both give good results. It is more likely be to do with the quality of the print.
LikeLike
Hi John, I have watched your demos exhaustively and you make no mention of the need for a scanning mat, pen holder and pens to draw seam allowances, and lo and behold, these necessary items are NOT AVAILABLE from Create & Craft!
How can I, as a quilter use these facilities, for which I, personally bought the machine, to help me as I am disabled and have difficulty cutting out. What a disappointment!!!
Ann Watling-Greenwood
LikeLike
Hi Ann, the scan mat is optional but poses advantages. I have discussed and demonstrated all of the accessories that you mentioned in detail on previous shows.
The buying team have been working hard to obtain additional stock for those that want or need them and therefore I would recommend regularly checking the website.
I look forward to seeing your creations :)
LikeLike
John could you please tell us when we will beable to buy the pen set and holder for the scan and cut also the 12×12 standard mats and low cut blades seems silly to have a new machine out and you cant get replacements. I would like to use my machine to the full but cant without these items
LikeLike
I’m afraid I don’t know the answer to your question. All of the items you mention come in the bundle.
LikeLike
Hi John
Have scanned in a door hanger with a centre cut out. Can I group it to move it on the mat.
When I move it, it is in two parts. It is a great machine, love it so far. Jill
LikeLike
Yes, just unify it and it will move as one shape.
LikeLike
Thanks so much for your reply. Hope this does sound stupid but how do I unify it. Thanks Jill
LikeLike
I would suggest taking a look over your instruction book. This will show you step by step on how to do this.
LikeLike
Hi John, I have been trying to scan an image on the 12″ by 24″ scan n cut mat but it keeps telling me this mat cannot be used, it is showing up as a12 by 12 mat and I can’t alter it.
LikeLike
This is correct. The 12×24 mats can’t be used for scanning at this time. I have submitted an update suggestion to brother.
LikeLike
Hello John. I just got my machine recently & adore the scanning feature. However, I’m wondering about the scanning mat. When I went to purchase one, it said it was for use the CM550DX model. I have the CM100DM. ($100 price difference) Will that scanning mat work in machine? Right now I’m just using either the low or standard mat for it. Thanks for any help or ideas you can share. Karen
LikeLike
Karen, not sure where you have attached the images however I cannot see them. If you would like to email them to me then please feel free to use the link at the top of this page.
J :)
LikeLike
John, there’s no pic. I have the ‘brown’ machine, while you & others have the blue one. And it seems the scanning is used w/ the blue (CM550DX). My question is, can I use the scanning mat w/ my machine (CM100DM)? Thank you for your help. Karen
LikeLike
I don’t see why not.
LikeLike
Thank you, John. I have used inkscape before but I’m not sure how this would relate to Craft Artist. Keeping my fingers crossed that you might be able to do a quick blog piece.
LikeLike
Hi John
My husband and I love watching you as you go into great detail on all the pro’s and cons on all the new products out there plus giving us such great idea’s to play with ourselves.
Now to my question I know you have been asked this many times but it has never been answered in a way that I want to know and that is does it cut decoupage. I have bought 1000s and 1000s of uncut sheets, but now I am finding it hard to use scissors so I need help. could I now cut these on the c & s or do I buy a cameo both are expensive so I can only get one. Or will neither work and do I have to wait a little longer for a machine that does, or may there’s an update coming out soon for the s & c.
I do understand that it will cut out these sheets if they are printed in bold colours like tbz but many of the step by step ie; le suh, morehead ect are not. These are the ones i’m talking about.
I don’t want to stop crafting but cutting is now becoming a problem.
Please help,
Carol and les
LikeLike
Hi John, can you please tell me how you created your artwork in Serif? I have only ever used the digikits and I’d like to try my hand at creating my own shapes etc. Would you be able to do a quick video? :-) Thanks, Debbie
LikeLike
Hi Debbie.
I don’t have the facilities to do videos for my personal blog at this time.
It’s mostly with auto shapes. Just have a play.
J :)
LikeLike
Hi John
In response to Debbie’s comment on the Serif creating your own shapes
dated 13/02/2014.
Would it be possible fore you to do a demo on Create & Craft
LikeLike
Keith, I will try and do something on the blog at some point in the near future. Not set up for video but after Debbie’s comment I am looking into screen recording software.
LikeLike
Where did you get the scanning mat?
LikeLike
I got mine from Create and Craft TV. The buying team will be trying to get more in stock soon but I can’t tell you when that will be.
J :)
LikeLike
Hi John, wonder if you can tell me how to line up the blade when putting a new blade in. I have found all the ‘how too’ info but cant find anywhere that tells how you line it up. Thanks for all your demos and info, loving my machine already. Linda
LikeLike
I am not sure what you mean Linda. You just unscrew the holder, drop in the blade and screw the holder back together as far as I am aware.
J :)
LikeLike
You are so helpful. I bought the cameo just for decoupage but find it really complicated so it just gets dusty as don,t have loads of spare time so as soon as I can afford the brother I’m going to purchase one. I think with choosing the right bolder images it will be great. So going through all my CDs. Thanks again.
LikeLike
Hi John I have entered this before but cant find it .can you please tell me when the pen holder and pens will be available on create and craft .They were both sold out when I bought my machine which I am waiting patiently for .
LikeLike
I will only know this when they appear on a show. I know that the buying team are working hard to get them but that’s the extent of my knowledge at this time.
J :)
LikeLike
thank you .I will keep an eye out for them
LikeLike
Hi John can you tell me can it cut perforation line for box es or will it only cut out line most box template s have crease lines that are perforated please help !
LikeLike
No perforation line at this time however I am working on a couple of solutions as will report back ASAP.
J :)
LikeLike
Thank you john for your reply I will wait for you to report back
Regards Alison
LikeLike
Hi John, thanks for all the tutorials, but I have a question. Will it be possible for me to scan in an image longer than 12 inches? I have some images I would like to cut but they are between 18 and 24 inches long. Thanks, Fred
LikeLike
Hi Fred. Mel tried to use the 12 x 24 inch mat to do this. For some reason it did not work. Mel will be speaking to brother about this in the near future to find out if it can be changed.
Could they be scanned in sections then welded?
J :)
LikeLike
hi i have just bought the scanncut, could you please tell me if it will cut decoupage and pyramage sheets that i have already bought thanks janet
LikeLike
Janet,
This point has been much discussed between Mel and myself.
The machine recognises shapes based on contrast between areas and analyses the whole mat. This would make it difficult for the machine to recognise areas on a very finely detailed decoupage. It will of course always scan the sheet and try and find some areas to cut.
Obviously using the Direct Scan feature would be the most appropriate feature as the sheets that you have would be under copyright. This feature does not recognise landlocked areas.
Mel and I are continuing to look at ways to work with decoupage sheets so I don’t have a definitive answer for you at the moment.
J :)
J :)
LikeLike
thank you so much for this information really helpful cant wait to get my machine and start trying out everything janet
LikeLike
You’re welcome :)
LikeLike
I received my scan and cut and I am delighted with it .I initially bought it for decoupage .I found that when I scan a decoupage sheet you can see on the screen which areas are missing .I used a felt tip pen to fill in those areas and scanned it again and they showed up.it might take a few goes but it did work
LikeLike
Great tip :)
LikeLike
Hi John – I do apologise if this question has already been asked and answered!! I watched you the other morning demo-ing this machine and I am so tempted. I have a silver bullet machine and use the print and cut method often. However I really struggle with text etc on the SCAL software (getting confused between cut lines,draw lines , print lines etc) So…..my question is can I print out – for example a printed tag with names and imagery and scan into this machine and ask it to cut the outline only (not the detail within the tag)? Effectively a print and cut without any alignment and confusion with cut lines?? – many thanks Bernie x
LikeLike
As long as the tag has either a solid colour on it’s outer edges or has a solid continuous outline, it should work. You would use the Direct Scan feature for this.
J :)
LikeLike
Fantastic news – I can feel a purchase coming on – now where I am I going to put this??? :) xx
LikeLike
Could you tell me what version of Serif craft artist you used.
I have looked on the Create & Craft web site but can’t find it.
I can find one on another web site Serif craft artist professional 2.
Is this easy to use.
Also could you tell me if you can use the deep cut holder and blade on a smaller number instead of the standard one.
Also could you tell me when Create & Craft will be getting the standard blades in
LikeLike
Keith,
I used Serif Craft Artist Pro 2. C&C often have this when they sell digikits. It is quite easy to use, and there is lots of support and tutorials out on the internet already. Perhaps you might like to try watching some of those in order to give you a better overview of how it works, or even download the evaluation (free) copy to have a look around for yourself.
The deep cut blade is intended for use with thicker, heavier or denser materials than the standard blade. The numbers on the blades range from 1 to 12. You will receive both in the package that Create and Craft TV are selling so in that respect you shouldn’t ever have to make this choice.
I am afraid that I don’t know when Create and Craft will have the standard blades back in. They will appear on their website when they do, so it might be worth checking back regularly.
J :)
LikeLike
Hi John
I have a Silhouette Cameo, haven’t got to play with it much yet so not really sure what is can do :-( Please can you advise as to whether the Brother Scan and cut is better and if it easier to use etc. compared to the cameo? Thanks
LikeLike
Corrine,
Both machines are lovely. The main differences that I’ve found is that the Brother has all of its features built in and does not need to be connected to a PC to use it.
J :)
LikeLike
Hi John
Thanks for your reply, Another question, please can you advise as to whether it can cut out printed Decoupage sheets, ones that I have stashed in my craft room but cant be bothered to cut out by hand.Some of the images are quite small. eg Christmas and flower images. If it can I will defo be buying one. Cheers Corrine x
LikeLike
Thank you John for your clear and concise explanations. i will be watching C&C but I’m afraid it is way out of my price range. Will have to start a special fund methinks…because I NEED it! Really….I do!
LikeLike
Hi John, you really are terrible. You are tempting me more each day to buy this machine.! Can’t wait for Saturday. Many thanks for your posting. Regards Janet Cooper
LikeLike
Hi John. Your blog showing how we can do things on the machine in advance is just great for giving us confidence in understanding how much we can do with this machine. Please will you demonstrate how the machine will cut out a complicated stamped image I have coloured, i.e. I want to cut round the image only for figure stamps such as Magnolia Tilda, various Crafter’s Companion stamps etc. Knowing how to do this and whether we should cut them before or after colouring would be great. If you could do a demo on this I could be really confident in buying the machine. Thanks again, your tutorials are really super. xxx
LikeLike
Val, there will be a blog post about this later. In my experiments I have generally cut before colouring.
I will do some tests and let you know what I find.
J :)
LikeLike
Thank you so much John. I look forward to the blog post. xxx
LikeLike
Very concise John, you have really shown us so well but I don’t think I would use it enough to justify the expense, we’ll have to see. Best wishes Jackie
LikeLike
Hi John, thanks for the tutorial. Unfortunately this machine is out of my price range even with the four flexi payments. Will have to start saving up.
LikeLike
Hello John
I must say this looks extremely exciting but I have a feeling that the cost of this machine is going to be out of my budget. I am a pensioner and will be 81 next week and as I already have a cricut mini and various die cutting machines and I feel I will just have to dream. “But” nevertheless I will be watching the programs with much envy.
LikeLike
Seems foolproof reading your post John. Look forward to reading tomorrow’s post. Pat x
LikeLike
Hi John, is the 399 for the blue machine or red and is the 399 with club discount or without Mary x
LikeLike
Thanks John. It’s really interesting to see all the features in detail. I hope we get a good chance to see what it’s capable of when it goes to air.
LikeLike
john your a star, you have made that most clear. look forward to tomorrows followup. i presume it is the blue one thats on sat show? . many thanks gili
LikeLike