
I haven’t really experimented much with embossing folders but have always liked the way that they can add interest to the background of a project so I thought that I would have a go at coming up with something myself.
This “Bird On A Branch” card was what I ended up creating – here is a quick overview of how I put it together.
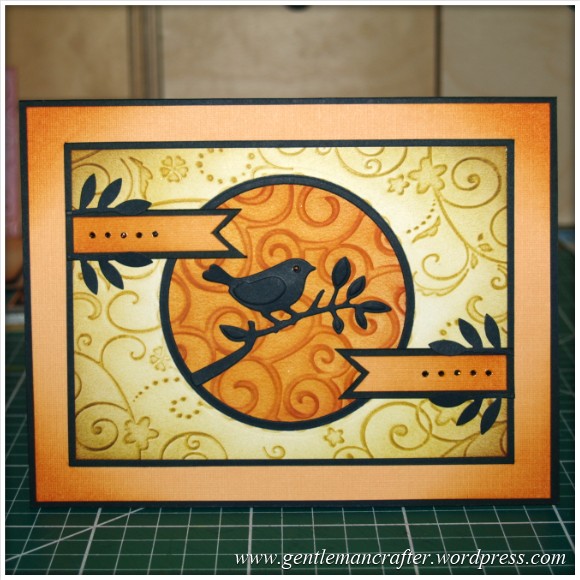
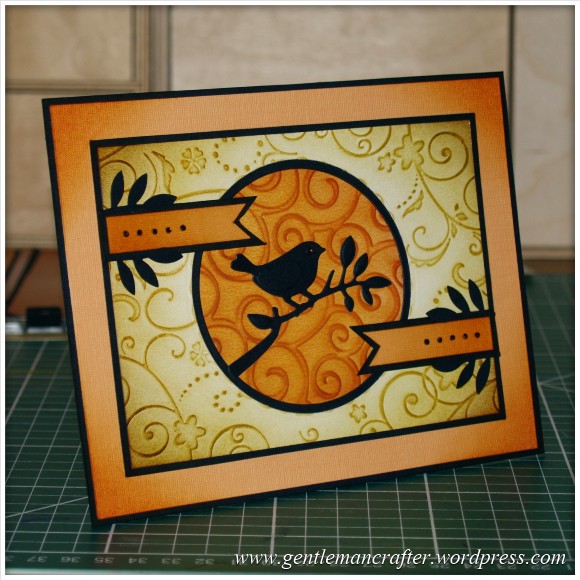
First off, here is a front view of the finished card.
 If I am honest, it did start out as something totally different and really just (accidentally) evolved into what you see now.
For that reason, I haven’t got any step by steps for this blog post so I hope that you will get the idea from what I am about to right.
With embossing folders you are always left with a raised area, well, me being me, wondered what would happen if you ran it back through the die cutting machine without the folder after it had been inked.
The result was kind of cool. It literally just flattens the raised areas. The finished effects looked almost as if I had stenciled the pattern onto the paper, rather than embossed and inked.
Here is a view at an angle.
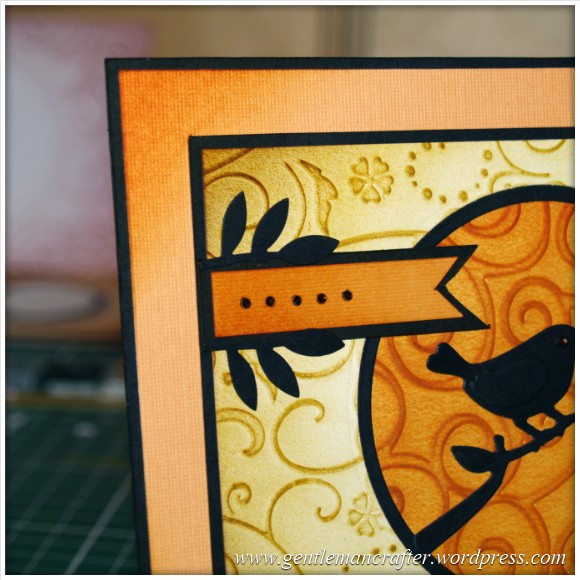 Although these areas still look raised, they really aren’t.
Here is a quick guide to the steps –
- Emboss the cardstock using the embossing folder.
- Brush/blend ink over the surface, making sure to really highlight the raised areas. I used Tim Holtz Distress Inks, but you could of course use your preferred ink for this.
- Put the embossed card back through the embossing machine (covering the inked area with a sheet of paper or card as it’ll probably still be wet). For the Spellbinders Grand Calibur the sandwhich (to flatten the embossed card) will be base plate, cardstock and paper, tan mat and pink plate.
- Remove and use.
It was that simple.
The real benefit that came out of this technique was that the pattern stayed in place even when I then went back in to die cut the cardstock with a shape, which meant that I was able to create the circular aperture you see on the card without losing the design.
Neat eh?
Anyway, to finish the card I layered one embossed design onto another (with black card in the middle) and used a die cut from a Marianne Design Creatables die (for the bird), some hand cut pennants with sticky gems on and some leaves from a Martha Stewart punch (which I then chopped in half) to place top/bottom of the pennants.
And et voila, the card was complete.
 Although I didn’t intend it to, it certainly has a sort of Halloween vibe to it.
Anyway, just a quick one today. Hope you liked it.
As ever, if you have any questions or comments then please feel free to use the comments section below.
Thanks for reading and look forward to seeing you again soon.
J :)

What a brilliant idea John. I like the “flattened” embossing very much and will be trying this technique next time I am Grand Caliburing. Thank you for inspiring.
Marion
LikeLike
:)
LikeLike
Lovely again. The little bird is so sweet. jan
LikeLike
Just wish my card making “experiments” would turn out as well as yours, John! So glad there are crafters like you in the world to give us an idea that really works.
Love the colour combination and try to use them myself without being too “Halloweenie “-
your card looks lovely.
Cheers xx
LikeLike
What a fab idea! Will be trying this out – thanks for the inspiration and for sharing your gorgeous card x
LikeLike
I love your happy accident John wish mine looked as good they always seem to end up in the bin (sigh) love Gill x
LikeLike
Love the card John – which make of embossing folder did you use for the bird on a branch please?
LikeLike
Great idea to run the embossed card through again to flatten the embossing. Makes the whole design tie in.
LikeLike
That’s pretty darned cool, young John! I do love ‘happy accidents’. I really need to get me some embossing folders. My problem is that I fall in love with the A4 ones I see and as I’ve only got a Wizard die cutter, of course they don’t fit.
Happy crafting :)
LikeLike
Superb card again John! Teaches us to ‘think outside the box’ as I didn’t think about running embossed items back through without the folder either but it does work and looks very nice. Some experimentation is needed I can see then who knows what we’ll come up with?! Thanks again for a great idea :)
LikeLike
Love it John, I’m going to give a go today and see what I come up with. I haven’t got the birdie die but will find something else on my Cricut and put that in the circle instead. Thanks for the inspiration.
LikeLike
What a brilliant technique, will definitely be giving this a go. Love the colourways and design of your card John, thanks for sharing x
LikeLike
Wonderful card John. Love the inky textures and the bold, graphic design. I like how the silhouette of the bird is given extra dimension with the wing and eye. Will have to try that on my bird dies. Very inspiring. Px
LikeLike
Great – a new technique for creating backgrounds. I haven’t seen this done before so thank you John. Pat x
LikeLike
Thank you for this John, having embossed the card to get the pattern I wouldn’t have thought about flattening it but it is certainly effective!! best wishes Jackie
LikeLike
That is really lovely, ready for take off then John ? Xxx
LikeLike
As Bob Ross used to say ” a happy accident”. I often potter around with odd ideas and suddenly I see a card coming together, not planned, just evolved from nowhere. Looks lovely John.
LikeLike