Whilst I love stamping and rubber stamps, quite a lot of the time I have bought unmounted red rubber stamps, like those that you get at Stampscapes. This means that getting at them without causing a mess has been a challenge.
That’s mostly my fault as I have been simply chucking them back in old, worn packets and then into a cardboard magazine file.
This meant that every time I wanted one of them, I had to get the lot out in order to sift through them to find the one that was wanted.

I therefore set about researching various different storage options. Sadly a fair few of the ‘prettier’ options were way out of my budget so I decided to have a go at making my own using a fairly well known technique.
The results were actually a lot better than I had anticipated and I think that I might start to fall in love with rubber stamping again!

Ok, so, I have created a video [below] if you would like to see this technique in action but in simple bullet list form it goes like this …
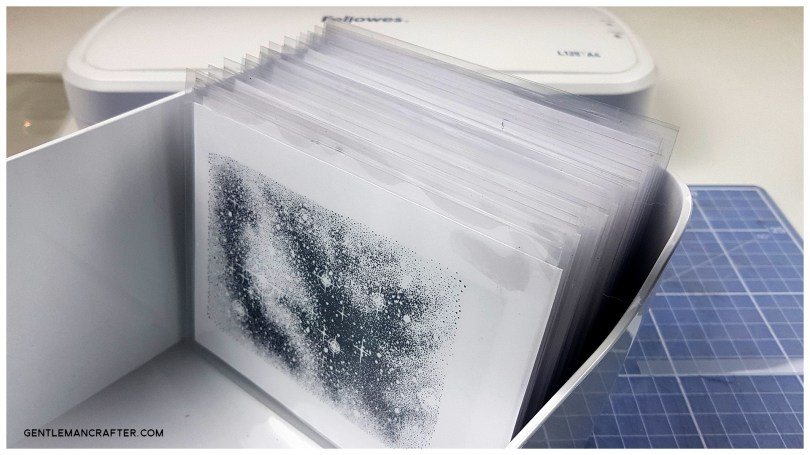
- Trim a laminate pouch to the size you want.
- Flip the two sides so that the glossy sides are facing each other.
- Put this ‘new’ sandwich inside another laminating pouch and run it through a laminator.
- Trim across the top edge to open the ‘pocket’ and trim the remaining three sides down to approx 3mm from the edge of the ‘pocket’.
Using this technique I managed to create 4 stamp storage pockets from just 3 laminating pouches! Awesome value when you can get a laminator for less than £15 and 40 laminating pouches for £2.49 from Aldi, like I did.
33p per pocket for the first batch, including the cost of the laminator, then 6p per pocket thereafter or a bit more if you are making bigger ones but still, a lot cheaper than £2.69 for ONE polypropylene wallet!
FYI, I didn’t include links above as Aldi often rotate their special buys and I have a fair few readers in areas without an Aldi store so, if you don’t have one, just pop laminator into your search engine and you will find something affordable locally – it doesn’t have to be all bells and whistles, a basic one will do just fine.
Anyhoo, back to the point. I took this technique a little further in the video below by creating laminated reference sheets onto which I could mount the stamps.
Also, a quick thought occurred to me after making the video, if you slip a magnetic sheet inside, it’s perfect for die storage too!
Right, if this has piqued your interested, just hit play!
Hope this cool technique will help you get a little more organized too.
If you have any questions or comments, please feel free to leave them in the comments section below.
I look forward to hearing your thoughts.
Thanks for stopping by and I look forward to sharing more with you soon!
Bye for now.
J :)

[…] This extra layer adds durability and safeguards against environmental elements [2]. […]
LikeLike
Super idea John at the moment my stamps are all over the place, will have a go. keep safe.xxx
LikeLiked by 1 person
Great idea and just what I’ve been looking for, so thanks for sharing John. Off to get the supplies!
LikeLiked by 1 person
This is just what I need for my stamps, currently they’re in a photo album and all falling out!!
I wonder though, what if you simply took a folded piece of paper/card (with a stamp impression on each side) and laminate it then chop the top off… That would save you laminating sheet and a step in the process.
Your method is probably stronger and has flexibility in terms of which stamp goes where.
Thanks for the video.
LikeLiked by 1 person
What an great storage solver! I used the same thing with zig but it left a lot of stuff on my laminated storage and after a while there were no more zig on the stamps. Have you ever have this problerm?
LikeLiked by 1 person
I have. I just clean off the old gunk and reapply :)
There are other more permanent temporary options like cling foam but that’s not what I wanted this time around.
LikeLike
Great idea John. I have for my dies the expensive pouches that are specialy for storaging stamps and dies. But I didn’t have enough aswell for all my stamps. So I bought cheap cardpouches, for storing self made cards and used them. But they are not so strong as the expensive ones. I think yours are strong and will give this certainly a try when I need some more.
A quick tip for buying a laminator and sheets by the Aldi, they have them most of the time at the end of the schoolyear and the beginning of a new schoolyear.
I bought one a few years ago.
Thank you so much for sharing your great idea John and have a wonderful week.
LikeLiked by 1 person
Great idea John, I have been buying stamp storage wallets. I stamp all my stamps out and keep them filed in folders in categories, so that I can flip through it to see what I have easily. I have done this with embossing folders, dies and masks too. xx Hazel
LikeLiked by 1 person
Hi John,
I have been laminating my stamp sheets, but photocopying the card first, as they usually come in a collection by a particular lady. I then glue the photocopy of the collection to the inside of a zip lock bag,with the picture facing outwards. I use a similar glue to yours to stick all the cut out stamps to each card, and place in the zip lock bag, and store in a draw. It really helps to keep them in order and makes it easier to find the particular stamp/s I’m looking for
Love and Light
Sioux x
LikeLiked by 1 person
Great alternative there Sioux. Thank you for sharing.
LikeLike
What a great idea John, I have tried a few different stamp storage ideas but all have had their problems, this one of yours though looks fantastic I can’t wait to get started on it.
Thanks for sharing.
LikeLiked by 2 people
I’ve just seen this post on Facebook, excellent idea, although I thought my system was quite good until I saw yours xx
LikeLiked by 1 person
I use an iron over brown paper as I don’t have a laminator. Will try it on this.
LikeLiked by 1 person
Excellent idea and thank you for sharing this will indeed be my next project
LikeLike
What a corking idea John. I will definitely be using it as my stamp storage is non existent!
LikeLiked by 1 person