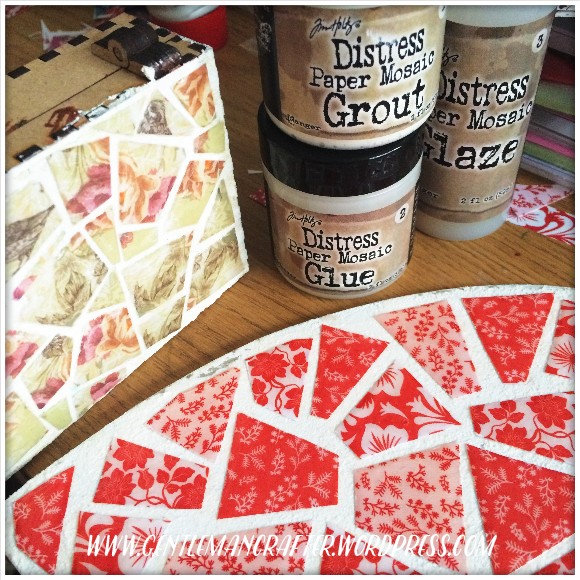
I treated myself to a Tim Holtz Paper Mosaic set recently, having seen a bit about it online, and managed to have a little play this weekend.
If you haven’t seen this kit before, and are looking for something different to do with your MDF or chipboard kits then this is definitely worth a look.
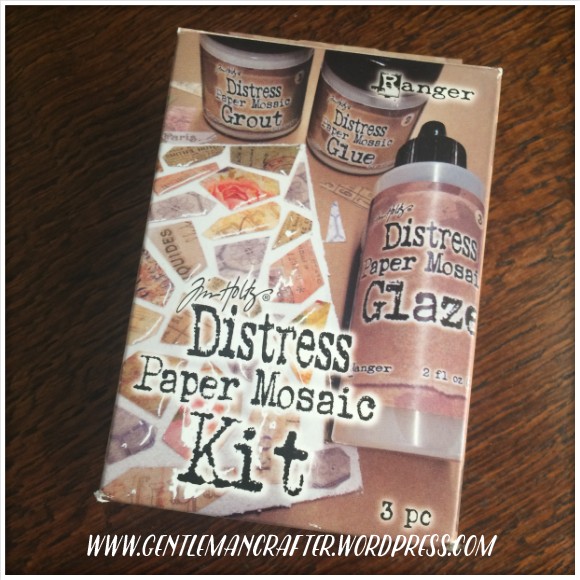
The kit includes a grout, a glue and a glaze.
The process is fairly simply.
- Chop up some decorative paper.
- Apply the grout; let dry.
- Glue the paper pieces in place; let dry.
- Apply glaze to paper pieces; let dry.
Bingo, job done.
Further instruction shows that you can still apply distress inks to the grout if you want a more aged look.
Anyway, here is a look at my first go at this.
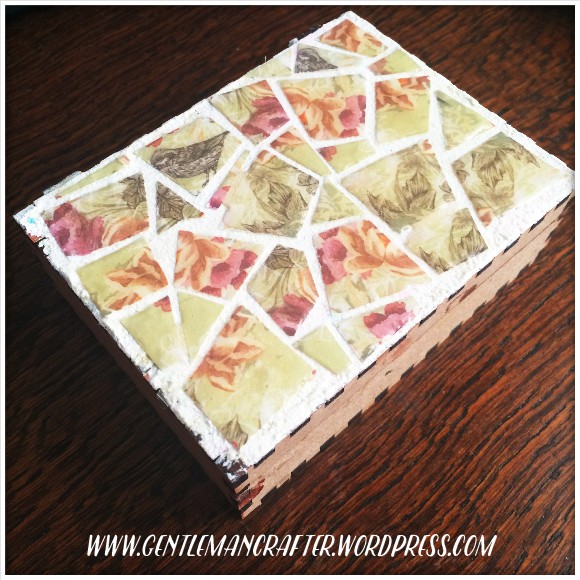
This is a little hinged box from Fernli Designs.
The lid was a nice flat area.
On completion I did notice that I had placed a few of the paper pieces to close together so when applying the glaze it bled across the adjacent pieces.
Not a huge disaster but something to bear in mind.

I did love the look of this though so decided to have a go at creating a larger project from it.
Grabbing a chipboard heart (from Designs By Georgina) I followed the intructions/stages to the point that I had a lovely faux mosaic heart – cool don’t you think?

Here’s a closer look – hopefully you can make out the glaze more so in this image.

You may have also spotted the little bits that I accidentally chipping off the grout.
Hmmm, now how to cover this?
I’ve had a few of the floral stamps from Designs by Georgina in my stash for a while so I thought that these would make a lovely addition to this heart.

Sifting through my papers I found a few beige floral pieces but wanted red; I covered the sheets in red pigment ink and then stamped the flowers over this.
A few quick snips of the scissors and I had a couple of layers for each bloom.
I did the same again for the leaves (but using green as my colour of choice this time).
The shaping tools and Pinflair glue came out and I quickly assembled the flowers and positioned them on the heart.
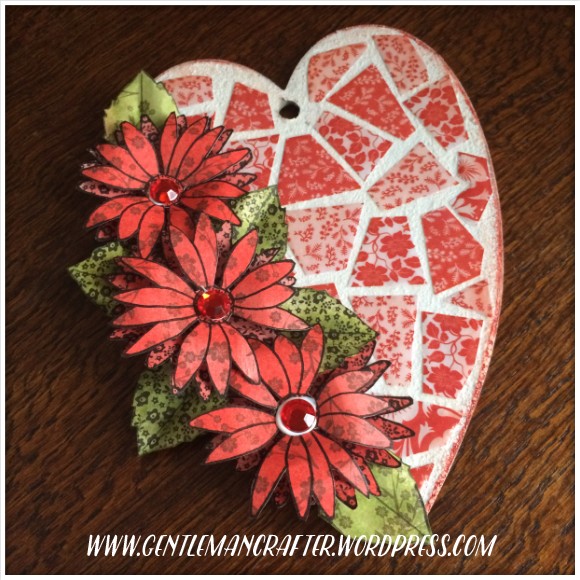
Big ass gems were then plopped into the centre of each flower …
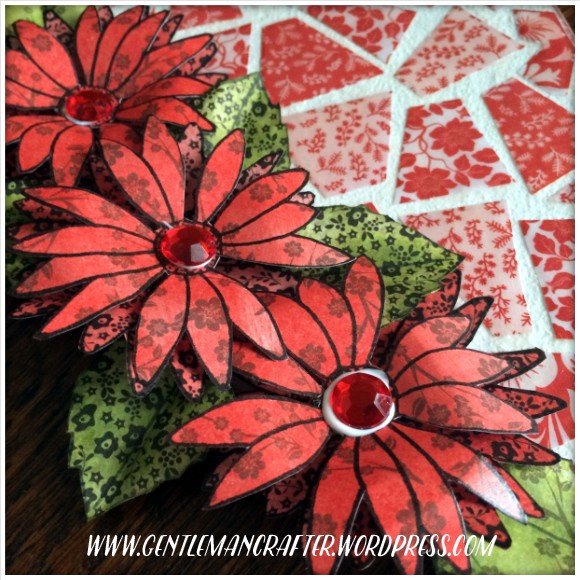
… and to finish I added some lace through the hanging hole and a laser cut word.

Here’s a closer look at the bits and pieces that were used to create this (relevant for today – Valentine’s Day) project.

So, what do you think? Have you tried this too?
If you have any questions or comments about this post then please feel free to pop them in the comments section below.
Thanks for visiting and I hope to have a few more makes to share with you next week – workload dependent of course :)
J :)

See, I didn’t read your instructions on how to use the grout, here I was going to grout the dang paper after I placed it… Smh… Ughh
Wow, you saved me a kit and the time to mess it up!!! Lol but still same idea, ok after re-reading your wonderful tutorial I still am not sure I like the whole grout look, it’s personal as I must have something against it because it’s CERTAINLY NOT your creativity, no, I just dislike that chalky look on anything including tiles for mosaics, I use silicone or resin to get into those nooks and crannies. I think I dislike grout because it’s not shiny, it’s not blingy! There’s nothing spectacular about it. It’s just missing something, oh I know, color? Glitter? Lol but thanks again for your tutorial and I’ll make sure to actually interpret what you wrote ughh I’m sorry I’m a little slow on the uptake sometimes lol
LikeLike
Excellent! I purchased the kit with nothing particular in mind ( I just wait for “crap to talk to me” I dunno lol) so coming across your blog helped a lot as there’s really no instructions just use your own imagination, obviously THAT is not included in the kit haha.. So you gave me a few ideas! Question for you, do you think the
” grouting” for paper tiles is really necessary? Or could one just use resin. I’m looking at your pics, which are great and I love how you covered up the area that chipped. But I don’t think I could get an even grout like you did unless I set the “paper tiles” up higher using some sort of riser ( haven’t thought that far ahead. Creating a space so to speak so the grout actually has crevices as if grouting real tile? Am I making any sense? Lol
LikeLike
Thank you for the compliments.
It’s fairly easy to get a thin layer and it does not have to be thick either. It’s for the texture. If you ditch that step, the in between grout won’t be grout. It’s an option though if you wanted a different look.
When using paper to create the ’tiles’ it generally shapes itself to the texture anyway so you shouldn’t have to worry if your grout has a little variance.
Hope this helps.
J :)
LikeLike
Thank you for taking the time to reply to me! I get what you’re saying now that I figured out what application I’ll be using them for. You certainly know your stuff. Thanks for the creative jumpstart. I’ve hit an inspiration/ creativity wall and trying to get my creativity mojo back! Love your blog, glad I found you/it!
LikeLiked by 1 person
They are lovely John, and I love the way you covered up what you saw to be mistakes.
Gorgeous.
Love and Light
Sioux x
LikeLike
Absolutely love the look of this John you have done the product proud. What a way to use up beautiful scraps. Perfect for me who throws not a scrap out. So it will be off to buy it this week and I hope to have a finished object on here for you by the end of the week. Though could be end of next the way this week is shaping up. Lol.
LikeLike
Hi John
I have looked at these kits myself so I’m glad to see you review them. I very much like the heart project, the flowers are the perfect finishing touch.
I hope everything is going well for you. It’s lovely to see the all counties craft challenge being mentioned in the create and craft club magazine, really pleased for you to get the exposure!
Take care and happy crafting,
T x
LikeLike
Hi John I tried to fund you only a small amount I’m sorry to say. Not sure it worked if you have not received a donation from a D Pannell please let me know and I’ll try again.
Diane
LikeLike
Could you let me know where you tried to do it please so that I can check – was it PayPal or Go Fund Me?
LikeLike