
It certainly feels like yonks since I last wrote a blog post so I just wanted to do a little post to let you know that I am still around and thinking of you :)
So as not to just pop in, say hi, and pop out again I decided to make a quick card to show that I have been thinking of all of you lovely people.
Now, I say “quick”. What I probably meant was “intended to be quick however it turned into a ‘most of the afternoon’ card”. Lol. Ah well, I had fun and I hope that you like the finished result.
Anyway, let’s crack on shall we?
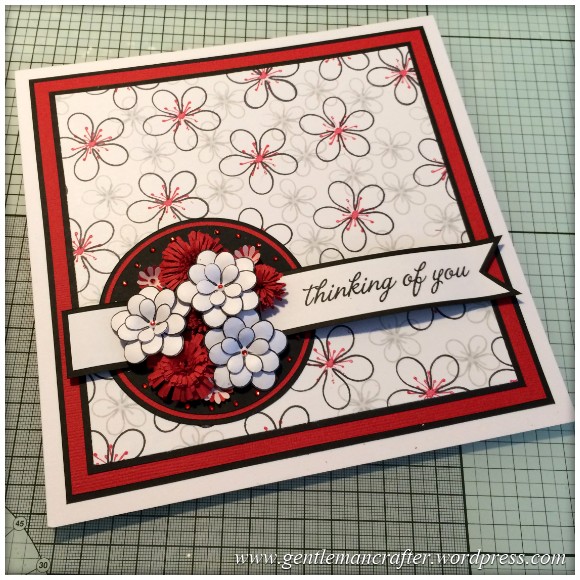
For this card I decided to use the Essential Flower Stamp Set from Hayley and Carol (lovely ladies) over at Dreamees.
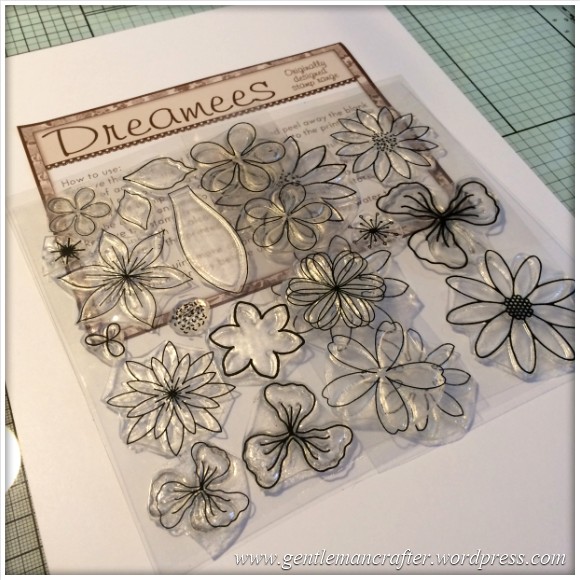
I’ve had this set for some time now and have been meaning to sit down and use it for ages as I think that it’s a very handy and useful set to have.
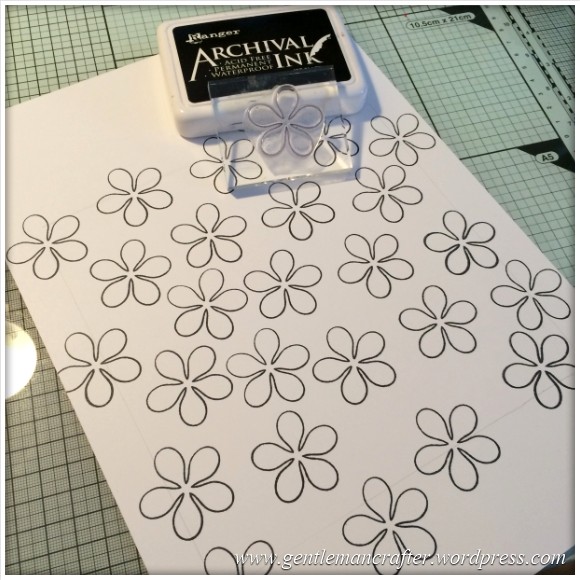
To begin the card I drew a large square in pencil onto some Super Smooth cardstock (to act as a guideline into which I should stamp the flowers).
Given that the square ended up being about eight inches square I’m not sure that there was much point but you live and learn.
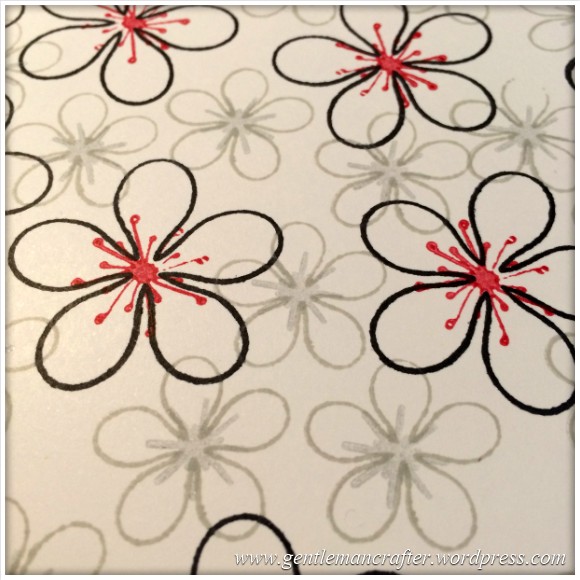
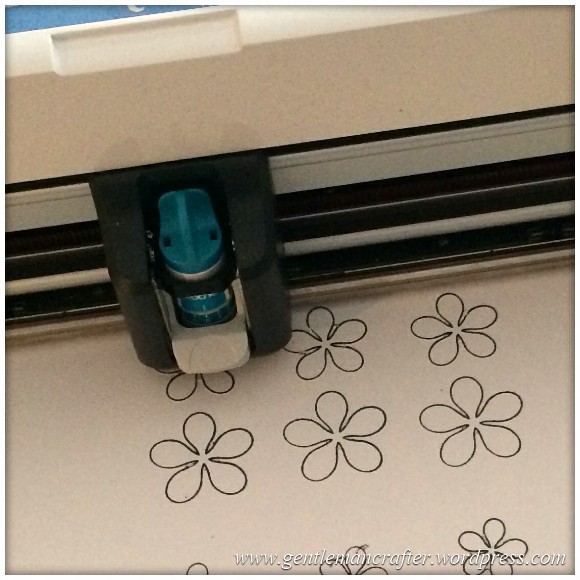
I then used some black Ranger Archival Ink and stamped out a load of the largest of the five petal design.
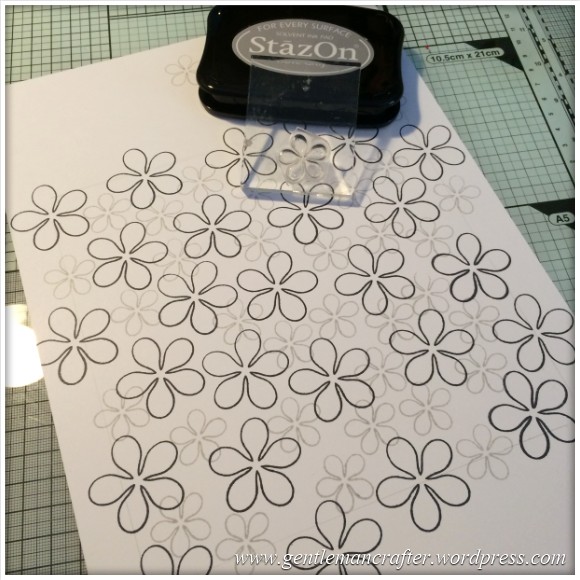
I then changed the stamp to the smallest of the three and changed the ink to a grey Stazon and stamped in the spaces left by the larger flowers.
To add a little pop of colour I chose a bright red Versacraft Ink Cube and stamped out the stamen for the larger flowers in that colour.
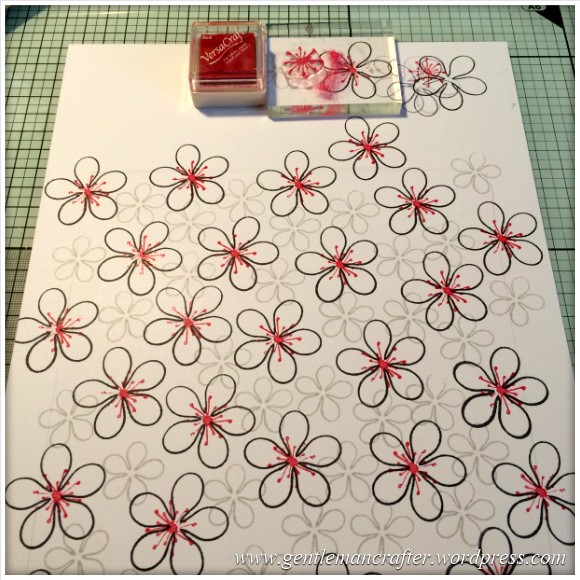
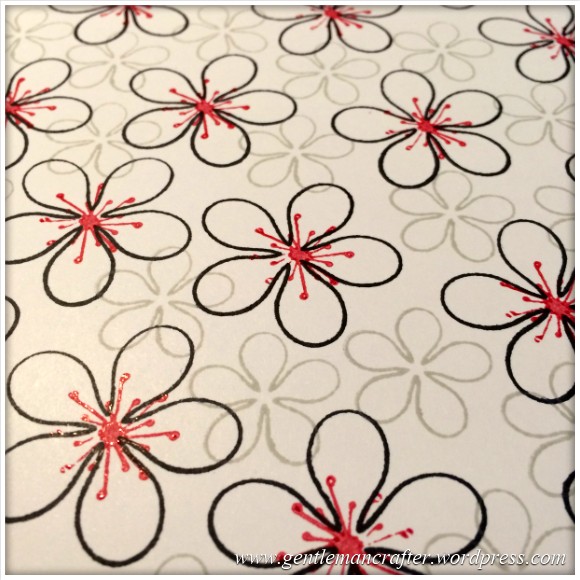
I then changed inkpads to a light grey Versacolor and changed the stamp for another stamen design and added an impression onto each of the smaller flowers.
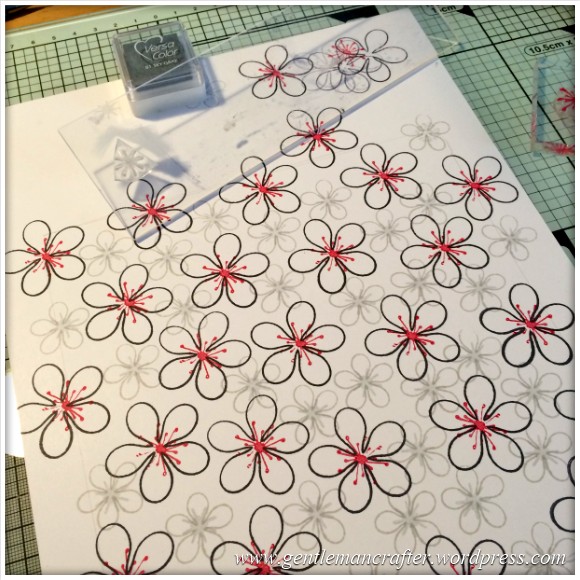
So that was the background all done.
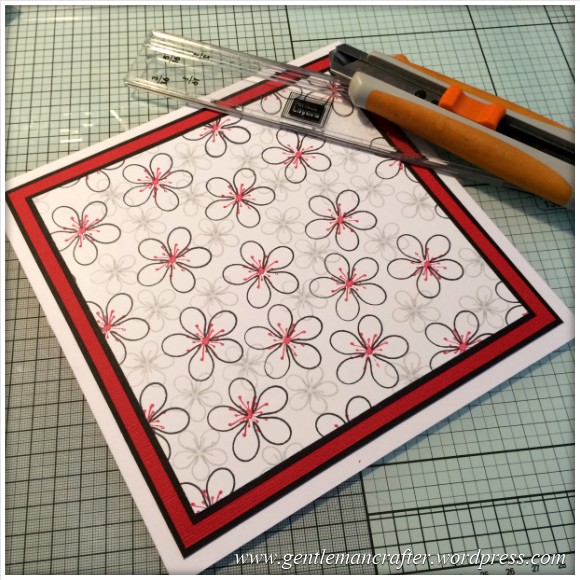
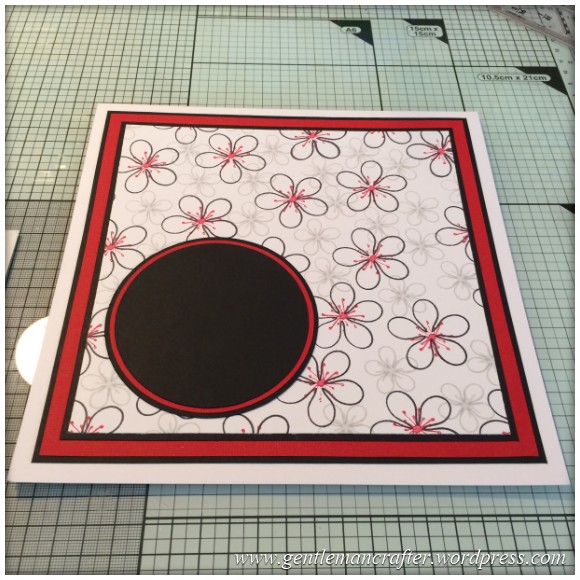
After trimming the cardstock down to about six and a half inches (the design “worked” at that size) I used the Perfect Layers tool to add a couple of layers of coloured cardstock and then mounted the lot onto an eight inch square card blank.
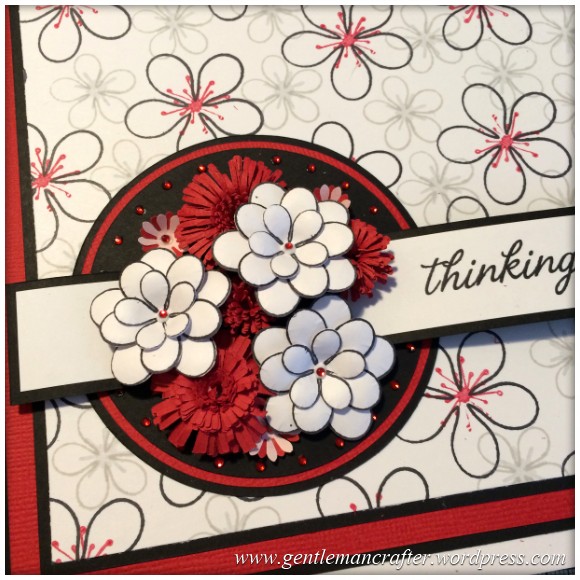
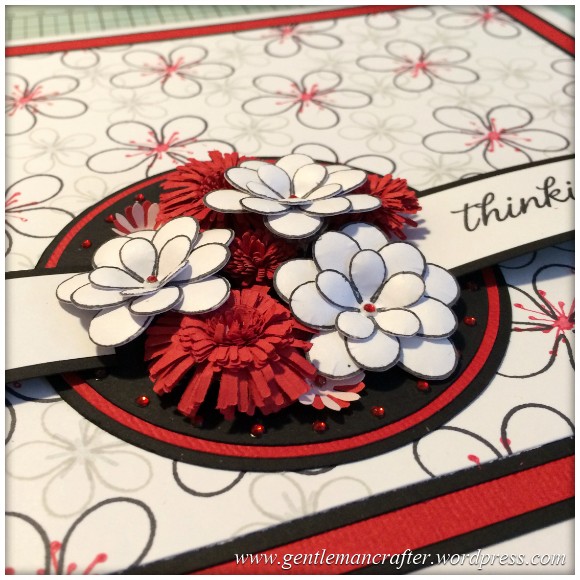
For the next step I wanted to create some flowers for a little bouquet area on the front of the card so I stamped out the flowers again (multiple times) and then cut these out using the direct cut feature on the Brother Scan N Cut.
To give the petals some shape I used the Tonic Flower forming tools, choosing a different sized stylus for each of the three sizes of flowers.

(reminds me of the three little bears in goldilocks, lol).
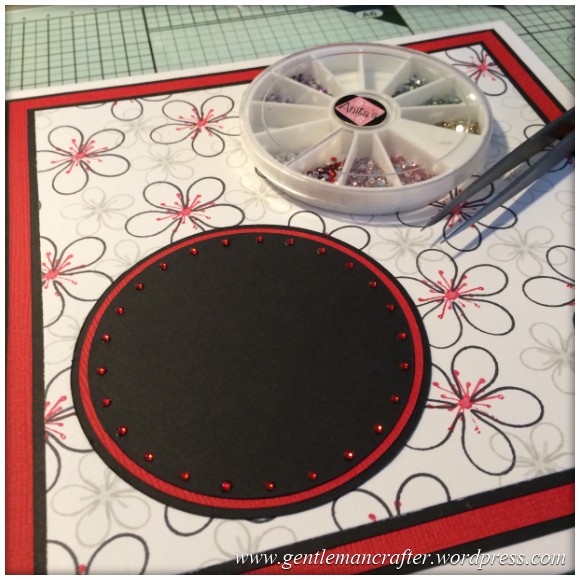
I then gave some thought to the layout of the bouquet and worked out what size circle mats and flowers I would need.
The circle mats ended up being 8cm, 8.4cm and 8.8cm. To ensure accuracy I again used the Brother Scan N Cut to cut out the circles.
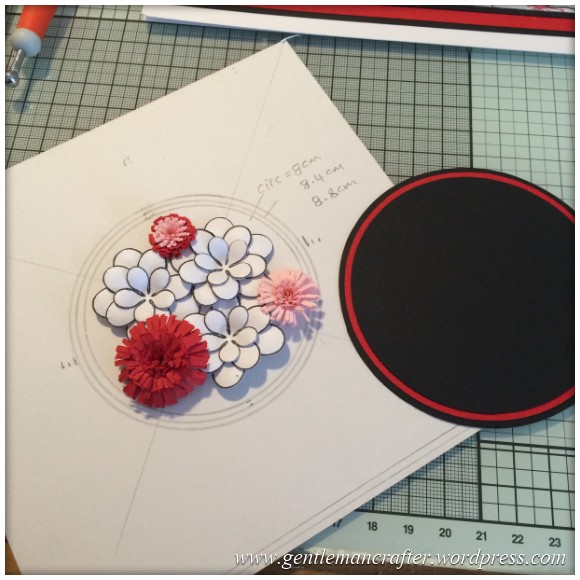
After layering the circles up with some Cosmic Shimmer PVA glue I positioned the stack bottom left of the card front.
Now, here was my opportunity for some bling! (not that I need an excuse LOL).
I used a placement guide that I had designed and had made in order to put some pencil marks where I wanted the gems to be.
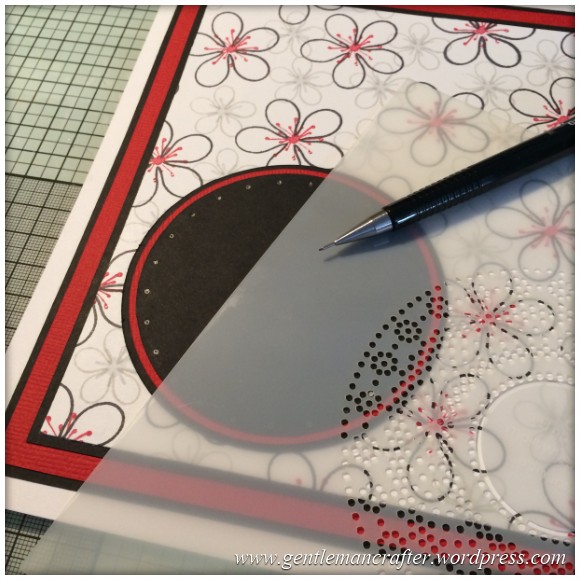
Then, using fine tipped tweezers, I applied a mini gem to each of the pencil marks using a tiny dot of PVA glue.
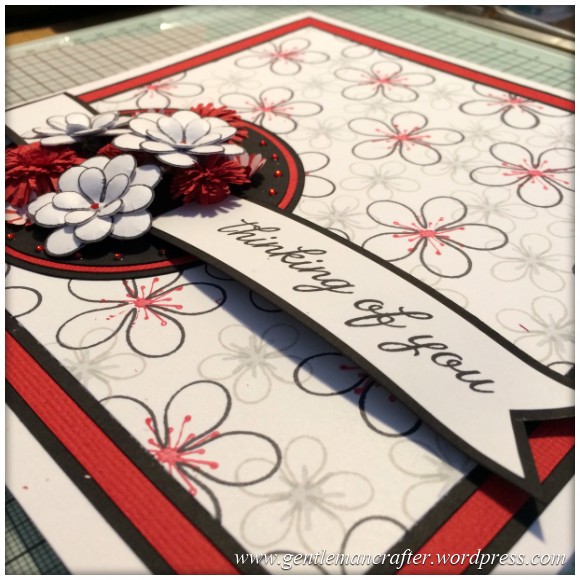
I chose the “thinking of you” sentiment for obvious reasons and stamped it onto Super Smooth paper. I then trimmed this down and layered it onto black cardstock.
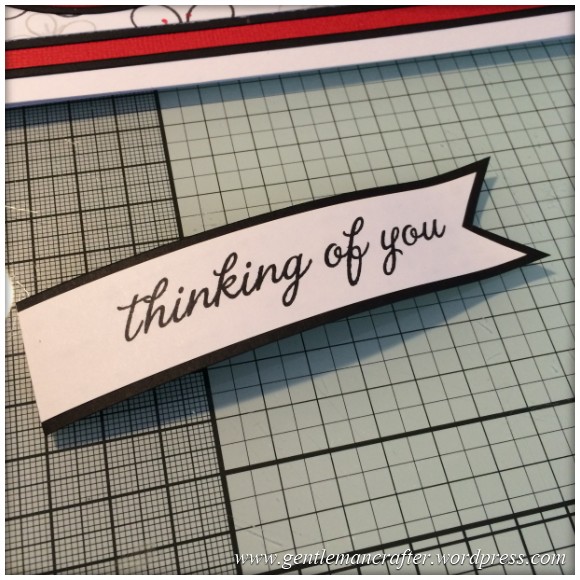
I had originally trimmed off the end of the sentiment banner but when applying it to the card I realised that it would look good if the leftover bit was sticking out of the other end of the circle so I applied that too.
I used Pinflair glue gel for both sections in order to help hold their domed shape and give the banner the feel that it was light and floating behind the bouquet.
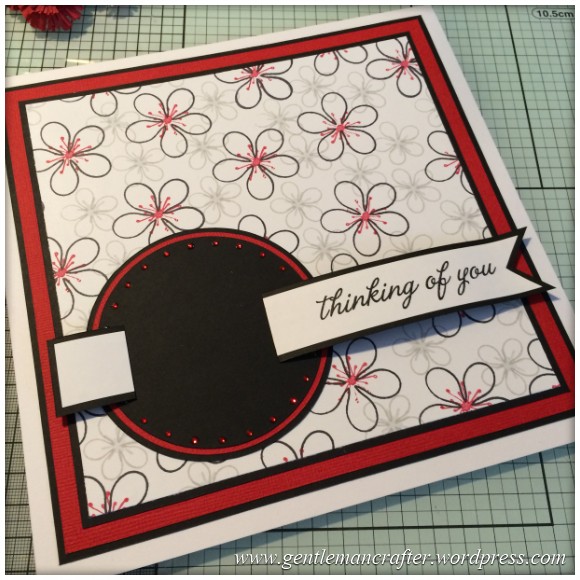
Earlier on you may have seen pink flowers however I wasn’t planning on using those, I just had them to hand when I was thinking of the layout.
To create the flowers, that were going to work in with the white flowers that I made earlier, I used the Quilled Creations quilling dies to cut strips of red cardstock and then coiled and stuck them.
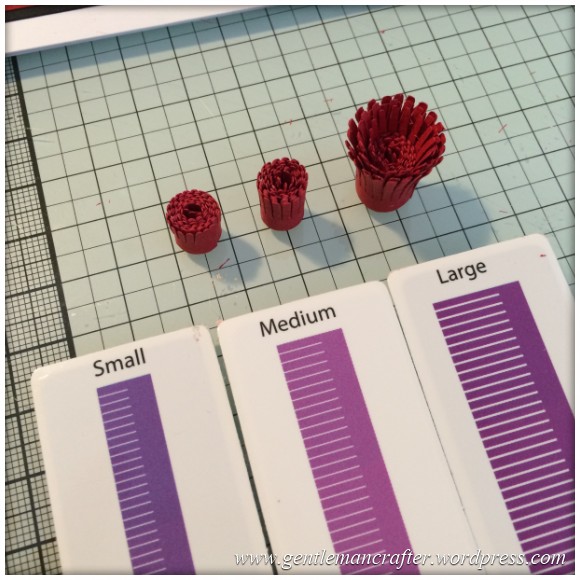
Having fanned out the petals I then arranged (and fiddled quite a bit with) the bouquet.
I finished off the white flowers with a central red gem and changed my mind about having some pink in the design and reached for a flower punch from which I created three small blooms that I positioned around the outer edge to help fill out the bouquet.
Then, with a sigh of happy contentedness I decided that it was finished and marched off for a cup of tea and a caramel wafer.
Oh, yes, I did come back later and take some pics of the finished card – here be they me hearties…
Not bad eh?
What did you think? I don’t always think that a single range of smaller stamps are enough to cover the vast majority of the front of an eight inch square card but it really does work.
Anyway, thank you for stopping by and taking the time to read this post.
I’ll try not to leave it so long next time!
J :)

Awesome Card! Have been making cards all weekend and this makes mine look so simple! Love all your ideas!
LikeLike
Fabulous card, John. I love the stamped background image, and like that you teamed ‘cut out’ flowers and some die cut ‘twizzlers’ – which is what I call the stamen cuts which I make into flowers. lol.
Oh … and …. Did you bring a note from your mother? :D
Sending love, <3 as always, ~ Cobs. x
LikeLike
Thank you :)
Erm, the dog ate my note?
LikeLike
tsk tsk, John. Don’t let it happen again, young man, or you’ll be writing a hundred lines!
LikeLike
Great card, John, love it!
Nice to read your blog again, have missed it.
Maybe you could think of going further with your prototypes, it’s a fantastic idea!
Annie x
LikeLike
Hi John this is gorgeous I just love how you have constructed this card. Hugs Jackie
LikeLike
Beautiful card, John, but you need to get your “prototype” out there. I for one would find it really useful.
Hugs
Jill x
LikeLike
Lovely, I’ve missed your posts x
LikeLike
lovely card John, have missed your blogs especially fabric Friday, but you are a very busy man, got my bag pattern from etsy, thankyou. Only printed out the cover at the moment, not mastered how to open the pattern, god loves a trier, hope to hear from you again x
LikeLike
Another cracker John, goes to show all you need is talent!! you could have done it all without a Scan N Cut ho ho………..
LikeLike
Wow lovely card – this shows me the reason I am wanting an electronic cutting machine – love the clean cut they give you.
LikeLike
It’s a beautiful card John. Thank you for sharing it with us.
Love and Light
Sioux x x x x
LikeLike
A superb card John, well done. It’s good to read your blogs, I’ve missed it.
LikeLike
Soo pretty
LikeLike
Hi John
What a stunning card! People who don’t craft and don’t believe the time, care and effort that goes into a card should read that. I have missed your posts (as I have been unable to comment at times myself) so todays is a real treat. I have been painting some storage of late (was on C and C about a year ago, comes with a dvd that Stephanie recorded about ways to decorate it) so cards are on as and when till I’m done. Now it needs a finishing touch so some stamping. Was just going to use one colour but now I’ve seen this I’ll be breaking out all those coloured inks!!!
Do need to start on my Christmas cards asap. Have you started yours?
Crafty hugs,
T x
LikeLike
Not started the cards yet. Only just starting the gifts!
LikeLike
I thought this was a good card and has given me lots of ideas for using some flowers stamps I have had for quite a while. Thank you for sharing this. ]
LikeLike
Nice card John.
Can I ask about scan n cut mats – I am wondering whether I could cut a hole in the tops (like Cricut mats) so that I can hang them to keep them flat. It works well with Cricut and I struggle to keep them flat and with the covers on !
LikeLike
As the machine “recognizes” the mats, this is probably not advisable.
LikeLike
For Marion, I had similar problem so I shaped and stapled a couple of large cereal boxes together and used some leftover sticky back plastic! so now I can hang them up together or carry them easily when I take my scan n cut to my craft club.
LikeLike
That is one beautiful card, Mr. B! I love those stamps, it looks like it’s another set to add to my wish list (which I’ll be able to empty once I win that lottery jackpot). I’ve made some quilled flowers but sadly, I had to make them by hand as I didn’t have the dies. It took a long time but there’s a warm glow of accomplishment once they are all finished lol.
It’s certainly handy to have the scan ‘n cut for all those petals, John. I will be cutting them out by hand once I get the stamps, my budget will just about stretch to a new pair of scissors ;). xx
LikeLike
What a fantastic looking card John….and another exvellant use for the SNC which has become my main work horse too…..I cant rate that machine highly enough……I am,trying to get into stamping more….on the photo it looks like u have a plastic ‘arm’ to rest your wrist on whilst stamping?…..what a great piece of kit John…..what name and make is this please if its ok to ask
Thanks John…..& Happy Crafting :-) x
LikeLike
Not sure which picture you mean Lynne however I definitely don’t have one of those.
LikeLike
Very lovely creation John. Love the way you made the background and I think I will pinch this idea for one of my creations.
All the very best.
Carol
LikeLike
what a lovely card, the colours really pop! The placement guide you used looks very interesting……tell us more!
LikeLike
Nothing to say really. I designed it. Had prototypes made and never took it any further.
LikeLike
Hi John, what a great card, perfect stamping and cutting, what type of card did you use for cutting the flowers out of and I love your gem guide, how did you do that, loved it all xx
LikeLike
It was just something that I designed on the PC. I had a prototype made but didn’t take it any further.
LikeLike
Beautiful card, love the colours you’ve used. Thanks for sharing x
LikeLike
Fab card John, and has given me a reason to delve into my stamp box and fine my Dreamees stamps and bring them out to play. I don’t have these particular quilling dies, but I do have the Tattered Lace ones, which I think should work just as well :-). Thanks for the great blog! B :-) xx
LikeLike
Wow, well done you, love the card, thanks for sharing. X
LikeLike
Beautiful card John, simple arrangement but beautifully executed……gorgeous detail…your are an inspiration!!
LikeLike
Lovely John as always xXx
LikeLike