
In a couple of previous posts I have been detailing a few projects that I started using some pretty Fat Quarters that I had picked up at the local market.
I am pleased to say that I have most of the things now finished (but not in the way that I had expected).
I set aside a day to finish things off however I don’t think that I had my logical head on as most of the things that I did seemed to throw up an issue that I then had to work around.
If you have missed any of the previous posts, you can see them here > Fat Quarter Fun Part 1 or Fat Quarter Fun Part 2.
Oh, before I get all carried away, I am very excited this week as I have finally got a permanent sewing desk – no more having to tidy away other stuff before I get sewing!
It’s nothing special to look at …

… but it’s all mine and it’s all sewing! :)))
Anyway, in case you haven’t got time to go trawling through all of that lot, here is a picture of where I got up to with the various projects that I started back in Part 1.

There was a handbag bag, small patchwork block and a pie wedge cushion – all half started.
Not sure what the key was doing there, or what it’s for either?! Must have lobbed it there whilst I was tidying the other day.
Look, my brain is still wondering as I type this! LOL :)
Right, so let me bring you up to speed with what I have been up to today, and what happened to these little pretties.
First, remember the quarter square triangles that I showed you?

And remember how I got to this stage last time?

Well, this week was supposed to be about finishing it off with some binding.
I previously mentioned that I thought some little strips would look good as groups of two on each side?

So I set about trying to do that.
I cut the strips precisely and stitched them so that they would fit the block and then stitched in place.

For those of you out there that know what you are doing with binding, you’ll probably be punching your screens as you look at this. Sadly it wasn’t until after I began turning the binding over the edge did I realise my fundamental error of not leaving enough “wrapping” on the corners and therefore all of the decorative binding would be lost to the back of the fabric.
Now, I had the option to unpick ALL OF THE EDGING, or try and come up with a plan that moved me forward.
Given my use of capital letters above to denote my abject horror at having to do the first option, I am sure that you can guess which option I went with, lol!
To secure my sanity and bring things back to a conclusion I unpicked at the corners were the strips met, stitched down the binding so that some of the decorative strips met and then created a small strip which I wrapped over the corners and stuck in place.
Now, you won’t find a professional quilter or patchworker showing you this so although it’s a bit of a cop-out solution, I actually think that I may have devised a whole new finishing technique all of my own! LOL! ;)
Anyway, here is the finished piece.
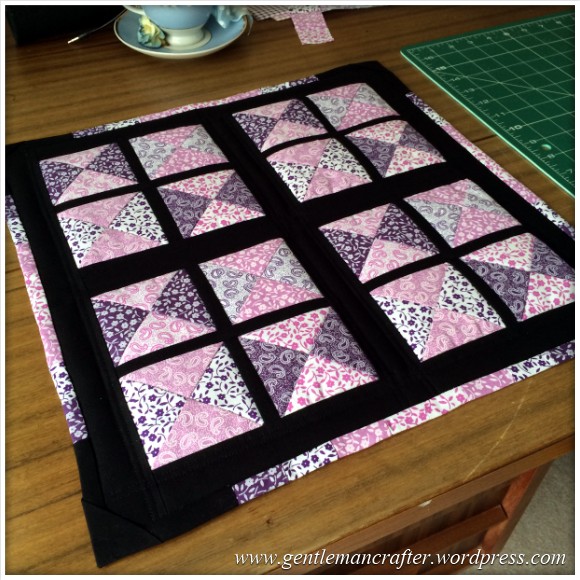
And a closer look at that pesky border.

Not too shabby really, considering that I was winging the first part and mucking up the second part.
I have surprised myself with this and actually quite like it :)
What do you think?
Ok, so also I have been using some of those fat quarters for a pie wedge circular cushion.
I was actually much further on with this than I last thought and it only really required stuffing (which I had great joy in doing after the issues with the quilt block) and then the application of a button.
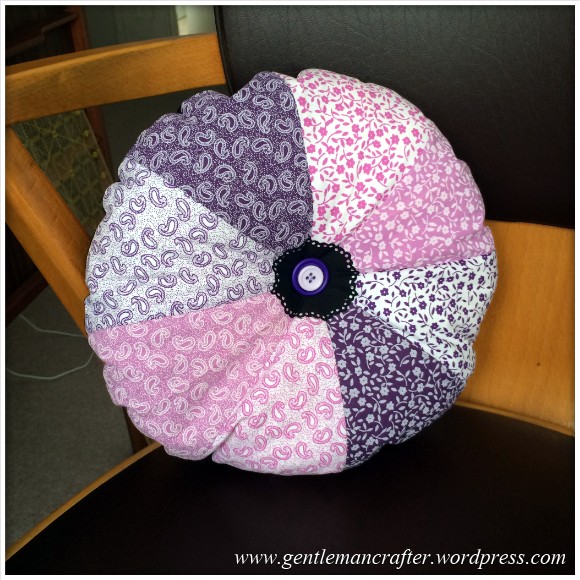

Being honest, I would have preferred a white central “doily” and a different button however I have made a promise to myself to try and use more of what I have, rather than buying what I don’t – it’s a savings thing.
All in all, it turned out as expected:)
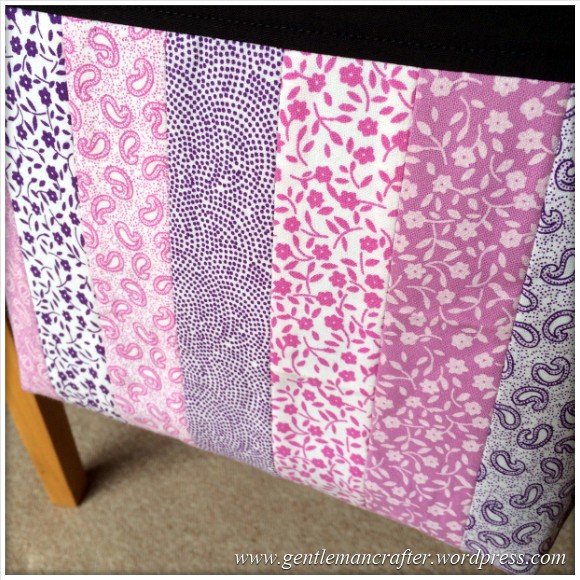
Ok, finally the bag. Oh, the bag.
Right, so last time I had made the outer shell so realistically it should have been an easy job to create the inner and stitch it all together however I didn’t realise that whilst I was making this my brain was going to go for a coffee break and leave me on my own.
Anyway, long story short – I mismeasured the inner; didn’t realise that I could have just chopped the top edge off to resolve the problem and ended up coming up with a convoluted plan to have an extra panel at the top of the bag in order to include the extra “bit”.
*sigh – punches brain*
I guess that it doesn’t look so bad after all though.

I particularly like the strips of fabric on this style of bag.
So, anyway, despite the issues and deliberations and absence of brain, at least they are finished and that in essence was what I set out to do today – so tick! :)
I have enjoyed making these and am considering myself lucky that there is still quite a lot of fabric left after making these pieces.

Although, I think that I had better apologise to my brain before asking it to do any more thinking for me.
Anyway, how are things going with your projects? Going well I hope.
Thanks for the catch up, I’ve enjoyed seeing you again.
As ever, if you have any questions or comments about this post, please feel free to use the comments box below.
See you next week for more Fabric Friday!
J :)

Well done and huge admiration John for not leaving these unfinished due to technical hiccups…. we’ve all been there hence the ubiquitous UFO (unfinished objects) acronym much bandied about in sewing forums.
I now have more UFOs than Roswell!
… You know the routine, you find this bit of almost completed work neatly rolled up and labeled at the back of the drawer you get it out muttering “yes, time to get you finished” then, flashes of the struggles you had with this seep into your brain. That colour clash you can’t resolve without lots of unpicking and you don’t want to do lot’s of appliqué to cover it up, those points that are so bumpy which you eventually got to meet but it is going to be awful to quilt … Then with a slow shake of the head you catch sight of that lovely new fabric you bought last week and put the UFO back skipping back to the sewing machine with your new toy. You’ve inspired me to get the UFOs out John and get them finished. Determined nod lips pursed….
Now where’s that lovely new linen I bought yesterday…..?
LikeLike
Lol! We are so alike :)
LikeLike
Well done on finishing these and they look fab! Another inspiring episode!
LikeLike
Fab post Jon, do enjoy reading your blog it has a lot of great tips and shows there is always hope if you mess up what you are making.
Good to see your completed projects, they all look beautiful.
Link to my WP blog, if you get time would love you to see the first ever thread catcher i have made. A very proud moment in my sewing journey.
http://somuchmoretolearn.wordpress.com/2014/06/19/soc4-week-2/
LikeLike
Congratulations on finishing all of the projects, they have all turned out so well, just wish I could find the time to do likewise!! best wishes, Jackie
LikeLike
well done on achieving the beautiful results, like the sewing desk, where are you moving the craft area to? xx
LikeLike
Thinking of switching the bedroom/craft room.
LikeLike
Well done John, I love the results of the brain coffee break .Like Jane, I would have vented my frustration and stuffed it all some where out of sight and preferably out of mind.
LikeLike
Lovely items John, I too like the stripes on the bag, well done you. Christine in Bulgaria.
LikeLike
Lovely results and sometimes it is ‘brain-off’ mode tat comes up with really good results that weren’t actually intended lol… As always well done John, brilliant work…great inspiration…
LikeLike
First of all, congrats on getting all three items done and dusted! There are a lot of quilters out here who never quite manage that. OK, I wouldn’t have done the borders like that either, but you came up with an acceptable solution, so good for you!
Congrats on getting a sewing area too – you are likely to do much more with the machine, if it stays out, and plugged in (use one of those extension thingies that stop the electricity melting your machine innards if there is a storm). I’m probably telling you to suck eggs, but you may not have thought of it. Sorry, I couldn’t think if the name, but I bet you know what I mean.
So what’s next in the pipeline?
LikeLike
I’m actually thinking of having a change around at home and move the craft room! Lol. ;)
LikeLike
Hi John
Really like the projects the prints go well together.
LikeLike
Lovely projects John, the colours go really well together (something I need to learn) and I love the desk.
LikeLike
Congratulations on finishing all your projects John, despite the ‘Happy Accidents’, you must have great patience,I think I would have thrown them in the cupboard and forget about them! lol Fabulous work and thank you for sharing x
LikeLike
Lovely stuff, you are very clever! Those fabrics go together well I must say. I’m inspired :)
LikeLike
Hi John, as I’ve only just invested in some fat quarters, for the very first time, this short series has been invaluable for inspiration. Thank you :-) x
LikeLike
All I. Need is the time. But love them, thanks
LikeLike
Love it. You would never know you hadn’t planned it to be that way. The bag is fan too. John you are so crafty✂
LikeLike