I’ve had a LOT of questions about importing and exporting different file types for use with the Brother Scan N Cut so I thought that I’d do an explanation of the file types and how to use them with the Scan N Cut Canvas so that you can refer back to it whenever you need to.
Firstly it’s important to know that the only file type that the Brother Scan N Cut cutting machine recognizes is FCM. If therefore you wish to use any other file type, like an SVG, GIF, PNG, BMP or JPEG, you will need to convert it into an FCM file first.
One of the easiest ways to convert a basic image is to print it and then scan it but sometimes this isn’t possible because either you don’t get the result you want because of the picture quality, or you’d prefer to convert it digitally to save paper etc so this post is more about the digital conversion route.
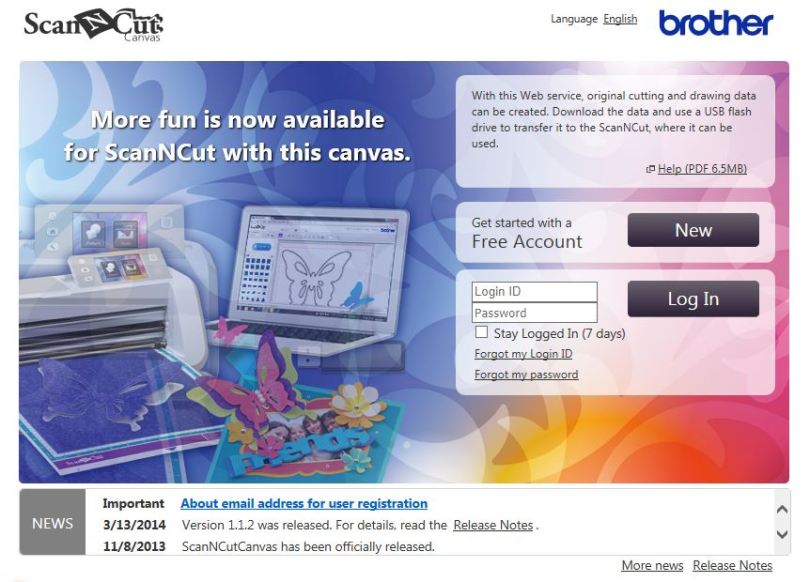
To convert files digitally you will need to use the Brother Scan N Cut Canvas which I talked about during last week’s Scan It Saturday. It’s the only software that will convert to and export in the FCM file format.
The scan and cut canvas will import and convert the following file types – JPEG, GIF, PNG, BMP, SVG and FCM however there are some ‘restraints’ on each which I’ll explain as we go through this.
Before I begin, I should explain that I am using the Windows 7 operating system. You may need to consult your computer’s help files to see if any of the computer based menu instructions that I talk about differ; I’ll try and suggest alternatives that I know about but don’t have experience of all operating systems however the actual Scan N Cut Canvas operations should be the same no matter what OS you are using.
I’ve split the overview down into each file type(s) group so that you can refer to just the one you need.
They will run as follows –
- Image Tracing – JPEG, GIF, PNG, BMP
- Image Converting – SVG
- Image Importing FCM
The process for saving and exporting is the same in all cases so this will be covered on it’s own at the end.
Ok, ready? Ok, I’ll wait while you grab a fresh brew ….
Sorted! Here goes :)
Converting (tracing) a JPEG, GIF, PNG or BMP image file into FCM cutting files
- Sign In to Brother Scan N Cut Canvas.
- Start a new project and give it a name.
- Now, either: Click on the image trace button (it’s the third button along that looks like a leaf in water) OR Click on the Project menu and choose “Image Tracing…”
You will then be presented with this options box.
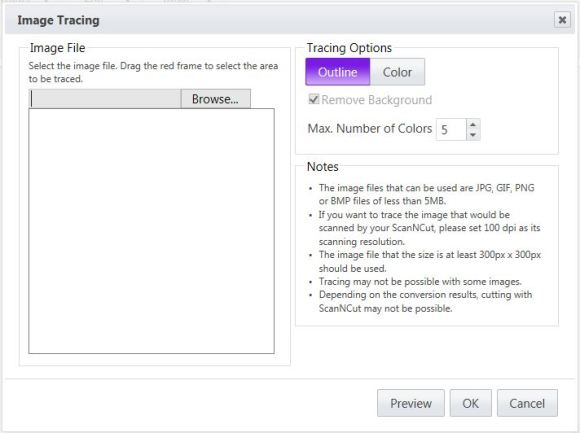
Here’s an explanation of what these mean/do.
Outline/Colour – Outline traces the outer most edge of (each part of a design) is traced. If for example you have a red apple with a black outline, all colours are combined into one and treated as a silhouette around which a cut line is formed. Colour – When an image consisting of multiple colors is traced using the colour detection method, a cutting outline is created for each area of colour. Each pattern part can be selected separately and moved in the edit screen. After rearranging the parts in the screen, each part can be cut out from paper or fabric of different colors to create a project with a rich color scheme. You can see examples of the two types of image tracing options on Page 10 of the Brother Scan N Cut Canvas help file PDF.
Remove Background – If your image is on a colored background, you can remove this during the conversion process and just trace the shape.
Number of colours – The number of colours in an image is reduced and then the image is analysed for cutting lines according the the Colour conversation process described above. This gives you a way of adjusting how many colours the conversion process will try to locate and simplifies your design (if you decrease the number) or makes it more detailed (if you increase the number).
Notes – Some important import/export notes.
Preview – Gives you a preview in the box on the left showing the outline that will be the cut line in blue. This gives you the chance to change things before you commit the conversion to the virtual mat.
OK/Cancel – Either continue with, or cancel, the conversion process.
To get the image into this conversion section just click on the ‘Browse…’ button (might say ‘choose’ in some browsers) and locate the image that you want to ‘trace’ (convert).
- Click Preview.
After you have twiddled with the options and found the combination of settings that you like…
- Click OK
Your design will now be loaded onto the virtual mat for you to save, download or edit some more. I’ll not be covering additional editing here though as this post is purely about converting.
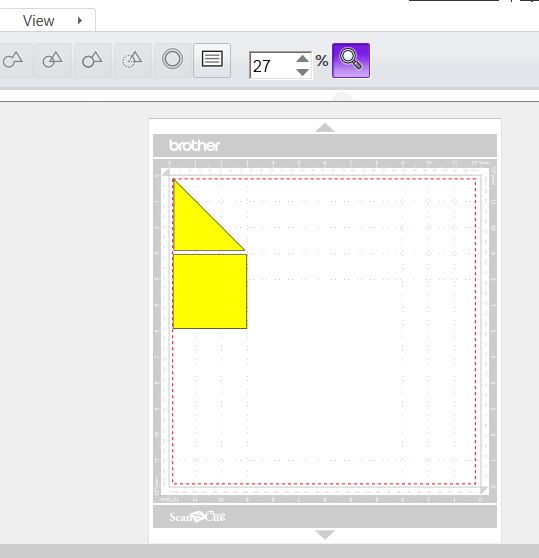
Here is an example of a frame that I designed in the conversion process.
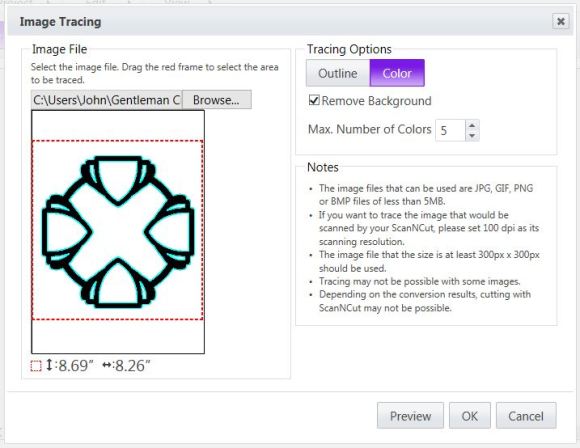
To get the landlocked areas traced you will need to use the Colour option. If I had not selected this I would have only had the outline around the outer edge.
When tracing some image types you may find that you end up with a double cut line on the land locked areas. Brother are aware of this and inform me that it is totally normal.
Here is what I mean …
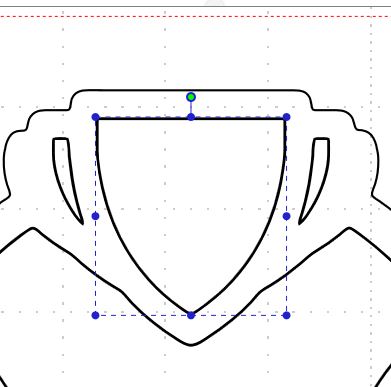
See how the line appears thicker and I can select it independently of the main design. You will need to select and delete each of these before saving and cutting otherwise the machine may try to cut this line twice and it will ruin your design.
You can now move on to save and download your file (see the section later in this post).
Converting an SVG image file into and FCM cutting file
I’ve had lots of questions about SVGs over the months and they are a great way of accessing a wealth of amazing designs but they will need converting before you can cut the design on the scan n cut machine.
SVGs (scalable vector graphic) are written in a computer language, rather than being created from pixels. This means that they can be increased in size (on screen) or converted for cutting very easily and with no loss of line quality. This, in my mind, makes them perfect for using with cutting machines.
Anyway, here’s how to convert them for using with your Scan N Cut.
- Sign In to Brother Scan N Cut Canvas.
- Start a new project and give it a name.
- Now, either: Click on the SVG icon (it’s the fourth button along; the one with SVG written on it) OR Click on the Project menu and choose “Import SVG/FCM file…”
You will now get an import box specifically for SVG and FCM files.
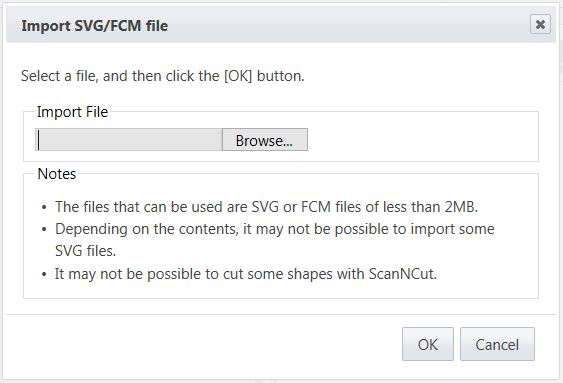
As you will have noticed, there are some notes below the file locator box. After further investigation I have found that there is a maximum original file size of 2MB and/or 300 ‘lines/shapes’ for each SVG file that is going to be converted and/or exported and cut. Going over that limit will result in an error message and the conversion not being completed.
Some of you have experienced this already (and have contacted me) with some of the designs from Birds Cards, unfortunately there is no easy way around this and the only way that I know of to test whether they will work or not, is to try and convert it.
To continue.
- Click on Browse (might show up as Choose… on some browsers).
- Locate the SVG file and click OK.
- Click OK in the Import SVG/FCM file box.
Your design will now be loaded onto the virtual mat for you to download or edit some more. I’ll not be covering additional editing here though as this post is purely about converting.
The picture below shows one of the SVGs that I created and then imported and converted for the recent Scan It Saturday Corner Bookmark post.
If your SVG has any shading or colouring, like mine had, then this will transfer onto your virtual mat but will make no difference to your cut on the machine.
You can edit each part of the design separately.
You can now move on to save and download your file (see the section later in this post).
Importing FCM files into Scan N Cut Canvas
If you have created a design on your Brother Scan N Cut, or want to play with some of the pre-installed designs from the machine that don’t show up in Canvas, and want to bring them into Scan N Cut Canvas for further editing or adding to your online library then you will need to follow this process …
- Save the design from the machine onto a USB stick.
- Insert the USB stick into your computer.
- Follow the same process as shown above for loading SVG files.
This will then load this design onto your virtual mat and you can now edit, save or export.
Saving And Exporting An FCM File For Use With The Brother Scan N Cut Machine
If you wish to export your design for cutting on the Brother Scan N Cut you will need a compatible USB stick. If you are not sure, here is a list of those that Brother have tested as being compatible with the machine – USB Compatibility List
To save the design that is on your virtual mat, first make sure that it has a name in the Project Title box.
Then either:
- Click on the “Overwrite This File” button. It’s the second one along with the downward facing blue arrow. If you overwrite a file, it will do exactly that – all of your changes to that file will be saved.
OR
- Use the Project menu and click on either “Overwrite this project” or “Save as another project”. Obviously the second option here is for when you have added to or edited a design and you want to keep the old file but save the changes as a new cutting file.
Once your file has saved you will get a confirmation message.
Just click the OK button to return to your virtual mat.
Accessing the FCM files on your USB via the Brother Scan N Cut Machine
Now that you have successfully mastered these steps like a crafty ninja you’ll be wanting to cut the design on your machine so here’s a quick run through on how to do that.
I’ve made the assumption that you have saved your designs onto a compatible USB stick. If not, you’ll need to do so before going onto the next step.
- Turn on your machine
- Insert the USB stick in the USB slot at the side of the machine.
- Click Pattern
- Click the button at the top of the screen that says Save Data.
- Click on the large button that has the three pronged USB symbol.
- Browse the files on your USB stick to locate the file you want and tap it on the screen.
- Click Ok.
- Click Ok.
- If your design has multiple separate parts to it and you want to resize it then you will need to Unify (group) it before you move on. Consult your instruction manual for details on how to do this.
- Your design is now ready to cut or draw on your machine.
Closing Thoughts
Right, it might feel like you’re brain is fried if you’re not tech savvy, mine certainly is from trying to make this as easy to follow as possible, but try it a few times and you’ll have nailed it in no time :)
I am 100% sure that I will have created more questions than I have answered so please feel free to use the comments section below this post in order to ask away and I will do my best to answer all unique questions.
I hope that this helps all of you scan n cut users out there. Please feel free to share a link to this post on Facebook, Twitter or whereever else you feel that people would like this info.
There’ll be no follow on post today as it’s taken me a while to put this together but I have a few plans for the coming weeks so please look out for those :)
Thanks for reading, see you next Saturday for more scanny fun!
J :)

Hi John thanks for this and all your hard work. Can I just ask this please. I sold my Silhouette Cameo but I still have all of my cut fies,can I convert these to the FCM format and if so how do I do it. Hope you can help.
LikeLike
It depends what file format they are in. If they are SVG then yes. If they are GSG or STUDIO then no.
J :)
LikeLike
Im not sure? if it is what should I do??
thank you so much for help :)
LikeLike
Hi John,
Your explanations are great! Im still stuck though as Im useless with computers. Ive downloaded a simple paper bow image from Birdscards. Im saving it but its saying this file type cant be used…………….when Ive downloaded an image were or how should I save it?
thanks in advance
Jenny
LikeLike
Is the file ‘zipped’?
LikeLike
Hi Jenny, I am having the same problem, did you get it sorted with John? Thanks
LikeLike
Awesome post and so well explained thank you. One question, can GSD files be converted?
LikeLike
No. I’m afraid not.
LikeLike
Thank you so much for this!!! I now feel confident about creating my own images!!!
LikeLike
Hi John, How do I scan with the mats that i have as they are 12×24 and will not scan
LikeLike
The 12 x 12 mats are the only ones that can currently be used for scanning.
LikeLike
Hi John thanks for getting back to me,yesI do right click and still no joy. My computer still cant see the USB stick.More than fed up with it.I may try again latter.Keep up the good job.
Jackie Lewis
LikeLike
If it’s between your USB and computer I’m afraid that I can’t really help with that. I’d consult you’re computers help files on using removable media storage.
LikeLike
Hi again John,
Thank you for replying so soon..Yes I think it’s a problem with my computer,will let you know when I’m up and away. Jackie Lewis
LikeLike
Hi John, thanx for your great explanations. I have one question.
If I draw something in the canvas suite program, does that have to be converted or can I just put it on the USB stick and download it onto the scan &cut?
Thanx again.
Sandra Miaskoff
LikeLike
Anything that you design in canvas will automatically be saved/exported as an FCM file. No conversion needed.
LikeLike
Thanks john its great you and everyone else thats doing post about the snc and how to get patterns its great im sick and it gets to much so its great to go back to the page where you left off so thanks again john
LikeLike
Thanks John i love this post
LikeLike
Hello John, could you help me please. When I try to download your images to the USB stick the computer says what programme do I want to save it in,its anything but the USB stick.I have a cruzer edge16GB. and I have Windows 7.Don’t know what I’m doing wrong. Any help would be more than great.
Jackie
LikeLike
Are you using the right click method?
LikeLike
Hi John I am having trouble with my scan & cut getting it to recognise any of my mats, i have cleaned out under neath & still no better .I have today managed to get a mat recognised so i am not going to unload this as a last resort Thanks for your help Maureen Pope
LikeLike
Maureen, you will need to contact Brother support help desk.
LikeLike
Thank you so much . You sure make it fun to learn. You have answered my questions.
LikeLike
Thanks John, what would we do without you, probably pulling our hair out as well as everything else. Your hard work is much appreciated.
LikeLike
Please help! Still cant get my Scandisc cruze 8gb to work.Am so frustrated-really didnt expect to have this problem.By the way,I was so excited with the first scancut that I bought a second one.So dedication on my part is obvious.
LikeLike
Have you checked it against the compatibility list?
LikeLike
Yes I did .It is on your compatability list,so still puzzled
LikeLike
Me too! I would suggest contacting Brother support desk as that list is tested and supplied by them.
LikeLike
Are you using Chrome, it does not seem to always work in it.
LikeLike
I am using Internet Explorer for Canvas.
LikeLike
Brilliant. Thanks John. That is definitely one for keeping for when I get around to playing with the canvas. You put an awful lot of time and effort into this.
Best regards,
Shirl
LikeLike
Hi John
I asked the other day if you had a contact for brother as my machine would not accept any mats. after a lot of searching I found a customer service contact and I am pleased to say they were very good and soon had the problem sorted. The reason it would not accept the mat was there something stuck on the scanner and ask me to follow the instructions in the book for cleaning the scanner. It was easy to do and thought I would let you know the out come in case any one else gets the same problem.
Thanks Denise
LikeLike
Thanks John. I know what hard work it is to put something like this together. Bit of labour of love there too do I detect? Much appreciated.
LikeLike
thanks for taking the hours and hours and hours to write this!! Sitting here with my coffee it’s a bit much to wrap my brain around, but will definitely give it a step by step try later! Enjoy your blog, thanks for all of the sharing!
LikeLike
Thanks John, but see am2406 has now added her video which I was going to steer you to, its brilliant and Ive been able to convert all the SVG’s that I hadn’t previously been able to. SueL
LikeLike
sorry wrong link posted it should be the troublesome SVG video look at my youtube channel applelover53 to see the correct one.
LikeLike
Morning, Mmmmm think I will have to read this a few times LOL. very well explained though, thank you.
LikeLike
Thank you so much john. I can’t wait to try this I am going to print it out and laminate it for my wall. You are brilliant jan xx
LikeLike
Hi John. Brilliant tutorial, thanks for putting this together. Is there a way of contacting you privately, as I have seen something that might be useful, but don’t think I’m allowed to put the link here. SueL
LikeLike
You can email me (link at top of the blog) if you’d like :)
LikeLike
Thanks John – life seems a lot easier when you explain things!!!!! Sue
LikeLike