
For a while now I have had a list of design ideas that I’ve been wanting to try. With a rare day off the other day I thought that I would give one of them a try.
It was a simple concept – make a teabag folding design using rubber stamps.
Little did I realise that it would become a labour of love and take up most of that day off.
It was definitely fun to do though and I was so proud of it that I thought that I would like to share it with you all.
For anyone that doesn’t know what Teabag folding is, it is a simple form of paper folding made using (mostly) squares of paper that are folded up into shapes that can be combined together to create medallion or mandala style embellishments for a range of creative projects.
There is already lots of information out there on the internet, including YouTube, and Pinterest, so I won’t be focusing too much on that side of things but will instead give you an idea of how I put my little take on this pretty paper craft.
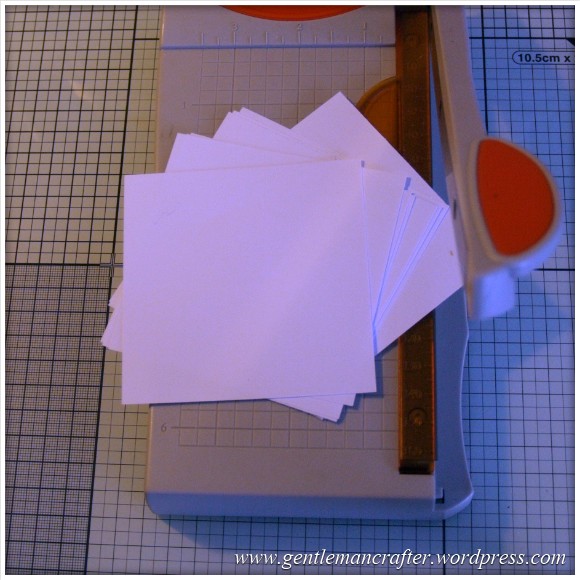
Well, the first thing that I did, as you can probably guess, was to cut myself eight equal sized squares. They were 9cm (approx 3.5 inches) in size.
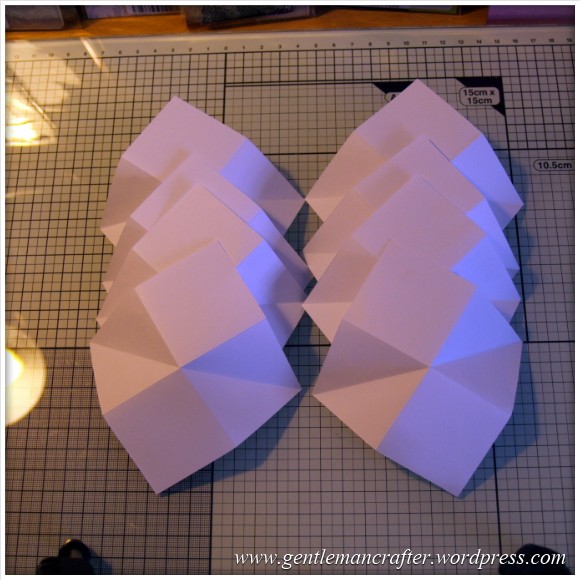
The next step was to fold and then unfold these squares. I did this because I wanted to be able to work out where to put the stamp before I began colouring them in and if I had folded them up and then done this, it probably would have been a whopping great disaster.
 Easy so far? Yup. Onwards!
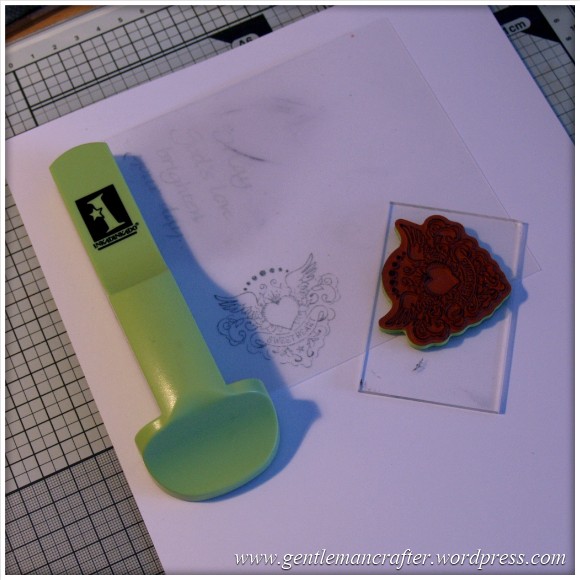
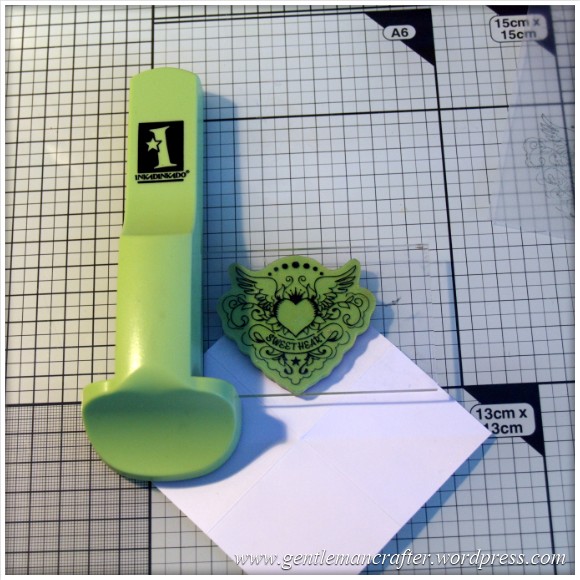
Next I took out my Stamp-A-Ma-Jig (from Inkadinkado) and positioned the clear positioning sheet next to the handle and stamped a single impression of the stamp that I was going to use.
 Then I took one of the squares of paper and positioned the clear positioning sheet over one of the corners (where there wasn’t a fold line). I then brought the little green positioning thing into place.
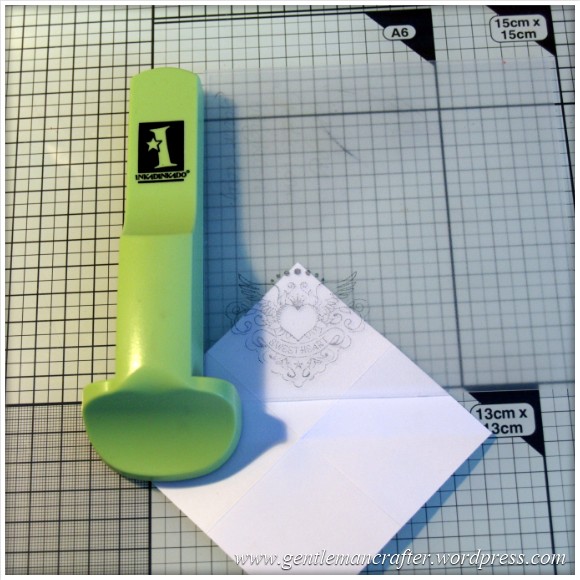
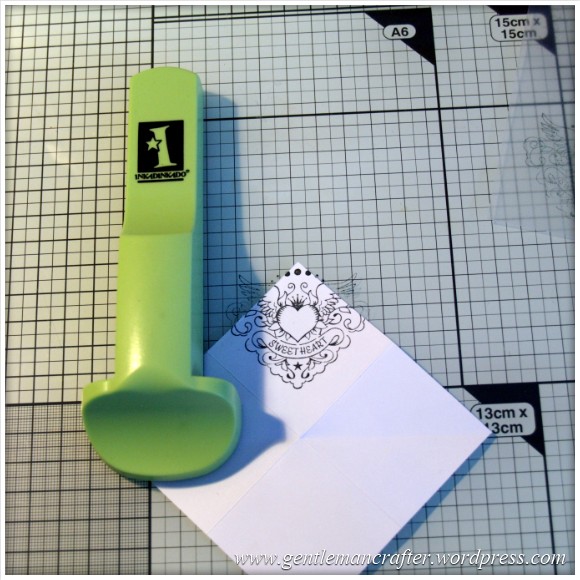
Keeping the green handle in place, and moving the clear positioning sheet out of the way I stamped the design onto the corner.
and it ended up looking like this.
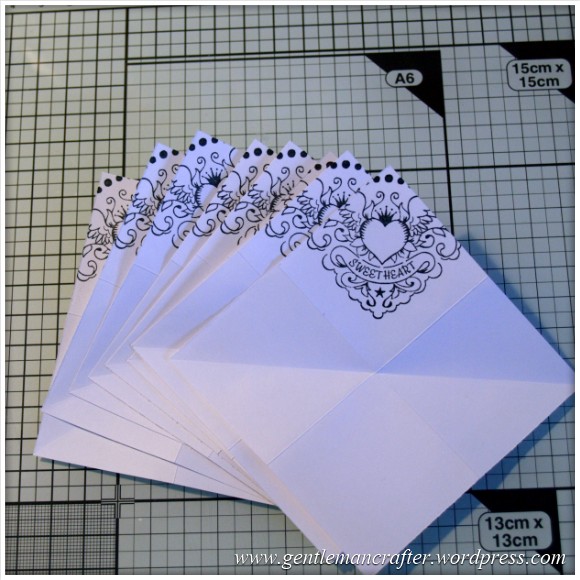
 I then repeated this process on the other eight squares.
Getting the impression that this was going to be a long job yet? I think that it had just started to dawn on me, but I carried on in a stupor of creative bliss.
 So, next up was the bit that I had really been looking forward to – the colouring in!
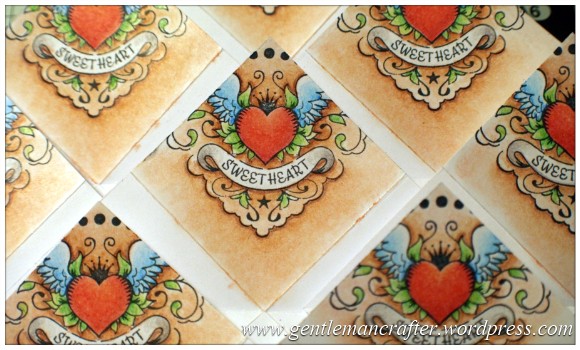
I’ve had the Spectrum Noir Colouring pencils hanging around for a while now and haven’t really used them on a full project so far – so this was my opportunity.
Now, in all honesty I didn’t do a full set of photos for this as there were quite a few steps in terms of building up colour and shading so here are just a couple of photos of the colouring process.
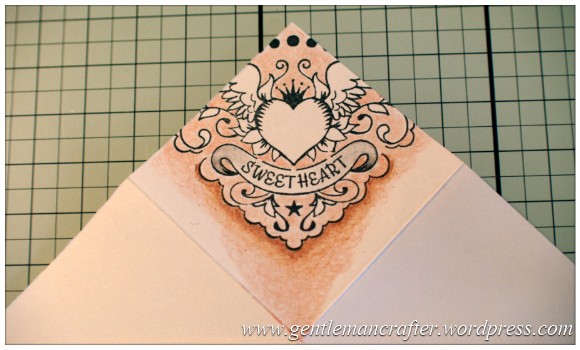
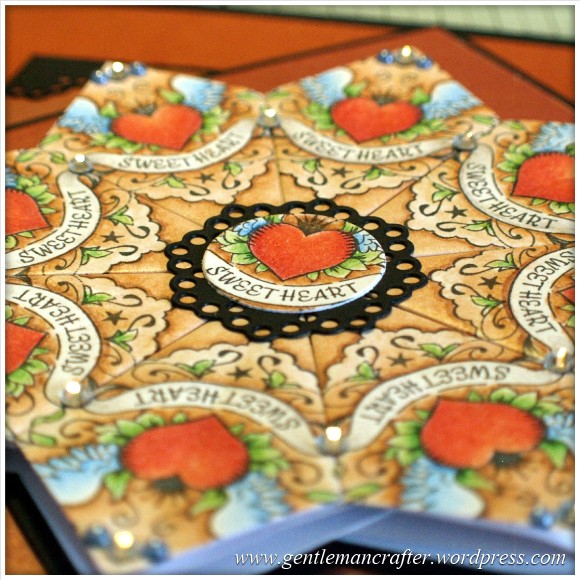
This first one shows the unblended beginnings of the “skin” areas of the tattoo. I used three colours on these areas and went on to blend this out with Zest-It Pencil Blending Solution.
This next photo shows the first square almost complete – and some more of the squares eagerly waiting to be coloured – impatient little monkeys.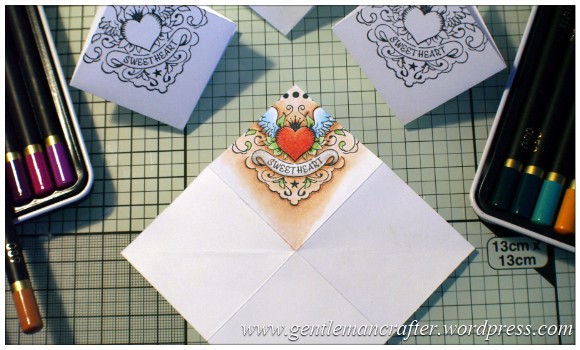
After working out the colour scheme and blending requirements on this first square I then started blending batches of colour across the remaining squares – it just made this feel a little quicker, but I don’t think it was …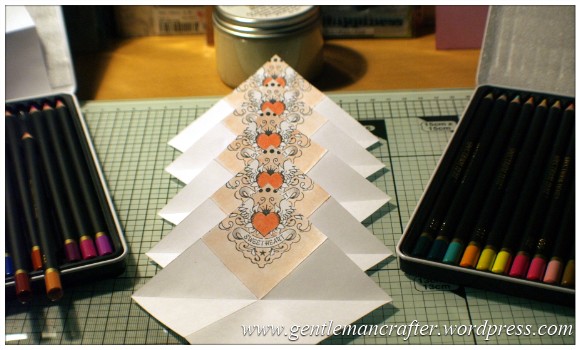
When I had done them all, they decided to play up to the camera and reenact the iconic music video, Bohemian Rhapsody, by Queen.
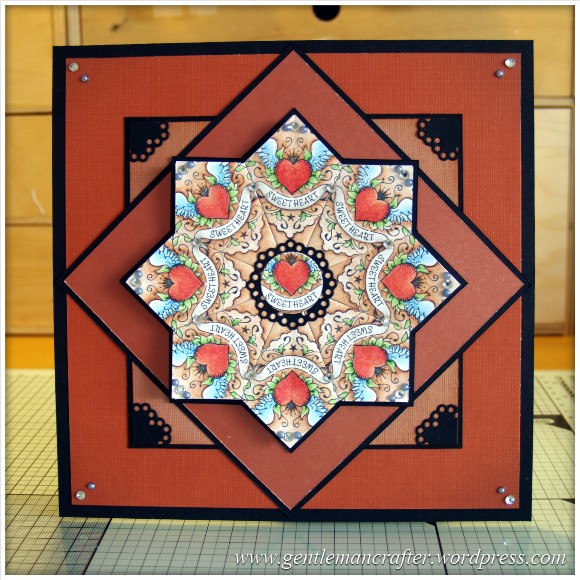
After sorting them out and giving them a talking to, I then folded all of the squares up and assembled into the final mandala design that was going to go on the front of my card.
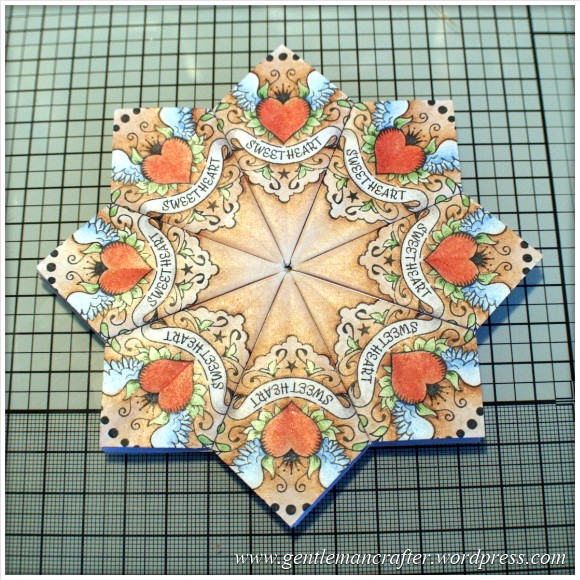
The finishing touches were simple – a little matting/layering, a few gems and I also stamped and die cut another of the tattoo designs in order to add a decorative touch to the middle of the mendala design.
And what do you know – it’s finished! Obviously that was the heavily edited version though ;)
Oh, before I sign off, I guess that I had better give you a list of the pencils that I used in case you like the colour scheme and want to use it for yourself.
Banner –
- Light 112
- Medium 117
- Dark 119
Heart –
- Light 024
- Medium 027
- Dark 033
Wings –
- Light 065
- Medium 066
Leaves –
- Light 065
- Medium 047
Skin –
- Light 009
- Medium 089
- Dark 095
Ok, well, that’s it for this post. I hope that you have enjoyed it.
As ever, if you have any questions or comments, please feel free to pop them in the relevant box below.
Thank you for reading – see you next time.
J :)

What a fantastic result! I can believe that it took a lot longer than you imagined but well done for getting there. It is a really inspiring piece of work. Love your colouring too.
LikeLike
I think you would have needed more than one day off if you hadn’t had the stampamagig – that was obviously key to getting the stamps all in the same place on the paper squares. Well done!
LikeLike
Only one word-WOW! You are so clever
LikeLike
I absolutely blooming love this :-) Well done you. I haven’t done tea-bag folding for a long while and yet I always loved it when I did (go figure). Amazing card x
LikeLike
Wow, what an amazing piece, lot of work but SO worth it. Thanks for sharing
LikeLike
Wow that’s amazing!! Might have a go myself. Keep up the good work john love your blog!
LikeLike
well worth all the work a ,beautiful design
LikeLike
That is a lovely idea John, and what a beautiful outcome. I think the card is stunning and you should be very proud of it and yourself
Best wishes
Sioux
LikeLike
Stunning. And I do know what you mean, an apparently simple idea turns out to take ages, but, my oh my, lovely lovely lovely.
and I enjoy, very much , your work with the cutNscan, thank you
LikeLike
I have to be honest that when I read the title I wasn’t sure that it was going to be my thing but WOW what a staggeringly beautiful piece of art
LikeLike
You are so creative, wish I had the imagination.
LikeLike
That is an absolute work of art John. I love card making and most have colouring as thats my favourite part but I dont think I could ever put so much work in. You are so talented, not only did you do all this intense work but your vision of what it would look like when completed shows what an artist you are. Beautiful, eye catching.
LikeLike
I have a stamp a jig, but every time I use it I get flummoxed. Can you direct me to an idiots lesson in great detail.? This looks great would love to try it. Thanks John.
LikeLike
A true labour of love John, your vision & knowledge have created a stunning masterpiece of a card. Hope you will frame this one! :-)
LikeLike
This amazing ,john you have got talent
LikeLike
WOW…..this is stunning john, I wish that I had the patience xx
LikeLike
John it’s beautiful you are so gifted thanks for sharing
LikeLike
John,
You always seem to keep me mezmerized, I can’t take my eye’s away.I excitedly scroll till I get to the finished project.How on earth do you
keep topping yourself. I don’t know how but I am addicted. Pat yourself on the back, and take a bow. And the crowd jumps up in applauds.’Bravo!’, ‘Bravo!’
Thank you for sharing.
Your loyal fan
MissDinTexas
LikeLike
Well what can I say but outstanding, was intrigued when I saw the peek on your fb page. :-)
LikeLike
Superb project, the depth of colour you got with those pencils is excellent. Do you remember the star book Barbara Gray made with the teabag designs? I did something similar a few years back and put a video of how to do it, if you have your Tea bag mojo on ;) http://billiescraftroom.wordpress.com/2010/03/05/video-tutorial-star-book/
Have fun, don’t let those squares drive you crazy!
LikeLike
Hi John. As usual beautiful work. May give it a go. Not very good at stamping yet.
Thanks for all your hard work.
LikeLike
Absolutely beautiful you are a clever and talented man
LikeLike
Oh my goodness such a lot of work, but brilliant. well done
LikeLike
This is just amazing – a real labour of love x
LikeLike
Oh wow John this is amazing and well worth the time it took to do xxx
LikeLike