So I’ve had mine for a couple of months, and it’s now only just over a week until the Brother Scan N Cut machines start shipping from Create and Craft TV so I thought that I would try and do a post per day this week to try and bring you up to speed with all of the things that I have tried, tested and discovered since I have had more time to work with it and to hopefully give you a head start for when yours arrives.
Most of the things that I will cover in this series of posts will also go on to cover a lot of the questions that you have sent to me via Facebook, Twitter and also this blog (thank you for all of those – you have kept me very busy indeed!)
First up I should say that I will be covering Working With Fabric and also The Brother Canvas design suite in more depth in separate posts later in the week, so if these interest you, please don’t forget to subscribe to this blog for email updates of when these posts are released.
Anyway, lets make a start …
Q: How Intricately Can The Machine Cut?
There are going to be a number of variables here.
- Complexity of design.
- Strength of medium being cut.
- Line Weight.
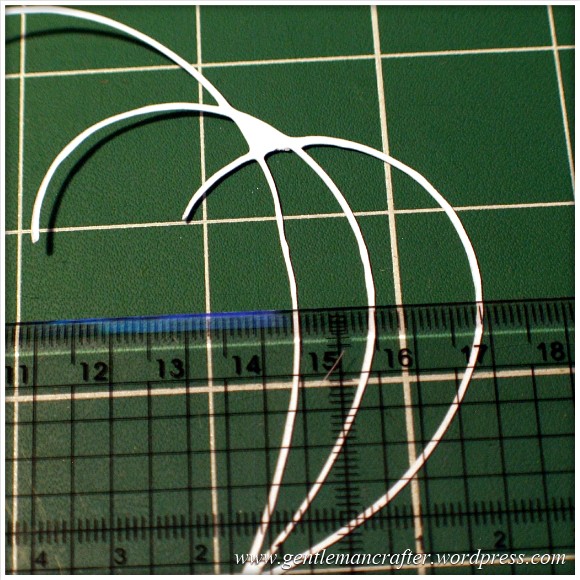
I decided to do quite a basic test for this post. I drew a few curved lines with an 0.5mm Pigma Micron pen and then used the Scan To Cut Data option.
I used a lightweight cardstock to test the cut.
This is the result.
I did increase the size of the scan by about double in this test so the lines that were cut were approx 1mm thick as you can see here.

The machine even picked up the varying line thickness of the ink against the textured paper which I think was quite cool.
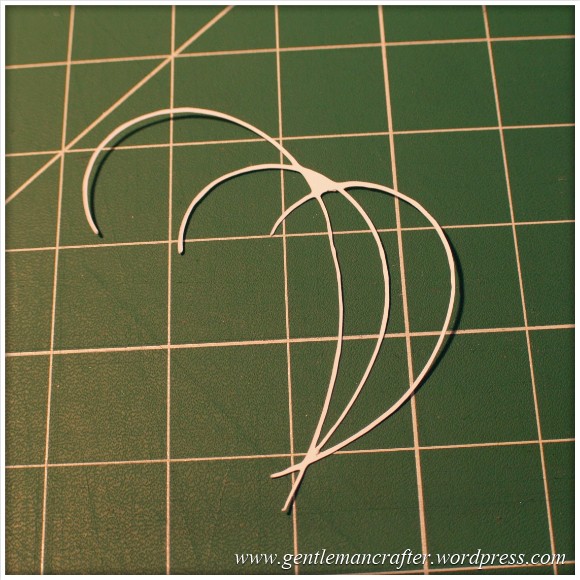
Anyway, here are the two side by side.

Conclusion: Not a bad result. I would however recommend starting bigger and decreasing the image rather than starting with a small image.
Also, unless ‘freehand’ is the look that you are going for, you will want to be fairly precise and use a ruler, french curve or other guide against which to draw your lines when hand drawing the design.
I used the standard mat as I was using cardstock. You will need to be very careful when removing intricate designs from the mat in order to prevent them from tearing – or perhaps do your design so that there are lots of overlapping lines so that there is more ‘structure’ to the overall design.
Q: Do I always have to stamp or print in black?
No. You can use most colours as long as there is a good contrast between the colour and the paper against which it is printed. Here is an example where I used four different colours to stamp a flower.
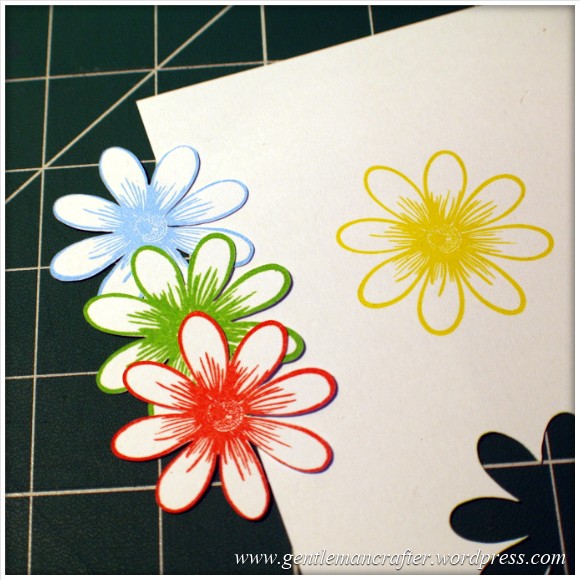
As you can see, the machine picked up three of the colours very well but sadly did not recognize the yellow as there wasn’t enough contrast between it and the paper (in all fairness, this image makes it look a lot brighter than it is in real life – even I was having trouble recognizing it with my eyes).
Conclusion: You don’t have to always print or stamp in black but should consider using ‘bolder’ colours to create the outlines for things that you wish to scan and cut.
Q: Do I have to colour my stamped images in after I have cut them or can I colour them before using the Direct Cut feature?
You can do either, but will need to remember the point above about having a good contrasting outline for the machine to recognize.
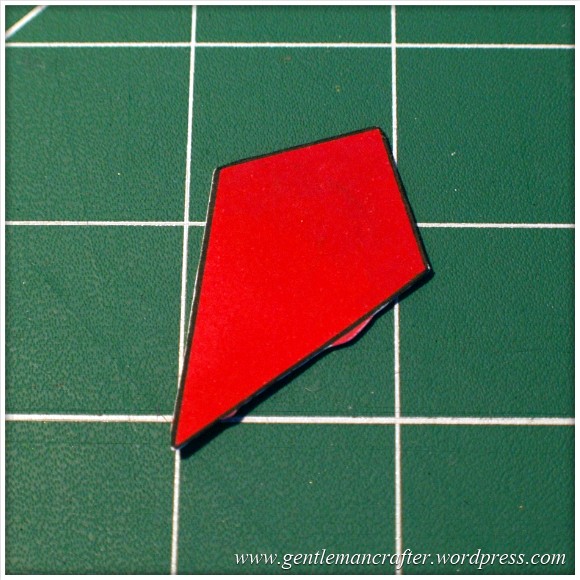
Here is the test that I did. One of the kite shapes was coloured (with a graduation of reds from my Spectrum Noir pen set) and the other was left blank.
I also did the Direct Cut process on these shapes at the same time (i.e. I didn’t do one sheet coloured and then one plain).
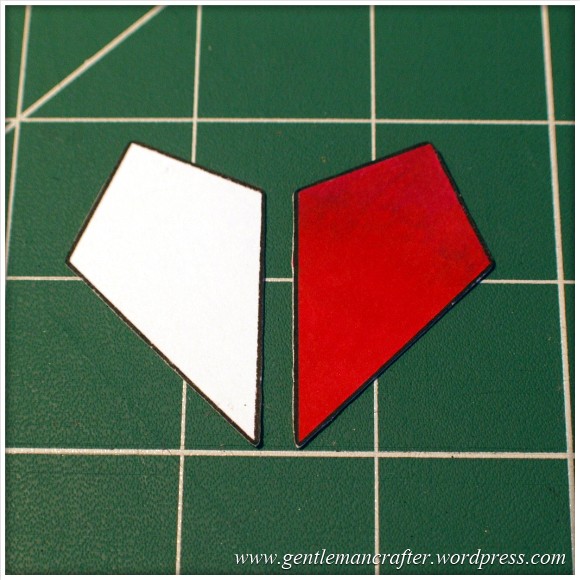
One point though, you will need to be a tidy colourer if you are going to colour before cutting. You can see in the next image how I went over the line and the machine thought that this was part of the outline.
Conclusion: It should not matter if you are colouring before or after the cutting process takes place as long as you have a nice solid outline to the image for the machine to recognize – but stay inside the lines if you plan to colour first! (Lol, flashback to colouring as a child then…)
Q: Can I Use The Direct Cut Feature To Cut Out A Stamped Image That Has Been Heat Embossed?
Yes* (I put the asterisk thing here for two reasons, one, I have only tried it twice and it may depend on a number of things).
The first time that I tried it I used black embossing powder and there were a few flecks out of place. This test did not work.
The second test that I did I used clear powder over a coloured impression. This one work perfectly as you can see here …

Conclusion: I haven’t really done enough testing to give it a 100% tick but initial results look good and testing will be ongoing and I will report back on more results in the near future.
Q: Can I Use A4 Cardstock And Scraps Of Paper And Card?
Yes. Just use the scan preview feature on the cutting mat screen to see where they are on your mat and then you can position your shapes precisely where they need to be – as shown in this image (which could be better – I really need to figure out a way to photograph this screen better).

Q: What Things Will The Machine Cut?
Oy! This list could go on forever! Ok, here are a few that I have tested and seen to work.
- Copy Paper, Vellum, Parchment
- Light (160gsm), Medium (220gsm) and Heavy (350gsm) Cardstock
- Mirror Card, Pearlescent Card, Satin Card
- Crafters Chipboard
- 100% Quilting Cotton Fabric
- Felt (with a fused backing applied)
- Lightweight Faux Leather
- Oil Cloth
- Denim
- Thin Magnetic Sheet (like the kind you print onto to make family photo fridge magnets)
- Shrink Plastic
- Doeflex Template Plastic
- Modelling Sheet (A thin plastic sheet that is maleable when heated).
- Acetate
- Project Acetate
- Craft Metal
Phew, and that’s just a few things!
Conclusion: It’s VERY versatile and will work with you no matter what craft you are into.
Q: Can I Export A Design That I Have Scanned Into The Machine And Then Edit The Lines In The Canvas Design Suite?
Yes. You can see the example below of the scanned image that I used earlier to test intricacy loaded up into the Canvas design suite and the line editing tools selected.

Q: Can the Brother Scan N Cut cut out sheets of printed decoupage?
Probably one of the most frequent questions that I have had.
Tests have been inconclusive. Whilst theoretically possible, it is proving more complex in practice.
As the machine recognizes outlines via contrast between areas of a page, when you have a complex design with multi tonal areas (i.e. a countryside scene or flower) the machine will always do it’s best to find as much as possible but doesn’t always detect the entire outline. In addition, as we would only really want to use the direct cut function, this would not recognise landlocked areas.
There is potentially a way by using an acetate overlay that you can give the machine a helping hand to recognize the overall outline, but again, not sure it would work with landlocked areas. You can see the process I mean by watching this video.
I don’t for a minute believe that it is a fault of the machine, as it has been doing exactly what it was designed to do which was recognize areas of contrast. Instead I think that this might just be a dream featured that has been transposed onto it by our combined desire not to have to cut out all of those fiddly bits.
Conclusion: Tests still ongoing.
Now for some quickfire questions.
Q: Can I ‘Direct Cut’ Multiple Stamped Images In One Operation?
Yes.
Q: Can I Cut A Shape Within A Shape To Create An Aperture?
Yes. Just position them one on top of the other in the design screen on the machine and cut as normal.
Q: Can I Weld A Word Into An ‘Aperture’ So That The Word ‘Hangs’ In The Aperture?
Yes, but you will need to do this in Canvas Workspace and will first need to “subtract” one shape from another to form a frame with an aperture in it before attempting to weld a word into a frame.
Coming Up…
Ok, That pretty much concludes this ‘test lab’. There is clearly much to explore with this machine so I will be doing more in the Test Lab series in the future.
Here are just some of the questions that I have not yet tested but will be looking at in the future …
- Scanning Multi Coloured images
- Direct Cutting With “Busy” images
- Direct Cutting with light ink on dark card
- Can I Cut ‘One Stroke’ Paintings
- 3D creations
- Will it cut foiled designs
- Is there a score/perforate feature?
- Can I cut Zentangle designs?
- What is the test cut button for?
- Can I cut swing cards?
- Is it possible to cut boxes?
I also have other posts planned for this week that will cover using fabric and using the Brother Canvas design suite.
Right, well thanks for reading and I hope that it has helped you in some way.
Look out for more on the Brother Scan N Cut this week.
As ever, if there are any questions that you would like me to add to the list then please feel free to use the comments section below.
John :)

Hi John. There is no doubt about it. The Brother Scan N Cut must have one of the Best Cut of any Cutting Machine going. It will take a lot of beating. John do you know if Brother are going to produce any more Patterns and Designs that we can Purchase by Downloading them onto a Memory Stick and then into the Machine. Or are those already Installed on the Scan N Cut Machine the only Designs and Patterns Brother are providing for use with the Scan N Cut for all time. Meaning if we want any more Designs and Patterns,we have to source or Draw them ourselves. Then transfer them into the Scan N Cut via the USB Port. Edna
LikeLike
As far as I am aware there are two USB sticks of designs out in America. I have not heard any plans of bringing more designs out.
LikeLike
Hi John. Surely if Brother have produced 2 Usb Sticks of New Designs for the USA. It is only fair that they will make them available to us Crafters who have Purchased thier Scan N Cut Machine in the UK. Regards Edna
LikeLike
Hi John. I managed to Cut some Decoupage with my Scan N Cut to-day. I Printed some Decoupage pages in full colour from the Designs I purchased for my Silhouette Cameo. I then Scanned them through the Scan N Cut Machine. It cut the outline of the Designs perfectly. I am still working on how to Cut the inner Lines. Although the Scan N Cut did cut a Border separately on one of the Designs, but I can’t remember at the moment what I did to make it do it. I guess I will just have to play some more and write down what I did. Regards Edna
LikeLike
Hi Am mastering the ScannCut and can now get it to scan and cut a templates – very hit and miss on the scanning as it picks up some lines and not others. I have also tried scanning and cutting out some coloured and stamped images but it did not like these. I have experimented and drew a black outline around the stamped image and it then cut it out. Also have tried to cut out stamped images without colouring and for whatever reason some it will pick up the outlines and on others it won’t. I am having to stamp up image really well and have to stand up to put as much pressure as I can on the stamp to get an outline for it to cut out. Is there any particular ink that leaves a better outline for scanner to pick up. When I can get it to cut a scanned image the cut is really really good but am concerned by how finicky the scanner is
LikeLike
Images with a solid continuous outline work best. If there are lots of fine diddly lines it may not recognise these but it will always try and find something, as you have seen.
If you would like to email me some pics of what you are trying to scan I might be able to advise better.
I have done coloured inks but bear in mind that the machine analyses by contrast rather than colour, so light inks on white paper might not get picked up. I had this with a lemon yellow on white paper, but a red, blue and green worked well.
Hope this helps.
LikeLike
Hi First Picture is of images where the outlines were not picked up On Second picture coloured image did not pick up so I drew a black Line around – it then scanned also on second picture are stamped images that were scanned and cut out at 2nd attempts when I virtually put all possible weight on stamp to get the image. I really appreciate all the help it is above and beyond your role and I think if there was a golden hands craft award for helping folks you should get it.
Regards Jackie D
Sent from my iPad
LikeLike
Thank you for the compliments. If you’d like to email me pics of what you are trying to scan I may be able to help better :)
LikeLike
Hi John I thought I had attached pictures – have sent them again but do you have a separate email to send pictures to
Regards
Jackie D
LikeLike
Yes. Link is at the top of the page :)
LikeLike
Have had success scanning royalty free images to USB stick and then cutting them out. My problem I am disappointed with is that using my scanning mat to copy photos to the USB stick and then to computer, they come out very grainy and brown coloured. My USB stick is a TDK 16gb TF10 2.00 flash drive. I have checked the compatibility on your list but it is not listed? As the scanner is a DPI 300 I was hoping for better quality and had high hopes of it for using apart from crafting. Any ideas where I am going wrong?.
Would Brother consider a back/return button, as an update, it would be so useful instead of having to delete and start again?
Thanks to John and Mel for all the useful ideas and programes all recorded!
LikeLike
Hi John, I have scanned the SAME image in , and received different results each time! These are outlined images of a page of 12 flowers, from MCS, from their Winter Wishes make a flower section. The first attempt showed only 8 of the flowers, the second, all of them, the third time it traced 9! It is very frustrating that the machine is so inconsistent with the same image, paper etc. This doesn’t seem logical so I can not think of any logical way to resolve this. Any ideas?
craftyy hugs, Beba
LikeLike
I too am having problems scanning stamped images, and I am so disappointed. I have tried everything, using new pads, different pads etc but like you have had to resort to drawing around the image with either a pencil or pen, not what I see in all the videos. Would be grateful for any further advice that can be given.
Did the upgrade ok no problems.
LikeLike
Thank you John, followed instructions and update complete. Now I hope I can remember next time.
LikeLike
Glad to hear that you are sorted :)
LikeLike
Just wanted to share a couple of points. Unbelievably I have just cut an image on 400gsm card – part of the design was less than 1mm thick!! Now that is impressive.
I think the tracing facility on the scanner software might need to be improved. Results can vary – with the same image, with bits missed sometimes but not others. It scans in OK so I assume it is the tracing ability. ( I scanned in the same image a few times in different positions out of curiosity)
Cutting fabric – didn’t buy the machine for this to be honest but thought would give it a try. Really don’t like gunking up beautiful quilting cotton with starch, glue etc. Seems best for me with ultra fine Vilene – but then that may not suit quilters. Just my early thoughts.
Brother/C&C need to get some more standard mats available.
That’s 4 points!
Looking forward to your test lab on fabric John- Thank you!
LikeLike
Thank you for all of the points. Glad you are finding you’re own way around. It’s not the easiest of products to explain in 57 minutes as there is so much information.
I’m sure that things will develop as time goes by but looks like you are well equipped to achieve what you want to achieve.
J :)
LikeLike
Hi John. I have just been advised by a member of one of my FB groups who is having issues with the way her scan n Cut is cutting. Create and Craft have been very good and are changing the machine for her. The issues she has is that when she contacted Brother, they directed her back to Create and Craft saying she must speak to them. Is this right?
LikeLike
No. Technical queries will be handled by Brother.
LikeLike
Hi John, I contacted Mel this morning and she advised me to contact you as you have done more scanning. I have received my Brother SnC and am slightly disappointed as it has yet to pick up all the lines in anything I scan. I have tried to scan 1) printed items from my computer, 2) drawn items 3) patterns from a book, and even though I hve gone over some of the lines with a pen it is still not picking up all the lins. Can you tell me if there is anything else I could do to improve this or if Brother is going to put in an update that might make this better. I have watched loads of shows and knew that there was a problem sometimes but I did not expect it to do it with most things. Any help would be appreciated. I do not want to return this but it seems silly to keep it if it really isn’t going to do the job and obviously there is a time limit as to how long I can leave it.
Also I have been using the SnC Canvas, can you tell me if they intend to put all the items from the machine onto this as it only has the fonts, shapes, borders and logos, this would help me to create a lot more. Love your shows and your enthusiasm.
Hope to hear from you soon
Kim Iles
kiles2960
LikeLike
Re your first point, please can you email me some examples of what you are trying to scan so that I can get a better understanding of what you are trying to achieve.
Re the second point I have already submitted a query to Brother about this and am awaiting a reply.
LikeLike
Hi John. Are Brother going to Add to the Designs already in the ScanNCut via a Usb. Link. Regards Edna
LikeLike
I’m afraid that I don’t know the answer to this question. The idea of the machine was more to give us the freedom to create our own.
J :)
LikeLike
hi john i got my Brother ScanNcut on Saturday but the mat keeps getting caught in the machine i was very carefull when i loaded the mat in and i have all the right settings on the machine so i am worried about using it please can you tell me if i should send it back i am very dissappointed about it
LikeLike
It is very difficult for me to help with technical queries like this. Have you contacted Brother?
LikeLike
Hi John
My Scan n Cut arrived on Monday and I cut my quilt block the same say – I have now just included in a cushion for my lounge – it was so easy I am impressed with the cutting blade.
I sew for a living but have always wanted to get into quilting – think I now will.
I am just about to peruse my next quilt block and then I will be off cutting and sewing again.
BTW – I used Mel’s link for the software update – easy Peasy. I used a generic USB stick – no issues as I suspected 😀
LikeLike
That’s great news! I am glad that you are enjoying your time with the machine.
J :)
LikeLike
I received my machine on the morning of the 10th. must admit I too got my paper stuck on mat, but found a quick rub over with a little water on damp cloth. a quick cuppa,then return to clean off. perfect job ,and so easy to remove. the mat is as good as new. and next time I will de-stick it before I use a new mat, by pressing lightly on my sweater or such like.the machine seems to cut really well, even better than my cameo.(which I dearly love). thank you john and mel for your many hours of hard work, and all that prepping time. you have helped so many of us. many thanks …gill
LikeLike
Thank you for the positive feedback Gill.
J :)
LikeLike
John, as with Julia, my machine arrived yesterday pm, had a few little trys, tried to download the update info and keep getting a message that my windows XP does nor recognise programme it is written in, do you know of any other people having trouble with the upgrade download. Also getting there doing my number card., just thought I’d let you know, will get there I promise.
LikeLike
Are you trying to open the file or download to the USB. It doesn’t need to be recognised by the computer, just the scan n cut machine.
LikeLike
Hi Lynne
I had the same problem but have sorted it.
My operating system is windows 7 but it should work for yours.
First make sure that there is nothing on the USB stick if there is then delete It so it reads empty. Then when you get to where it says open don’t.
On the same bar it should say save press the arrow at the side and save it to where you want Say my documents.
Then right click on the file where you saved it to and copy.
then put your USB stick in the computer open the stick and press paste.
Then follow the instructions on brothers site to install it on your Scan N Cut.
Hope this is helpful.
Keith
LikeLike
As I work mainly in textiles I wonder if the Scan n Cut will cut through craft (pelmet) Vilene, Lutradur 70 weight and iron on medium weight interfacing.
I could send some samples of these materials to try :)
LikeLike
I don’t know is my honest answer. If you can email me some details and I will try and source some locally and test it.
LikeLike
Thank you. is your emailon your blog ?
LikeLike
Yes, there’s a link right at the top (looks like an envelope)
LikeLike
Hi all
Have had some time to have a play, I think the cut is very very good, but have only been cutting a few lightweight items. Cut out a heart shape using double sided adhesive and this was really good used pressure -1 and this worked perfect for a kiss-cut. I used flocking powder on the adhesive and got really good results. The glitches I have had are, low tack mat not sticky enough for items and then standard mat too sticky card-stock leaving a layer on mat,(to get it off I dampened the stuck paper and it the. Came away with the spatula). I’ve tried cutting out some printed sheets from a craft CD – very hit and miss with the scanning – bit disappointed by this. I’ve also been wasting a lot of time trying to get box templates to scan and cut out, loads of problems with this. When resizing the finished item did not match up properly, scoring has been a problem – no scoring lines etc. I’ve tried to use some silhouette patterns for the boxes but I’m having problems converting the cut item shape into a shape I can print – that’s me I’m sure.
My brother wish list is for a Downloadable small box templates and of course more images in library.
If John and Mel had not spent so much time on showing use the machine I am certain I would have come up with a brick wall when trying out functions, but I think I have worked out how to do most things.
LikeLike
Hi John. I finally received my Scan N Cut Yesterday. I find the Cut amazing and the Best Cut of any Cutting Machine like Mel said. I like how sturdy and solid the Scan N Cut Machine is yet still reasonably Light Wait. My only disappointment is the machines inability to cut Decoupage successfully and in Colour. What would be the perfect Craft Print and Cut Machine would be a combination of the Brother Scan N Cut and the Print and Cut Features of the Silhouette Cameo that can Cut Decoupage in Colour. I am sure Brother’s vast experience with Printing Machines would make this a sure future possibility for them to produce. Boy ! What a Product that would be. Edna
LikeLike
Had problems today updating my machine. Have asked Brother for help. Hope they get back to me soon. Followed the instructions (which I thought were very clear) but :( no joy. I am sure it is just an age thing (ME). :)
Julia
LikeLike
YIPPEE!!!!
Mine arrived this afternoon and for my first experiment I decided to trace on standard parchment! I only tried one of the pre-installed flowers and it was perfect, just as if it was traced with the finest pencil or the lightest pressure with a scriber. Settings. Blade at a half, pressure 0, standard mat. Now to try something else.
LikeLike
Tracing design on 160gsm parchment for parchmen craft. Blade 2, pressure 0 and speed 5. That give a nice scratch on the parchment without cutting through. Obviously flip the pattern before tracing as the tracing/scratching is on the back of the parchment.
LikeLike
Got my scanncut Saturday, cuts a dream, but couple of issues.
I cannot get on to complete my registration on canvas website as not received an email to verify it…is there an email I can contact Brother to sort it, I have left messages on fb pages but no response American Brother said contact Brother UK, no response :(
Also is there a glitch on the label shape AR-K016 instead of smooth curved edges on one side I get a straight edge tried few times, but still odd!
Wondered if you could help, thanks in advance. Jo :)
LikeLike
Hi Jo, I am sure that Brother will be in contact with you soon. As for the shape, I am not aware of any issues; it would be a good idea to raise this with them when they contact with you about the other issue though if you feel that there is something wrong.
J :)
LikeLike
Brother have been in touch, I’ve sent them my contact details, hopefully here back from them about other issue.
I updated my machine last night just to see if that helped anything, oddily it did and this morning successfully cut a proper shape, how very odd, hey! Thanks for you help Jo :)
LikeLike
Great news!
LikeLike
I’ve had the emails, dispatched, with carrier, so I think it’s on its way, hopefully by the weekend.
Thank you John for all your amazing work and tips and ideas, am looking forward to now actually getting started, putting your words, your ideas into practice.
Keep up the wonderful good work you are doing.
LikeLike
I have been trying to scan and cut,I have 13recorded programs I though ah I will go look at them,hubby said 13 will l see the TV this evening lol,lucky the first one l played had just the info l required,thank you john from me and hubby lol
LikeLike
John
Got my machine today as did my friend and had great fun setting it up and playing. However when we tried to weld our names we came a cropper. We selected the whole name and tried to weld it this did not work then we tried selecting each letter individually and then tried to weld them together this did not work. We know we there is something simple that we are not doing can you please advise. I have so enjoyed you and Mel demonstrating the machine on Create & Craft. Thanks in anticipation.
Margaret
>
LikeLike
If you want to weld letters you need to load them onto the mat individually rather than typing the whole word. All of the letters will need to overlap in order to weld them.
LikeLike
Hi John,
I got my cutting machine today and, as everyone else has, opened it and started playing! As expected the quality of the cuts is brilliant and i am very happy, however after cutting out of 2 sheets of C&C 12×12 glittercraft cardstock, my standard mat is no longer tacky – is this the expected lifespan for use with glitter card? #littlebitdisappointed
Thanks,
Sue
LikeLike
The mats are initially extra tacky however they should remain usable for quite some time. One tip would be to rub down your Cardstock with the the spatula or a Brayer if you have one.
LikeLike
The problem is that the mat is covered with glitter from lifting cut shapes off using the spatula.. I had already tried using my brayer before I emailed you for help – it doesn’t make any difference how hard I press, the mat just isn’t sticky enough to hold anything – and it was the first 2 items I cut! I think there should be a warning about not using create and craft glitter cardstock on the mats! I am so disappointed!
LikeLike
It is never recommended using glitter card that doesn’t have the glitter encapsulated in any electronic cutting machine as the glitter can shed onto the mat, and also into the workings of the machine.
It is recommended that people use the standard mat (the one with the purple strip on it) for cardstock of 250gsm+ (although I note that you don’t say which mat you are using so just assuming that you may be using the low tack mat by mistake).
It is also advised that you use the back of the spatula or a brayer (or similar – whatever you have) to rub the cardstock down onto the mat to make sure that all of the card comes directly into contact with the adhesive of the mat.
I hope that this helps in some way.
J :)
LikeLike
Hi John
I have just received my brother scan and cut. Can I scan larger images on the 12×24 mat. What larger mat is best for cutting card. Thanks Jill
LikeLike
Hi Jill,
You can only use a 12″ x 12″ scanning area to can in images at this time.
If you wish to use cardstock for cutting it would be the standard mat, the one with the purple strip on the bottom.
J :)
LikeLike
Hi John, noticed that a couple of people have asked the same question about the larger scan, have bought the large mats 12 x 24 as well, wondering now if that was a good idea ?, perhaps in one of your next shows you or Mel could show us what you can use the larger mat for,
Happy crafting,
Ronnie
LikeLike
Thank You John for your quick reply. Shame I cannot scan in my template yet but I am sure I will have lots of fun with the machine. Jill
LikeLike
Need not have worried mine came this afternoon, luckily an appointment I had for tomorrow has been cancelled, so how shall I spend my time !!!!! I have cut a couple of shapes out already but thought the mats were of very sticky by then I am use to the silhouette.
LikeLike
Oops first cut on cotton fabric – test cut went straight through mat :( followed instructions from Quick reference guide blade 4 pressure 4 way too much – mat has hole in!
LikeLike