So I’ve had mine for a couple of months, and it’s now only just over a week until the Brother Scan N Cut machines start shipping from Create and Craft TV so I thought that I would try and do a post per day this week to try and bring you up to speed with all of the things that I have tried, tested and discovered since I have had more time to work with it and to hopefully give you a head start for when yours arrives.
Most of the things that I will cover in this series of posts will also go on to cover a lot of the questions that you have sent to me via Facebook, Twitter and also this blog (thank you for all of those – you have kept me very busy indeed!)
First up I should say that I will be covering Working With Fabric and also The Brother Canvas design suite in more depth in separate posts later in the week, so if these interest you, please don’t forget to subscribe to this blog for email updates of when these posts are released.
Anyway, lets make a start …
Q: How Intricately Can The Machine Cut?
There are going to be a number of variables here.
- Complexity of design.
- Strength of medium being cut.
- Line Weight.
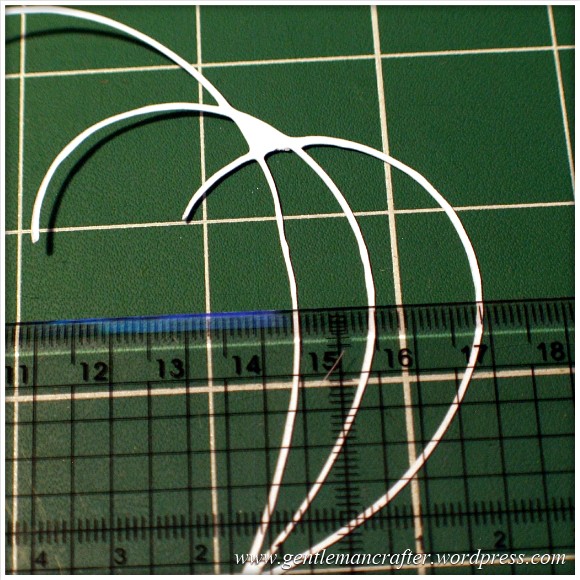
I decided to do quite a basic test for this post. I drew a few curved lines with an 0.5mm Pigma Micron pen and then used the Scan To Cut Data option.
I used a lightweight cardstock to test the cut.
This is the result.
I did increase the size of the scan by about double in this test so the lines that were cut were approx 1mm thick as you can see here.

The machine even picked up the varying line thickness of the ink against the textured paper which I think was quite cool.
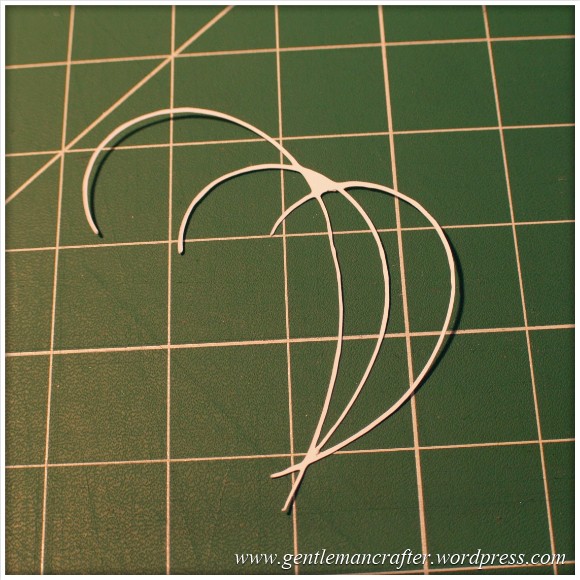
Anyway, here are the two side by side.

Conclusion: Not a bad result. I would however recommend starting bigger and decreasing the image rather than starting with a small image.
Also, unless ‘freehand’ is the look that you are going for, you will want to be fairly precise and use a ruler, french curve or other guide against which to draw your lines when hand drawing the design.
I used the standard mat as I was using cardstock. You will need to be very careful when removing intricate designs from the mat in order to prevent them from tearing – or perhaps do your design so that there are lots of overlapping lines so that there is more ‘structure’ to the overall design.
Q: Do I always have to stamp or print in black?
No. You can use most colours as long as there is a good contrast between the colour and the paper against which it is printed. Here is an example where I used four different colours to stamp a flower.
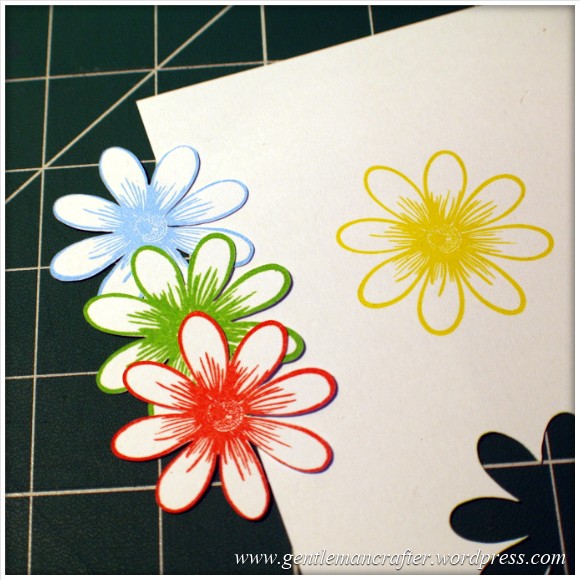
As you can see, the machine picked up three of the colours very well but sadly did not recognize the yellow as there wasn’t enough contrast between it and the paper (in all fairness, this image makes it look a lot brighter than it is in real life – even I was having trouble recognizing it with my eyes).
Conclusion: You don’t have to always print or stamp in black but should consider using ‘bolder’ colours to create the outlines for things that you wish to scan and cut.
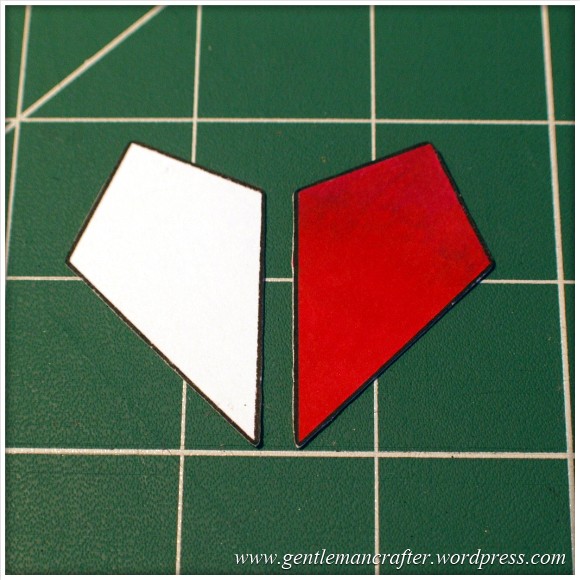
Q: Do I have to colour my stamped images in after I have cut them or can I colour them before using the Direct Cut feature?
You can do either, but will need to remember the point above about having a good contrasting outline for the machine to recognize.
Here is the test that I did. One of the kite shapes was coloured (with a graduation of reds from my Spectrum Noir pen set) and the other was left blank.
I also did the Direct Cut process on these shapes at the same time (i.e. I didn’t do one sheet coloured and then one plain).
One point though, you will need to be a tidy colourer if you are going to colour before cutting. You can see in the next image how I went over the line and the machine thought that this was part of the outline.
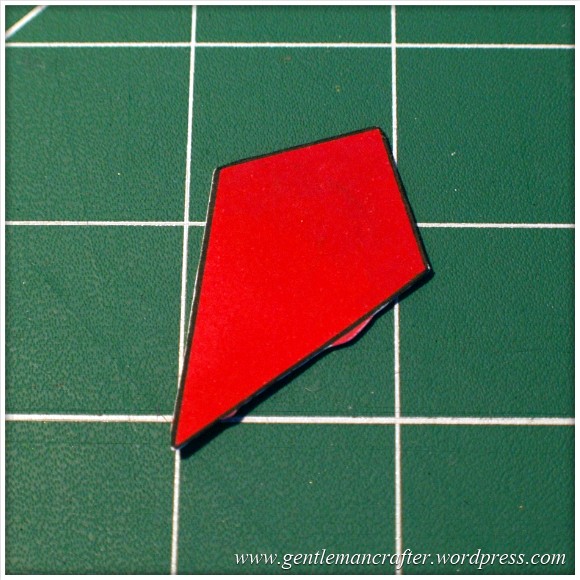
Conclusion: It should not matter if you are colouring before or after the cutting process takes place as long as you have a nice solid outline to the image for the machine to recognize – but stay inside the lines if you plan to colour first! (Lol, flashback to colouring as a child then…)
Q: Can I Use The Direct Cut Feature To Cut Out A Stamped Image That Has Been Heat Embossed?
Yes* (I put the asterisk thing here for two reasons, one, I have only tried it twice and it may depend on a number of things).
The first time that I tried it I used black embossing powder and there were a few flecks out of place. This test did not work.
The second test that I did I used clear powder over a coloured impression. This one work perfectly as you can see here …

Conclusion: I haven’t really done enough testing to give it a 100% tick but initial results look good and testing will be ongoing and I will report back on more results in the near future.
Q: Can I Use A4 Cardstock And Scraps Of Paper And Card?
Yes. Just use the scan preview feature on the cutting mat screen to see where they are on your mat and then you can position your shapes precisely where they need to be – as shown in this image (which could be better – I really need to figure out a way to photograph this screen better).

Q: What Things Will The Machine Cut?
Oy! This list could go on forever! Ok, here are a few that I have tested and seen to work.
- Copy Paper, Vellum, Parchment
- Light (160gsm), Medium (220gsm) and Heavy (350gsm) Cardstock
- Mirror Card, Pearlescent Card, Satin Card
- Crafters Chipboard
- 100% Quilting Cotton Fabric
- Felt (with a fused backing applied)
- Lightweight Faux Leather
- Oil Cloth
- Denim
- Thin Magnetic Sheet (like the kind you print onto to make family photo fridge magnets)
- Shrink Plastic
- Doeflex Template Plastic
- Modelling Sheet (A thin plastic sheet that is maleable when heated).
- Acetate
- Project Acetate
- Craft Metal
Phew, and that’s just a few things!
Conclusion: It’s VERY versatile and will work with you no matter what craft you are into.
Q: Can I Export A Design That I Have Scanned Into The Machine And Then Edit The Lines In The Canvas Design Suite?
Yes. You can see the example below of the scanned image that I used earlier to test intricacy loaded up into the Canvas design suite and the line editing tools selected.

Q: Can the Brother Scan N Cut cut out sheets of printed decoupage?
Probably one of the most frequent questions that I have had.
Tests have been inconclusive. Whilst theoretically possible, it is proving more complex in practice.
As the machine recognizes outlines via contrast between areas of a page, when you have a complex design with multi tonal areas (i.e. a countryside scene or flower) the machine will always do it’s best to find as much as possible but doesn’t always detect the entire outline. In addition, as we would only really want to use the direct cut function, this would not recognise landlocked areas.
There is potentially a way by using an acetate overlay that you can give the machine a helping hand to recognize the overall outline, but again, not sure it would work with landlocked areas. You can see the process I mean by watching this video.
I don’t for a minute believe that it is a fault of the machine, as it has been doing exactly what it was designed to do which was recognize areas of contrast. Instead I think that this might just be a dream featured that has been transposed onto it by our combined desire not to have to cut out all of those fiddly bits.
Conclusion: Tests still ongoing.
Now for some quickfire questions.
Q: Can I ‘Direct Cut’ Multiple Stamped Images In One Operation?
Yes.
Q: Can I Cut A Shape Within A Shape To Create An Aperture?
Yes. Just position them one on top of the other in the design screen on the machine and cut as normal.
Q: Can I Weld A Word Into An ‘Aperture’ So That The Word ‘Hangs’ In The Aperture?
Yes, but you will need to do this in Canvas Workspace and will first need to “subtract” one shape from another to form a frame with an aperture in it before attempting to weld a word into a frame.
Coming Up…
Ok, That pretty much concludes this ‘test lab’. There is clearly much to explore with this machine so I will be doing more in the Test Lab series in the future.
Here are just some of the questions that I have not yet tested but will be looking at in the future …
- Scanning Multi Coloured images
- Direct Cutting With “Busy” images
- Direct Cutting with light ink on dark card
- Can I Cut ‘One Stroke’ Paintings
- 3D creations
- Will it cut foiled designs
- Is there a score/perforate feature?
- Can I cut Zentangle designs?
- What is the test cut button for?
- Can I cut swing cards?
- Is it possible to cut boxes?
I also have other posts planned for this week that will cover using fabric and using the Brother Canvas design suite.
Right, well thanks for reading and I hope that it has helped you in some way.
Look out for more on the Brother Scan N Cut this week.
As ever, if there are any questions that you would like me to add to the list then please feel free to use the comments section below.
John :)

hi John got my machine today, wow I’m so impressed it took seconds to upgrade and my first cut was perfect it even cut out a 1/4” butterfly complete with antennae that was too near main image to isolate. I would like to thank both you and Mel for the wonderful demos, I was able to use it straight from the box and that’s down to you and Mel
Andrea x
LikeLike
A very good morning to you John, mine is on its way, I dare say there will be a few tears and tantrums as I work through getting used to the machine. I am a Kinetic learner and have to do something to learn it. I do hope the instructions are as clear as you say. Husband is at home today and he is not a crafter but as its a new toy he will want to have ago, this will add to my tensions if I’m still same at the end of the day I will let you know how I get on. Thanks for all your demos .
jackie
LikeLike
Hope it goes well Jackie :)
LikeLike
Have been trying more fabric cutting today. I first drew two wavy lines across and two down on an A4 sheet of paper, making a wonky nine patch. First of all I used a .05 drawing pen but the scanner didn’t like it and picked up all sorts of other shapes as well so I went over the lines again with a broad black felt tip pen. This time the scan was successful so I saved it to the machine. The fabric was backed with the bonding sheet provided and the cut was perfect on the standard mat, blade on 3 and 0 pressure. The result was a wonky stain glass design when the shapes were laid slightly apart on black fabric. it dawned on me that if I repeated the cutting twice more with two different fabrics I would be able to swap the colours around between the three sets to get three multi coloured stain glass blocks. Rushing out tomorrow to buy some Heat & Bond Light!
LikeLike
Hi, new to cutting machines and have watched you and Mel avidly! My SNC arrived and I found that my standard blade does not appear out of the hole at the bottom of the holder until No. 5 on the dial. Is this normal or just bad calibration on the holder! The deep cut blade seems OK and appears between 1 and 2.
LikeLike
Hi, I had the same problem until my husband pointed out that I needed to screw the blade right on then turn it back to the number I wanted. I can tell you I felt a right plonker as I was moaning that it didn’t work
LikeLike
Hi, I did that more than once and it is still out of sync.
LikeLike
Hi John, I got my machine yesterday and have been playing ever since, love it !! The only problem I have is that the scanned image and the cut image don’t seem to be in sync, it cuts into the bottom line of any image and above the top line of the image. I have tried the scan to cut data and direct to cut with the same result, I have taken the delete margins down to 0.04 ( can’t seem to go any lower) which has helped a bit, but still have the problem. Any ideas for what else I can try?? Thank you to both you and Mel for all the invaluable info you have passed on to us all.
LikeLike
Hi John
I recived my Scan NCut machine on Friday I spent 6hrs trying to scan decoupage sheets for my card making it is only scanning part or not at all also I tried stamping images on a sheet and again this did not work I have watched the show I noticed everything is demonstrated but not decoupage asit was stated it cuts decoupage and that is why I bought the machine I contacted customer service but not much help told to send it back any idear what the problem can be
LikeLike
I’m not sure who mentioned that it could cut decoupage however I have never stated that it will. I have repeatedly clarified that it will be down to the contrast levels in the design but that the machine, if it can’t find the complete outline will always try and find something, which it sounds like it is doing. There is a video on the create and craft website which shows a transparency overlay technique that you might like to watch.
LikeLike
Thanks John
I did stampling and that didn’t work but I will look at the web site thaks again
LikeLike
Which stamp did you use? If you email me a pic I could maybe advise why it might not have worked.
LikeLike
From previous shows that I have watched John demonstrating on I had understood the decoupage to be an iffy subject and not confirmed. I have played today and as John says it is very much a contrast thing. I have had wonderful results with a decoupage of very dark colours on a white background (a sports car with no background). Cut it really sharply and only missed one bit. But rubbish on (let’s be exact) a La Pashe petite sheet. These tend to be quite pale on the outer edge so it picks up on only the dark bits and discards the rest. I’m still a happy bunny. Have done a lot of stamping and outline cut them all ready for colouring. And my son has just started a school project on ScanNCut Canvas.
LikeLike
Hi John.
Mine arrived yesterday and have enjoyed playing with it. Have just been watching you live to get more tips and ideas. I think I asked the original question about decoupage. This came up on an e-mail today and you gave the name of a lady who had posted a picture of a decoupage card. Hazel Bainbridge. despite a couple of hours looking I can’t find this and would really like to have a nose. Have I spelt the name right.I too am having problems with card and paper peeling. Am using the standard mat and have tried different card.
Lynne G
LikeLike
P.S. Hey Jane my mojo did a runner at Christmas. Am with you on it returning with that lovely big brown box and a nice delivery man.
LikeLike
Here is the link https://www.facebook.com/TabbyKat47/posts/10202299782768116:0
LikeLike
Hi J. I have had the same problem with my Account at Create and Craft and was worried about my Scan N Cut Order. But mine is being Delivered to-morrow. I will let you know if I receive it ok. Edna
LikeLike
Good to hear that it’s on it’s way. This blog is in no way officially connected to Create and Craft so I can lot discuss any customer queries without breaching data protection act. Hope you understand.
LikeLike
I am getting concerned that when I log into my account to check the progress of my order there are n details there, really hope my SNC will be despthced shortly.
LikeLike
Beverly, this blog is not monitored by Create and Craft as it’s my personal blog. I would recommend contacting them via customer services or via Facebook or Twitter.
J :)
LikeLike
My scan n cut arrived yesterday afternoon and with it my mojo which has been sadly absent for the past few weeks!! I have managed to do a card with the text hanging in the middle. I did this using the Silhouette software, I discovered that the text has to be white and the background black as this is what will be cut out. I printed the design and scanned it rather than try to convert it! After a few trials and errors, success. Thanks to you and Mel who have enabled all of us to get straight in without having to study the instruction book for days! I also found it quite difficult to remove the first few attempts but now I am not having any problems. I think I may have been just a bit too over enthusiastic when sticking the card to the mat! xx
LikeLike
You can also do this very easily in the Canvas online program .. if you’re used to working in Silhouette Studio the idea is very similar and you don’t have to convert just save to your USB .
LikeLike
Hi John
Just a few questions?
Can the memory be upgraded ?
What’s it size
Is it possible to ask if Brother will produce a blade that can cut at a 45 degree angle to cut mount board for frames?
Thanking you in advance
Bob
LikeLike
I will feed your questions on to Brother. Please do check the manual, brother’s website and support area as your some of your questions may have already been documented.
J :)
LikeLike
I received my Scan N Cut today and have been trying it out. The standard mat seemed extra sticky and the light card I used (the one that goes through my printer) stuck to the mat although it cut out the design I couldn’t get the card off without tearing it. Any advice? I only had the blade on 1 and pressure on 0
LikeLike
You should have used the other less sticky mat for copy paper and light weight paper. Hope this helps.
LikeLike
I had the same problem with the standard mat. I cleaned mine by spraying with a little waster, scraping excess paper off and letting mat dry naturally. Good as new.
Hope this helps.
May have to de-tac a little before using again, am currently using low tack mat.
LikeLike
My scan n cut arrived yesterday,today l have cut wall decor letters ,birthday cards,waiting for my scan mat,but very pleased with the cut,watched john today and picked a few things up,the machine is easy to use far better than the cutting machines l have x
LikeLike
:) :) received my machine this morning. I have been having a little play just cutting shapes from the patterns within the machine just on coloured 135gsm paper/card. Blade 3.5 Cut Pressure -1 Speed 3. ALL been fantastic clear cuts. NO problem with mat too sticky, I used the low tack mat. Copied a ‘H’ on a banner from project book, easy to follow. Getting late now so will try some different materials tomorrow. All GOOD :) Fab machine so far. :)
Julia
LikeLike
I know there are updates for PC but can’t find one for the mac, can you point me in the right direction please
LikeLike
I don’t quite follow, the update should be for the machine which is neither. (I haven’t done mine yet).
LikeLike
I make dolls clothes. Is it possible to scan in selected tissue patterns and then cut the fabric? Would I need to go over the patterns in a black pen for the scanner to read it?
LikeLike
If they are your own designs then yes. I would however recommend using the scan mat and NOT a sticky cutting mat.
If you have bought the patterns it might infringe the copyright by scanning, storing and re-using the design in this way so you would need to seek advice from the patter creator.
LikeLike
Very very new to all of this, just posted to the wrong place so that is not a good start, posted on your Facebook page, did not know it should have been here. Ah Well!!! live and learn. My Brother Scan N Cut has arrived today, yes today, it is here and oh! I am scared to death, it looked so easy watching it on TV but well, I am scared to have a go. I see that a few others have received theirs too, what a nice surprise did not expect it until late next week.
LikeLike
Im still awaiting mine not expecting to receive it till next week ask ordered about a fortnight after launch.Enjoy I’m off to find the link about the cameo library.
LikeLike
I don’t know if this is allowed although I can’t see it would harm anything. In the absence of a scanning mat for the time being I used a 12″x12″ transparent scrapbook sleeve this morning to hold an A4 sheet to be scanned. I pressed the sleeve firmly to the standard cutting mat and then was able to slip the sheet safely into the sleeve. It scanned perfectly(extra bonus – no flappy bits to worry about!) I’m watching every day for the scanning mats to come in but in the meantime is this a possible answer?
Jenny x
LikeLike
Should be Ok. I was running a sheet of card, paper and acetate sandwhich through the machine this morning. Your solution might work well if you are worried about finer pieces of paper getting to “stuck” on the mat.
J :)
LikeLike
Hi there, received my scan n cut yesterday. When it arrived it was open and the box was damaged. The courier could see how disappointed I was. Thought I had to reject delivery. He allowed me to open it and check it all out before I signed for it. Phew all was okay, worked perfectly and all parts intact. Bless the courier, wonderful man. Looking forward to playing with my new toy, but alas work intervenes. Roll on Monday, three days of playing. Thanks Mel and John for all your help and information, from a avid crafter.
LikeLike
Delighted with my scan n cut machine which arrived yesterday, unfortunately I had exactly the same experience with a badly damaged open box, one corner very soggy, when I looked inside my inner box was perfectly dry. I must say it is like Christmas all over again. Thank you to John and Mel for fantastic informative shows, most appreciated and ver helpful.
LikeLike
Hi John, I received my ScanNCut this morning and am really pleased with it. I am looking forward to using it for both paper crafting and fabric crafting.I would just like to thank you and Mel for all your demonstrations and hard work over the last few weeks to make things easier for all of us. If my first cuts are anything to go by it is going to be a doddle thanks to the knowledge I have gained from you both.
Thank you
Sylvia x
LikeLike
Glad to hear that you are enjoying it :)
LikeLike
I received my machine at 8 o’clock this morning! What a lovely surprise! By 9.30 I had cut the first shapes in paper and by lunchtime had scanned and saved some images from my Cameo library (following Maureen Campbell’s reply to my comment on Feb 4th, which works beautifully, thank you Maureen!) All very straightforward. This afternoon it was time to bite the bullet and try some fabric (the main reason I bought the machine). After a couple of cups of coffee and a few deep breaths to calm my nerves, I ironed on the bonded backing provided in the pack to a small strip of fabric and after following the instructions to choose the design etc. duplicate it three times and then scanning to see the position of the fabric on the mat, I arranged the designs on the “fabric” and waited with baited breath for the result…..absolutely perfect cutting! I am so impressed. I have cut fabric on my other machine and never had such good results as this. It will be wonderful for applique designs and it really is so easy to operate. I couldn’t be more pleased. Thank you for all the advice.
LikeLike
I felt your nerves there. I’m so glad that you are happy with what you have achieved. There’s no stopping you now!
J :)
LikeLike
Hi Jenny. Is it possible for you to please Email me the Instructions Maureen Campbell sent to you. Onhow to Scan and Save Images from your Cameo Library into the Scan N Cut.
LikeLike
Edna, not sure you would want your email address listed here for all to see so I have edited it out. The steps to take (from Jenny) are listed in Jenny’s comment on this blog, perhaps print these out or copy and paste them to a document on your PC?
J :)
LikeLike
Hi Edna. Maureen Campbell posted the answer to your question on Feb 4th. Just go to “older posts” and you should be able to find it.
Jenny
LikeLike
Hi Jenny. Care to share Maureen Campbell’s method of Scanning Images from your Cameo Machine into the Scan N Cut. Edna
LikeLike
GOOD NEWS I RECEIVED MY SCAN N CUT TODAY only been using it for a few hours
but so far its GREAT don’t think I will be in bed before midnight
LikeLike
Got my Scan N Cut today, set it up and did a test to cut out one of the patterns. I used glossy photo paper. It cut out ok but that was not the problem. The paper just stuck to the cutting mat (I used the correct mat) and on trying to remove it the paper just tore and left a residue of paper stuck to the mat, which I can’t get off. It looks as though I’m going to have to get another cutting mat already.
Any ideas please?
LikeLike
Pauline, all comments on this blog will be publicly visible so I have removed the address that you listed for your privacy.
In relation to your comment, when removing paper or cardstock from the mats (especially when new) please remove them slowly to avoid ripping. In order to potentially restore your mat, gently tease off the bits that are on the mat with the spatula (included) and then if there are any tiny bits left, use a lightly damp cloth to rub over and ball up.
You should then still be able to use your mat.
J :)
LikeLike
Thank you :) x
LikeLike
Jean A.
I have just received my Brother Scan N Cut machine. Brilliant.
LikeLike