So I’ve had mine for a couple of months, and it’s now only just over a week until the Brother Scan N Cut machines start shipping from Create and Craft TV so I thought that I would try and do a post per day this week to try and bring you up to speed with all of the things that I have tried, tested and discovered since I have had more time to work with it and to hopefully give you a head start for when yours arrives.
Most of the things that I will cover in this series of posts will also go on to cover a lot of the questions that you have sent to me via Facebook, Twitter and also this blog (thank you for all of those – you have kept me very busy indeed!)
First up I should say that I will be covering Working With Fabric and also The Brother Canvas design suite in more depth in separate posts later in the week, so if these interest you, please don’t forget to subscribe to this blog for email updates of when these posts are released.
Anyway, lets make a start …
Q: How Intricately Can The Machine Cut?
There are going to be a number of variables here.
- Complexity of design.
- Strength of medium being cut.
- Line Weight.
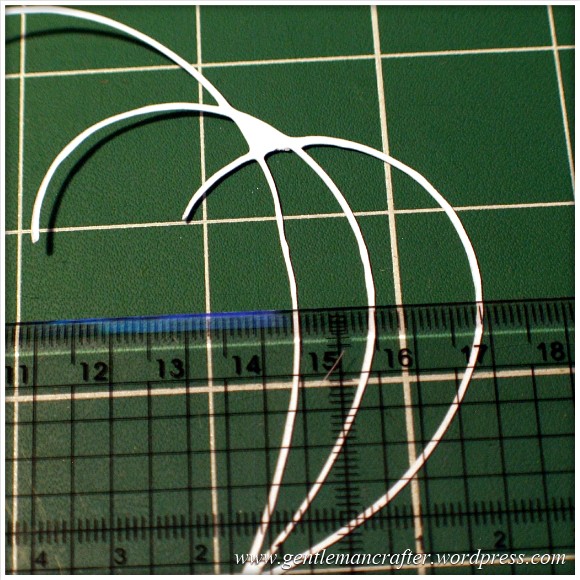
I decided to do quite a basic test for this post. I drew a few curved lines with an 0.5mm Pigma Micron pen and then used the Scan To Cut Data option.
I used a lightweight cardstock to test the cut.
This is the result.
I did increase the size of the scan by about double in this test so the lines that were cut were approx 1mm thick as you can see here.

The machine even picked up the varying line thickness of the ink against the textured paper which I think was quite cool.
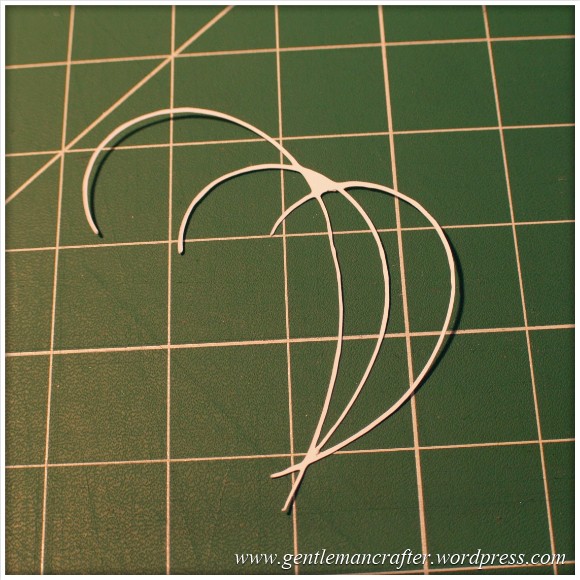
Anyway, here are the two side by side.

Conclusion: Not a bad result. I would however recommend starting bigger and decreasing the image rather than starting with a small image.
Also, unless ‘freehand’ is the look that you are going for, you will want to be fairly precise and use a ruler, french curve or other guide against which to draw your lines when hand drawing the design.
I used the standard mat as I was using cardstock. You will need to be very careful when removing intricate designs from the mat in order to prevent them from tearing – or perhaps do your design so that there are lots of overlapping lines so that there is more ‘structure’ to the overall design.
Q: Do I always have to stamp or print in black?
No. You can use most colours as long as there is a good contrast between the colour and the paper against which it is printed. Here is an example where I used four different colours to stamp a flower.
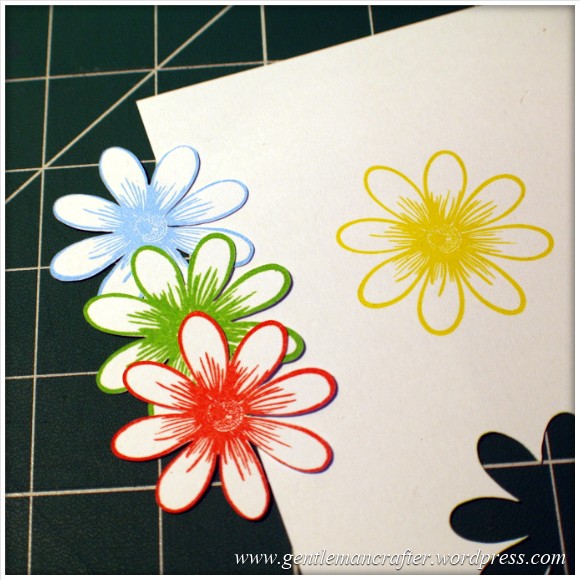
As you can see, the machine picked up three of the colours very well but sadly did not recognize the yellow as there wasn’t enough contrast between it and the paper (in all fairness, this image makes it look a lot brighter than it is in real life – even I was having trouble recognizing it with my eyes).
Conclusion: You don’t have to always print or stamp in black but should consider using ‘bolder’ colours to create the outlines for things that you wish to scan and cut.
Q: Do I have to colour my stamped images in after I have cut them or can I colour them before using the Direct Cut feature?
You can do either, but will need to remember the point above about having a good contrasting outline for the machine to recognize.
Here is the test that I did. One of the kite shapes was coloured (with a graduation of reds from my Spectrum Noir pen set) and the other was left blank.
I also did the Direct Cut process on these shapes at the same time (i.e. I didn’t do one sheet coloured and then one plain).
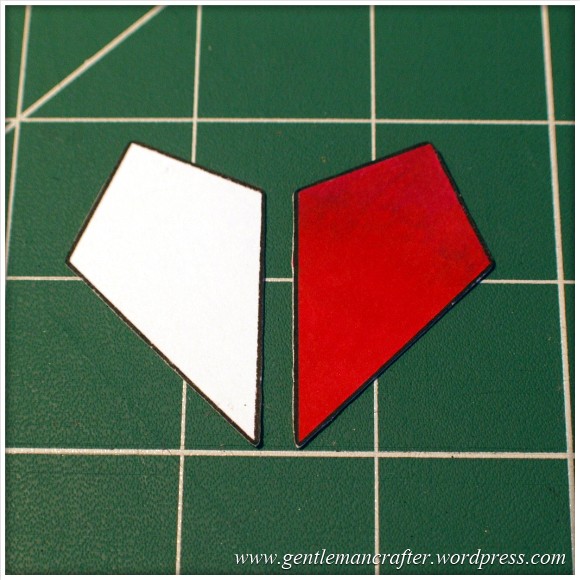
One point though, you will need to be a tidy colourer if you are going to colour before cutting. You can see in the next image how I went over the line and the machine thought that this was part of the outline.
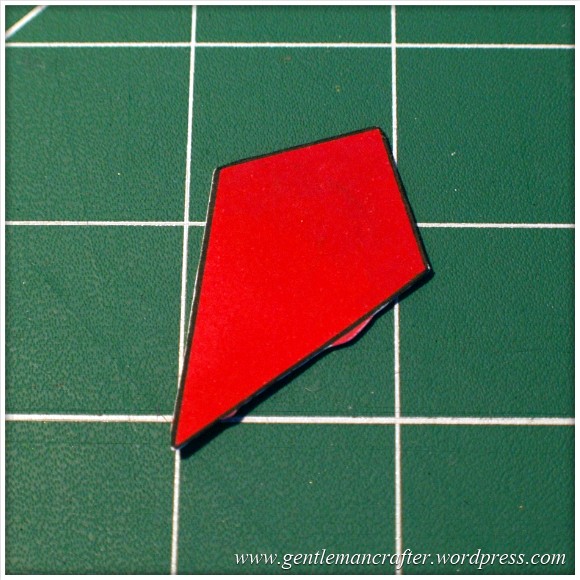
Conclusion: It should not matter if you are colouring before or after the cutting process takes place as long as you have a nice solid outline to the image for the machine to recognize – but stay inside the lines if you plan to colour first! (Lol, flashback to colouring as a child then…)
Q: Can I Use The Direct Cut Feature To Cut Out A Stamped Image That Has Been Heat Embossed?
Yes* (I put the asterisk thing here for two reasons, one, I have only tried it twice and it may depend on a number of things).
The first time that I tried it I used black embossing powder and there were a few flecks out of place. This test did not work.
The second test that I did I used clear powder over a coloured impression. This one work perfectly as you can see here …

Conclusion: I haven’t really done enough testing to give it a 100% tick but initial results look good and testing will be ongoing and I will report back on more results in the near future.
Q: Can I Use A4 Cardstock And Scraps Of Paper And Card?
Yes. Just use the scan preview feature on the cutting mat screen to see where they are on your mat and then you can position your shapes precisely where they need to be – as shown in this image (which could be better – I really need to figure out a way to photograph this screen better).

Q: What Things Will The Machine Cut?
Oy! This list could go on forever! Ok, here are a few that I have tested and seen to work.
- Copy Paper, Vellum, Parchment
- Light (160gsm), Medium (220gsm) and Heavy (350gsm) Cardstock
- Mirror Card, Pearlescent Card, Satin Card
- Crafters Chipboard
- 100% Quilting Cotton Fabric
- Felt (with a fused backing applied)
- Lightweight Faux Leather
- Oil Cloth
- Denim
- Thin Magnetic Sheet (like the kind you print onto to make family photo fridge magnets)
- Shrink Plastic
- Doeflex Template Plastic
- Modelling Sheet (A thin plastic sheet that is maleable when heated).
- Acetate
- Project Acetate
- Craft Metal
Phew, and that’s just a few things!
Conclusion: It’s VERY versatile and will work with you no matter what craft you are into.
Q: Can I Export A Design That I Have Scanned Into The Machine And Then Edit The Lines In The Canvas Design Suite?
Yes. You can see the example below of the scanned image that I used earlier to test intricacy loaded up into the Canvas design suite and the line editing tools selected.

Q: Can the Brother Scan N Cut cut out sheets of printed decoupage?
Probably one of the most frequent questions that I have had.
Tests have been inconclusive. Whilst theoretically possible, it is proving more complex in practice.
As the machine recognizes outlines via contrast between areas of a page, when you have a complex design with multi tonal areas (i.e. a countryside scene or flower) the machine will always do it’s best to find as much as possible but doesn’t always detect the entire outline. In addition, as we would only really want to use the direct cut function, this would not recognise landlocked areas.
There is potentially a way by using an acetate overlay that you can give the machine a helping hand to recognize the overall outline, but again, not sure it would work with landlocked areas. You can see the process I mean by watching this video.
I don’t for a minute believe that it is a fault of the machine, as it has been doing exactly what it was designed to do which was recognize areas of contrast. Instead I think that this might just be a dream featured that has been transposed onto it by our combined desire not to have to cut out all of those fiddly bits.
Conclusion: Tests still ongoing.
Now for some quickfire questions.
Q: Can I ‘Direct Cut’ Multiple Stamped Images In One Operation?
Yes.
Q: Can I Cut A Shape Within A Shape To Create An Aperture?
Yes. Just position them one on top of the other in the design screen on the machine and cut as normal.
Q: Can I Weld A Word Into An ‘Aperture’ So That The Word ‘Hangs’ In The Aperture?
Yes, but you will need to do this in Canvas Workspace and will first need to “subtract” one shape from another to form a frame with an aperture in it before attempting to weld a word into a frame.
Coming Up…
Ok, That pretty much concludes this ‘test lab’. There is clearly much to explore with this machine so I will be doing more in the Test Lab series in the future.
Here are just some of the questions that I have not yet tested but will be looking at in the future …
- Scanning Multi Coloured images
- Direct Cutting With “Busy” images
- Direct Cutting with light ink on dark card
- Can I Cut ‘One Stroke’ Paintings
- 3D creations
- Will it cut foiled designs
- Is there a score/perforate feature?
- Can I cut Zentangle designs?
- What is the test cut button for?
- Can I cut swing cards?
- Is it possible to cut boxes?
I also have other posts planned for this week that will cover using fabric and using the Brother Canvas design suite.
Right, well thanks for reading and I hope that it has helped you in some way.
Look out for more on the Brother Scan N Cut this week.
As ever, if there are any questions that you would like me to add to the list then please feel free to use the comments section below.
John :)

cant wait till mine arrives..question…when the pens and pen holder are back in stock…can you use promarkers and any other pens in the holder..as this has not been mentioned in any of the shows
LikeLike
At this time the pen holder is only designed for the pens that are made by brother.
LikeLike
Thank you for being so helpful, I like the rest ordered mine day it was launched and can’t wait for it to arrive, you and have made it all the better for us to get straight in when it arrives, I look forward to reading your posts.
Jeannette
LikeLike
Dear John, I’m loving the information on your blog about the Brother Cut N Scan and the programmes on Create and Craft which I’m trying to record them all. Mel keeps talking about her blog but I’m unable to find it. Please can you tell us so that we can follow you both. :)
Thanks
Enid
PS. already ordered and paid for from Create and Craft – so excited!
LikeLike
Just type Mel Heaton Paper Dreams into Google and you should find it.
LikeLike
Thanks, will do.
LikeLike
Hi John thank you for all your great posts and shows on the Brother cut and scan machine. I ordered mine the day it was launched and have been excited ever since and can’t wait for it’s arrival next week. Is it possible that you could roughly give me the dimensions for the machine as I want to make some room on my craft desk for it. I have already moved a few things round in anticipation for it!
Thank you again for all your hard work
Amanda Phillips xx
LikeLike
About 20 inches wide. You’ll also need about 12 inches front and back as space for the mat to go through and come back out again.
LikeLike
Thank you so much John for all you and Mel are doing to smooth our ScanNCut journey! it’s such a help to have all this info so that when we come to use the machine for the first time, it won’t be nearly as daunting. I have been using the canvas and have discovered how to import Sillhouette coloured in files by using the snipping tool and then saving as a jpeg to trace and save in the canvas projects. What I can’t work out is how to save a line drawn Sillhouette file. I get as far as tracing but when I click OK nothing appears on the work screen. I thought of printing the files from Sillhouette to scan in but don’t know how to get them to print! Can you help?
Thanks again.
Jenny
LikeLike
I don’t think that I have enough knowledge of the silhouette to answer that. If you can print it you can scan it though.
J :)
LikeLike
Thank you John. I’ll keep trying!
Jenny
LikeLike
You can do this by going onto the coloured lines window changing the red cut lines to black and then go into the line style window you can find these at the top of the page change the thickness and at the bottom of the line style there is a box with Print lines of selected shape tick this box and print your page I have tried this and it works Hope this is of some help
LikeLike
That’s brilliant Maureen. I’m going to try it straight away. T
Thank you x
LikeLike
I’m not John but hope I can help. The line you see on the page in Silhouette is only visible to the machine not to a printer. If you click on the line icon you will notice that the line width is set to 0. Select your design, then set the line width to about 1.5 and then when you use your snipping tool you’ll get your image you can save as a jpeg. I would also advise eliminating any dashed lines and just using the outlines. HTH
LikeLike
Just watched your show – I have a question re the cutouts of the hand drawn images (Lee and Leonie!) I don’t know if it was just the screen, but the cut outs didn’t seem very accurate, ie, in the main the cut line was on the drawn line apart from on a couple of places on the rhs of the images? Is that so, or is it just my eyes?
Thank you once again,
Dee
LikeLike
Hi John. When can you let us know which Makes and Size Memory Sticks we need to Download and Save Designs on our Scan N Cut Machines. We really do need this information before our Machines are Delivered from 10th February 2014. I have tried several Brother Websites without success to require this Information. It is really Important for Create and Craft to let thier Customers know which Memory Sticks are needed especially as there is an Up-Date Download already waiting to be Dowloaded Edna
LikeLike
Watching all these posts with interest. Will be buying the next time you get some stock in, so everyone’s problems will be solved by then! Just a thought about saving designs to a USB – some sewing machines can be very picky about putting designs in folders and the overall size of the USB. Does the BSC have any preferences like this? Can I sort designs into folders for the machine to read? Can I use a large sized USB (most of mine are 8Gb or larger? Thanks
LikeLike
Hi John
have you tried glitter silk cardstock.
LikeLike
No I haven’t, but it’s on the list.
LikeLike
thanks for the great info!! Just waiting for my machine to come in also!!
LikeLike
Thank you so much John for sharing all your testing with us. It is very much appreciated .
LikeLike
I watched you last night on C&C dreaming that one day I might be able to own the machine. My hubby only bought me the silhouette cameo last year so I thought I daren’t ask for yet ANOTHER gadget! Anyhow, my o/h came & sat with me while your show was on, which is unheard of! I ooh’d & aah’d a couple of times, not even sure if he was paying attention. After the show he got up & said “well if you want it, order it & you can have it for valentines day” I have never placed an order so quick in my life lol!
So anyway, the point of this message was to say THANK YOU SO VERY MUCH, coz without you demonstrating it so well, my hubby wouldn’t have paid any attention & I wouldn’t be getting a new toy :) :) whoop whoop :) :)
I am now reading & watching everything there is on it :)
Big hugs, Karen xx
LikeLike
Thanks for all you hard work – it is great. i have been trying to learn as much as possible before my machine arrives. I was concerned though to see a recent review from SVG saying that once a file has been converted it doesn’t cut the items to a good quality. They showed their results, but would like to see if they were correct or not – could you take a look at importing an svg cuting file and test the quality once converted. many thanks Alison
LikeLike
Without knowing what they were doing and what the results were I can’t really comment. Do you have a link that you could email me so that I can take a look please?
LikeLike
Email seems to be playing up but here’s a copy of the link
http://svgcuts.com/blog/brother-scanncut-review/
this is only based on its use with SVG cutting files. Obviously this machine has so much more to offer. See what you think.
LikeLike
Thank you.
I think that it says a lot that the reviewer chose to ignore the unique features of the Brother and focus on his perceived ‘negatives’.
I have tried a couple of SVG files and had no issues at all.
Probably important to note that he has been assessing based on minuscule differences in the final cut which he also admits probably wouldn’t make a difference to the finished result.
Having not done the comparison myself however I can’t really give any further thoughts on this.
J :)
LikeLike
John, you have made my near future use of the Brother so less frightening and also inspired. I am very eager to get going when I receive my machine. Have you cut Centura Pearl card? If so, what settings will I need to apply please?
LikeLike
I have not yet tried this yet however I can’t imagine it being very different from card of a similar weight. The quick start guide that comes with the machine should give you a rough guide to the settings that you will need.
J :)
LikeLike
Hi john watching all post blogs and shows on c/c I know you said you are going to go into the canvas part but can you please tell us how to get a file into it so can alter it as there is no import button that I can see thanks in advance 😃
LikeLike
All import functions are under the “File” menu. You can either import an FCM or SVG however to convert a jpg image you will need to use the image tracing function.
J :)
LikeLike
John, I am soo excited, I can’t wait for my Brother to arrive I love that you are going to continue to try out things for us. Create and Craft really are the best in service and on-going support, Brother made a great choice in giving you exclusivity about the product. You and Mel compliment the product and really take on board questions from the club members pushing the limits of the machine to new levels. Thank you, thank you, thank you. Please keep up the good work.
Hugs
Handijac
LikeLike
you have been very helpful thanks for that. I cant wait to try mine when it comes. Can you please tell me if you can cut plywood to make certain pictures with
LikeLike
The term “plywood” can apply to many densities and thicknesses. Please can you clarify the thickness, brand and type of material that you are thinking of.
J :)
LikeLike
Hi thanks you for the quick reply. The wood is airo ply (constructional ply) and Laser ply
LikeLike
This is a great help. Have you tried cutting Contact paper? And if so, do you leave the paper on the back of the Contact paper? Thanks
LikeLike
John, Thankyou, Thankyou Thankyou. Can you tell I really really appreciate this?! What would you recommend if cutting cardstock with double sided adhesive, and say gilding flakes – or is that pushing the boat a bit too much??
LikeLike
John Great info a BIG thank you.
LikeLike
Thanks John for spending time in your craft lab and then reporting your results,invaluable to us prospective scan n cut owners…squeals!!! I have a few questions,could I cut double sided adhesive foam sheet 3mm thick into for example a number shape so that I can then attach to matching glitter number and could the machine cut glitter fabric. Also could you check if cutting glitter card if it has to be non shedding glitter card as really prefer the textured glitter effect,perhaps even spraying glitter card with craters companion spray and varnish to encapsulate the glitter? Thanks in advance John :-)
LikeLike
This is so useful, thank you for all you are doing. I am looking forward to the next instalment.
LikeLike
Just wanted to say thank you for the brilliant information. I am eagerly awaiting my scan & cut next week & you & Mel have made me feel confident that I will be able to get creative with it straight away
Anita
LikeLike
John, have you tried Glitter card yet?
I have some bonded glitter card, which does not shred and is very good, so thought this might work. Like lots of people now counting the days, to play day
Lynne
LikeLike
John you are fandabbydosie i love you, you have been soooo helpful that it as made me feel that as soon as i recieve my brother i will be an expert and will not have to worry or stress on anything.Nothing will be confusing i just cannot wait.
A BIG thank you xxxxx
Hugs
Alison Glover
LikeLike
Very helpful john Thankyou .:-)
LikeLike
If I cut a shape out, can I then place the shape onto the mat and scan it to save?
I noticed that in some of your shows you drew around the shape before cutting.
What difference does this make?
A huge thank you for all your helpful shows and information on your blog.
Hugs, J.
LikeLike
If you intend to use shapes that have no “background” you will need to use the scan mat which is a separate purchase. This wouldn’t work on the sticky mats as it may pick up the debris on the mat.
The machine recognises contrast and therefore a solid “outline” of some sort is required. This doesn’t have to be an actual line if using a silhouetted shape.
Hope this helps.
J :)
LikeLike