Some time ago I mentioned about making microwave fused glass cabochons and promised to write a blog post about the tools and the process.
Well, as it’s Sunday and we’ve got the time to sit back with a cup of tea I thought that it would be the perfect opportunity for a lengthier blog post about this awesome technique.
Are we all sitting comfortably? Then I will begin…
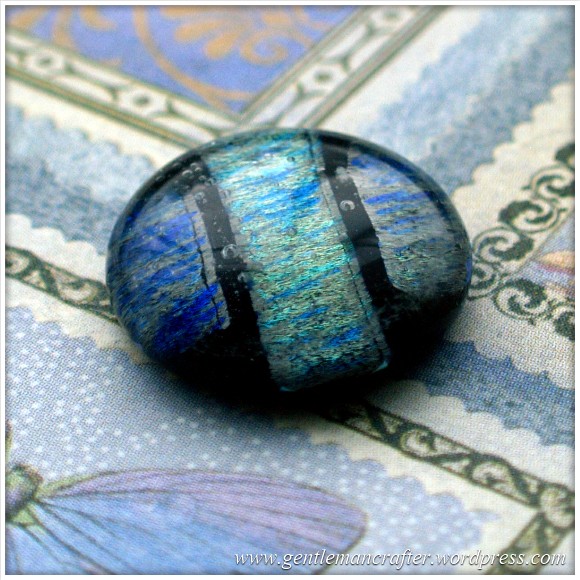
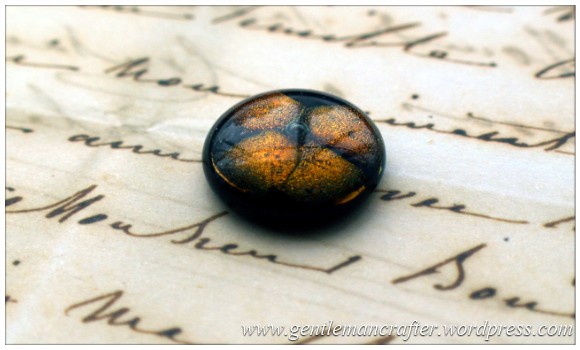
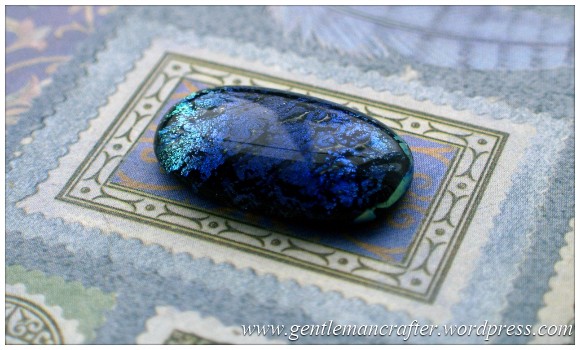
First up, I think that I ought to show you one of the cabochons that I am talking about. ‘ere be it.
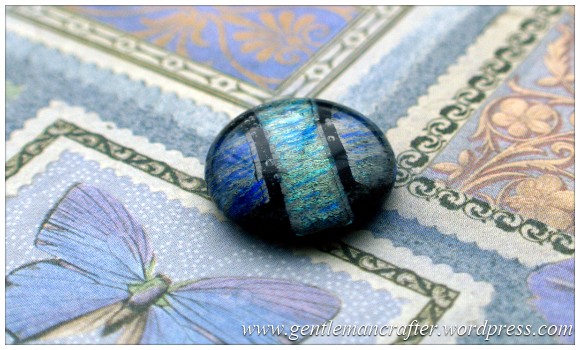
Pretty nice eh?
There is a gallery of other designs later in this post showing a variety of different combinations but for now I’d like to wander through the tools.
THE TOOLS
Here is a pictorial guide to some of the basic, and not so basic equipment.
The Kiln
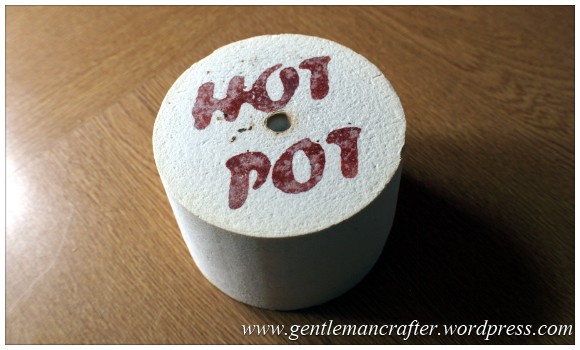
This is what does the work of heating and fusing the glass.
The one that I am using is the Hot Pot kiln. There are a number of other brands on the market and they all work in the same way.
The kiln is a two part piece of kit and has a base and a lid.

The kiln has been especially designed to work in a domestic microwave oven by enhancing the microwaves from the oven to create temperatures in the kiln high enough to melt glass.
It does this via the special lining that is on the inside of the lid shown here.

You can get this on it’s own or as a kit.
I’d recommend a kit if this is your first attempt as it will come with most of the other things that I am going to list below.
Fusing Papers
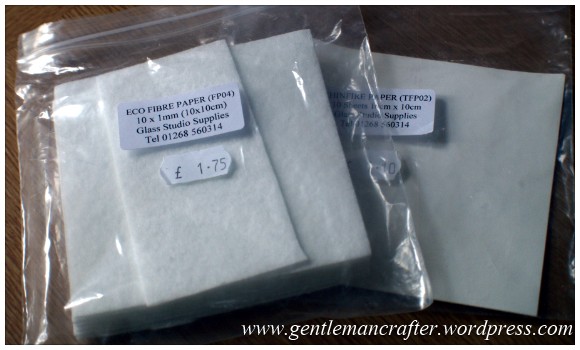
There are two types that you will use. Both are essential for the best results from your firings. They are not very expensive at all – about £1.75 per pack of ten 10cm square sheets.
You will only need one quarter of each sheet (or less) for each firing.
They are a single use item, meaning that you can only use each piece once (obvious really).
This is what they do.
- Fusing fibre. This is to provide separation between the molten glass and the kiln base.
- Thinfire Paper. This is designed to give you the smoothest possible bottom (oo-er missus). It just means that the base of your glass cabochon will be less bumpy and rough.
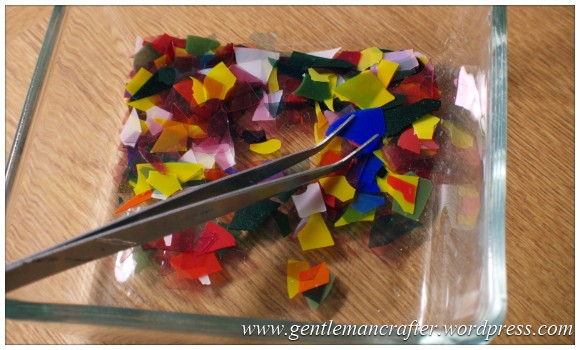
Glass
There are many different types of glass from sheet to frit and powders.
There are also many pre-cut shapes available from various suppliers to make it easier for you.
The one important thing that you should remember is that it needs to be of a compatible COE (coefficient of expansion). Yep, sounds technical, right?
All it means is that the different pieces of glass that you want to fuse will expand (as they heat) and shrink (as they cool) at the same rate and this will avoid any explosive shattering or cracking in your finished cabochon. COE is usually given as a number, such as 90, 96 or 104 etc. so you just need to match the numbers.
Here are a few of the different types of glass that you can find and work with.
Pre-Cut Glass Discs
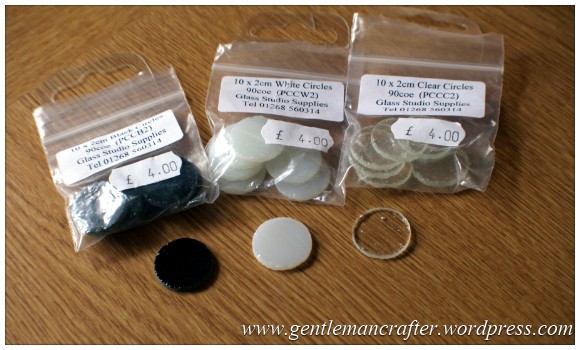
These are perfect for creating cabochons and being pre-cut save you the unenviable job of trying to cut a perfect shape from glass – this is no easy job!
They come in black, white and clear. They are also available as squares, circles and ovals. There are also various sizes of each available. So I guess what I am trying to say is that you have got plenty of choice for a base.
Millifeori
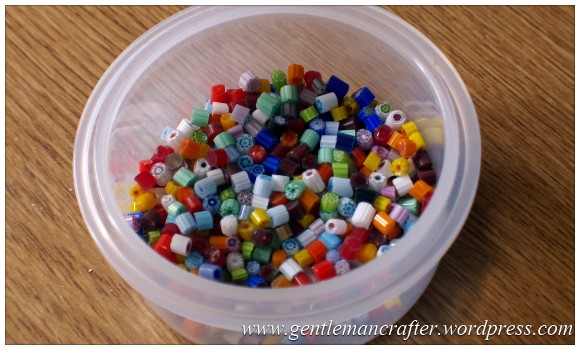
Millerfori is lots of long pieces of glass fused together, then stretched and finally chopped down into chocolate chip sizes; sometimes smaller.
These create fantastic multi-coloured effects or can even be fired on their own to make mini cabochons.
Frit
Frit is glass that has been smashed into lots of little pieces. It is available in many different grades of size and also many different colours and colour combinations.
Very fine glass (almost powdered) is also available for use with intricate pattern work.
Dichroic Glass
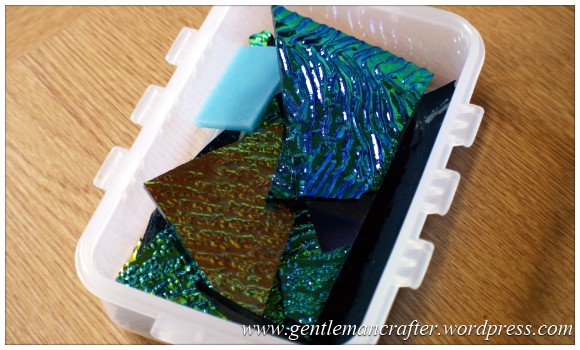
Often available as sheet, off-cuts or pre-cut shapes, this glass has an iridescent or opalescent finish to it when fired.
Strips and Stringers.

These are very long, thin pieces of glass. Available in a myriad of colours and finishes. These are great for creating lots of different effects in your cabochons.
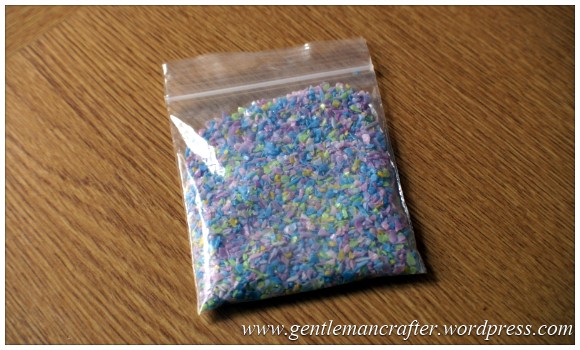
CONFETTI
Confetti is a very very thin sheet of glass that has been shattered into smaller pieces. It’s great for creating subtle effects and colour overlays without adding bulk.
Safety Gloves

You WILL need these, The kiln and glass become very hot when firing. If you touch the kiln or glass with your bare hands you would get a serious burn injury.
These gloves are specially graded for this type of work and are issued with a CE mark. Please don’t rely on your oven gloves, they are not appropriate.
Glass Cutter and Grozing/Breaking/Cutting Pliers.
You will need these only if you intend to work with sheet glass, or to cut down long strips of flat glass. If you are just using pre-cut shapes, frits and millifiori you won’t need either of them.
My Own Additions

These are not tools designed for the use to which I have put them however with experience I have found them to be very useful indeed. They are …
- Old lens cap – I use this when working with frits and powders to catch any tiny bits that fall off.
- Kebab sticks – for manipulating and moving the tiny pieces of glass.
- Old teabag squisher – I use this to scoop up frits and powders and deposit them on my project.
- Old and broken poached egg cup (it’s the black bit of metal – it lost it’s poaching cup a while back) – it’s great for lifting and moving the flat project – i.e. from lens cap to kiln base.
- Tweezers (not shown) – great for positioning millifiori or confetti glass.
Cooling Rack
You will need either a thick kitchen tile (big enough to put your kiln on) or (as I have) a decent quality wire rack (the kind that you would tip freshly baked bread or cakes out onto – mmmm, cakes, lol). The kiln gets VERY hot so you should NEVER put it directly on your kitchen counter.
Microwave
You will obviously need a microwave. The microwave kiln is useless without it.
I use a regular 700w kitchen microwave. This does mean that the firing times are a little longer but the important thing is that it still works. I have seen others using 2000w professional kitchen models which does speed things up, but there is no more control over the process whichever power wattage you have, so I didn’t see the need to shell out the money for the extra wattage.
One important point I should make here is that the kiln manufacturers recommendation is that you have a separate microwave for food preparation and glass fusing as the hot glass can give off fumes. For that reason it is also a good idea to make sure that the room in which you are firing is well ventilated.
Anyway, time to move and on talk about how to do this.
FIRING
There are just a couple of preparatory steps that you will need to take to start fusing glass cabochons.
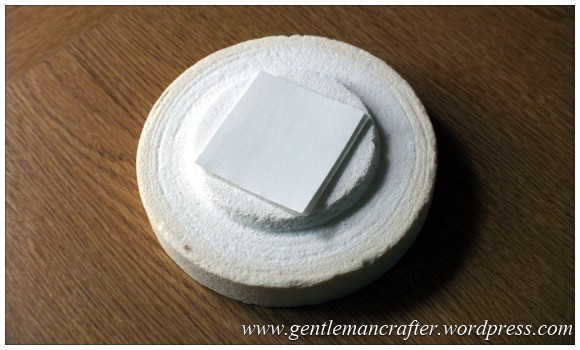
First, cut out a square of the kiln paper and kiln fibre.
These should fit the inner raised area of the kiln base.
Place the fibre on the kiln base and then the paper on top of that, un-printed side up.
These are important as they will stop the molten glass sticking to your kiln during the firing process.
You can see the arrangement here.
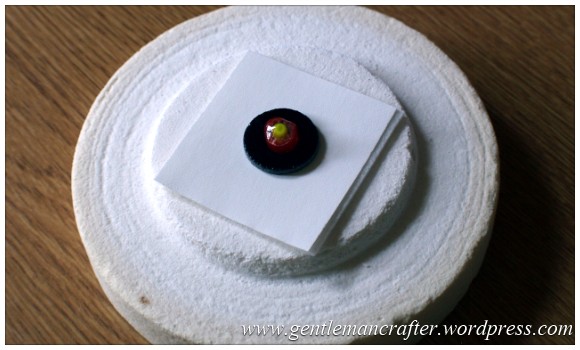
Next, arrange your glass on top of this. It’s usually a good idea to place it centrally as the glass may move slightly as it fires and you wouldn’t want it sticking to the side of your kiln.
For this firing I used a black pre-cut circular glass blank and then carefully placed a piece of millefiori onto the blank.
This is how it looked before I put the kiln lid on.
You put the lid on after putting the base in the mircowave (to make sure that your project hasn’t moved on the based as you position it – but that’ll be dependant on your confidence level.
In either instance place this on the centre of the turntable in my microwave, using the supports that were supplied with my kit and close the door gently.
Just a reminder – SAFETY GLOVES SHOULD BE WARN WHEN HANDLING THE KILN FROM THE SECOND YOUR TURN THE MICROWAVE ON!!! The glass and kiln WILL BURN YOU if you touch them with your bare skin. Please also note that the outside of your microwave will also become quite hot.
I set the initial firing time at twenty minutes.
The firing times will varying considerably between appliances however as a general rule you will need to fire the kiln until you see a constant red glow coming from the hole in the top of the kiln and then keep the microwave going for a further sixty seconds.
Tip – you can either remove or cover the light bulb in the microwave to give you a better chance of seeing when this happens.
You can always check the firing process by opening the microwave door and lifting the kiln lid a little WITH THE SAFETY GLOVES to make sure that the firing has fused everything together. If it’s not done, just pop the lid back on (being careful not to disturb the stack) and switch the microwave oven back on.
This particular firing took approximately 25 minutes in all.
When lifting the kiln from the microwave WEAR SAFETY GLOVES!!! (I think I’m making my point here).
This pic is of when the kiln came out of the microwave and you can still see the dull red glow in the hole at the top of the kiln.
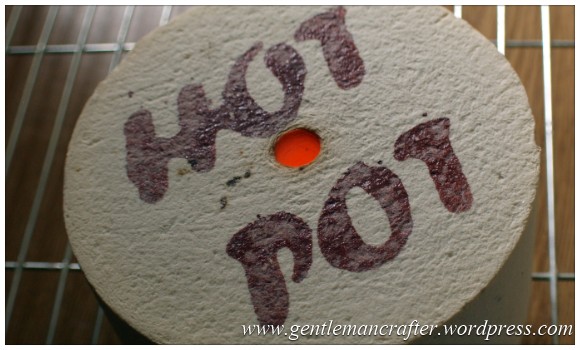
That glow is actually coming from the fired glass piece which is clearly red hot.
It’s not recommended that you open the kiln at this point as the thermal shock could crack your creation. For your benefit though, I thought I’d risk it so that you can see what has been happening in the kiln.

You can see that the glass has become red hot and the two pieces have melted together to form the cabochon. As tempting as it may be – DON’T TOUCH IT – IT’S SUPER HOT!!!
Anyway, as mentioned, leave the kiln lid on and let it cool for about an hour. It should then be safe enough to handle the kiln and glass without the safety gloves.
You will notice that the paper and fibre have become powdery. Just wash this off the glass and dry your cabochon. You can brush it off your kiln base and into the bin. This stuff is a bit of an irritant though so I would recommend not touching your eyes with it and also wash your hands as soon as you can after touching it.
Anyway, this is what the finished thing looked like …

It’s not the prettiest, but this firing was only really a test one so that I could show you what happened.
So, despite initially sounding quite scary, and having a number of potential hazards, it’s actually quite safe to do in your home and the results can be quite amazing.
GALLERY
Here are a few more of the cabochons that I have made over the months. I’ve also given a brief explanation as to the “stack” used to create the effect.
This one was quite simple; the stack was as follows:
- Base – Black circle.
- Middle Layer – 4 small pieces of dichroic glass cut to fit the black circle.
- Top – Clear circle.
I liked the result on this one as it had a definite style to it. The stack was as follows:
- Base – White circle.
- Middle layer – three pieces of dichroic stringer.
- Top – Clear circle.
Normally I would have added some clear stringers aswell to fill out the spaces in-between the dichroic strips however I didn’t on this one and just let the sagging of the glass dictate the result. Pretty neat eh?
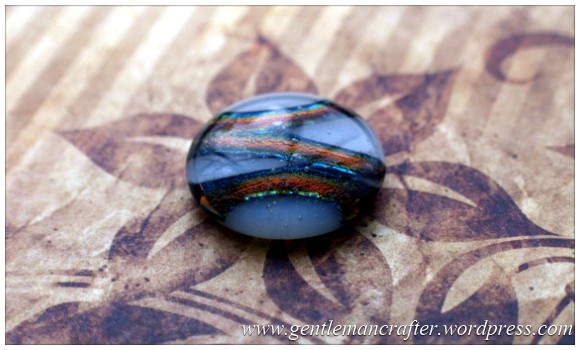
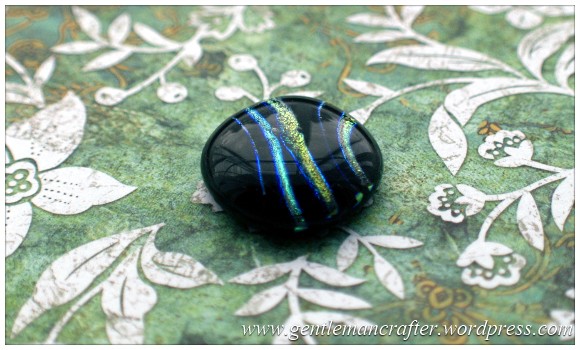
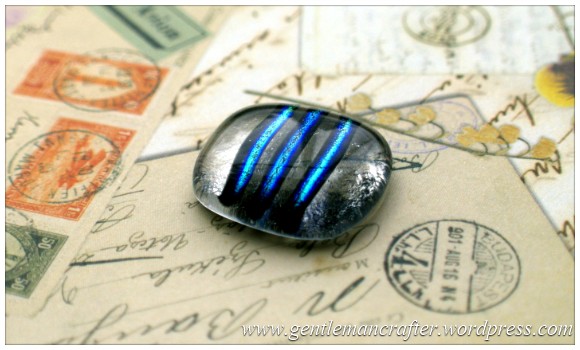
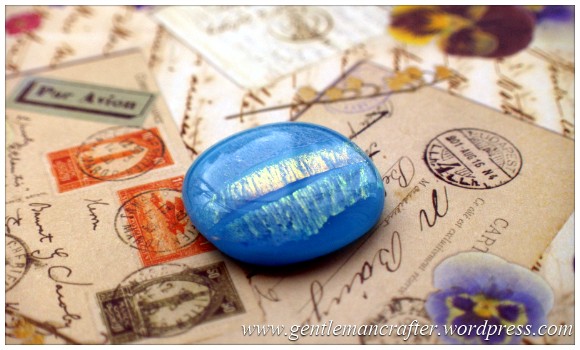
Here are another couple of examples using this technique.
This next one used a strip of dichroic glass (which already had an opaque black base) with a clear overlay that I cut from a sheet of glass.
The striped effect in the two images below were created by cutting strips from long flat pre-made pieces of dichroic glass. One (the first) was on a black opaque background and the other was on a clear base. Both were given clear overlays.
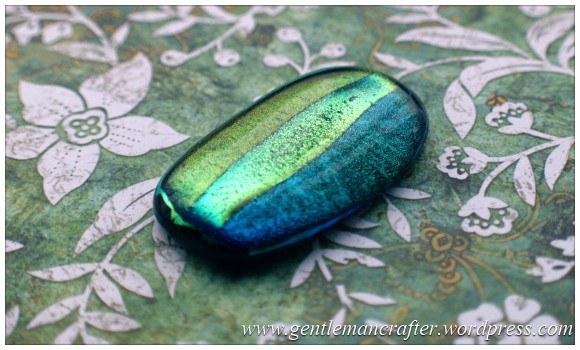
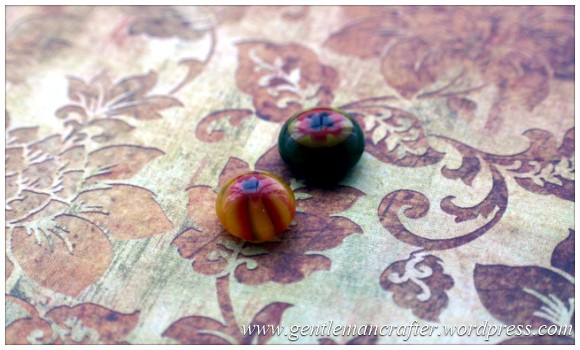
This last one was just to show that you don’t even need to layer up the glass to create funky little cabochons. Both of the cabochons in this next picture were a piece of millifiori that I fired on their own. These are the perfect size for earrings or smaller projects.
Ok, so that endeth the gallery section.
I hoped that you enjoyed it.
Now, it’s all well and good making these things, but what are you going to do with them (apart from keep them in a secret box which you occasionally open and whisper “my precious” too)?
USES FOR CABOCHONS
One obvious use would be to make earrings and pendants simply by gluing the finished cabochon to a bail or ear post. This would be great, but, why not try and frame your creation in something spectacular like some wire wrapping?

You can find more about this project that I did a while back in this blog post from the archives.
GIVEAWAY
Would you like to get your hands on one of these cabochons? Well, as a thank you for all of the visits and followers since January I have decided to part with three of these little beauties. To be in with a chance, just pop a comment or question into the comments section before December the 22nd and I will use random.org to draw a three numbers – the comment that matches the number drawn gets one of the cabochons – (i.e. if I draw number 3, the third person to have commented by the 22nd December will win).
It would be great if you could share this post with someone that you might think it would interest as well but that doesn’t form part of the entry requirements. There are easy sharing buttons at the bottom of this post.
These are the three cabochons that I will be giving away.


Good luck!
Ok, I did say that it would be quite a long post, but I hope that you enjoyed reading it.
As I make more I will be posting them on my Facebook page and Twitter profile so please feel free to pop on over to my facebook page and hit the ‘like’ button or my Twitter timeline and hit the follow button.
Thank you for taking that time to visit.
See you again soon with more creative stuff.
J :)

Gorgeous creative pieces, thank you for the step by step it’s really fascinating!
LikeLike
John, absolutely fabulous and thank you for such clear instructions. Would like to thin k about trying this in the new year but can you give an idea on cost of the basic items needed. Always read your blog with great enthusiasm and as I’ve said before, don’t know how you get the time to work and do all these varied and wonderful creations. xx
LikeLike
Fabulous John. I have a microwave ready to be replaced and Hubby is desperate to know what I want for Christmas. I think a Hotpot will definitely be top of the list.
Happy Crafting
Chris K
LikeLike
John thank you so much for this clear and perfect tutorial. Your results are amazing and although I’d love to play with these pennies don’t stretch to buy the materials needed so fingers crossed I win one one of your amazing pieces of art. I couldn’t give them away if they were mine and would be whispering my precious to them every day,
Big hugs,
see you on facebook,
Hugs
Hazel xxx
LikeLike
Just think of endless number of variations possible. Would love to have a go. You are so clever….but would I need Safety Gloves for this.LOL.
LikeLike
Thanks, John. That’s great. A new craft for the new year, me thinks.
LikeLike
John, you have surpassed yourself! Who would have thought such beauty could be produced in an ordinary microwave cooker! They are all beautiful. I am amazed that they don’t just melt into a messy pile instead of the beautifully shaped cabochons you’ve brought to life. You’re a star, young man! x
LikeLike
Hi John. These look fantastic.Thank you for going in-depth with how it works. Will be looking for a microwavable kiln!
LikeLike
Fantastic post John. As I’m getting Stamping Gear for Christmas(Have you tried the new bar one to make wallpaper style patterns yet, would love to see you do a post on that?) I will have to wait until I get the equipment to give this a try. I’ve seen other demos of this technique before, but not felt able to try it myself. You give such useful and detailed instructions, I always feel I could have a go too. It’s not my Birthday until June, so I might have to wait some time, but I will be trying this at some point. Thanks Kim.
LikeLike
Hi John, you know my opinion on these cabochons, I tell you enough times on Twitter. Fantastically descriptive instructions, I feel a big spending spree coming on. You’re not helping my holiday fund! ;) xxx
LikeLike
Thanks for sharing John – you always seem to come up with something new and interesting – this one is brilliant. Would love to give it a go and achieve your kind of results, keep ’em coming – please,
LikeLike
You are truly a man of many talents! I really enjoy seeing what you have created and you explain things so clearly. Thanks for inspiring me.
LikeLike
Great thanks John – the dichroic glass give such beautiful effects. As I make Jewellery I will be give this a go.
LikeLike
Thank you John, really interesting. Don’t have a kiln but this has made me want to Search for one!
LikeLike
Thanks for such clear instruction John. What did I need the gloves for again?!?!! I always read your posts, and you’ve inspired me to get an inkadinkadoo kit (well, my partner’s getting it for me for Christmas!). I have dabbled with jewellery making before, and may need to ask for bits of this system for my birthday!
LikeLike
Absolutely fantastic pieces you have created John. You are a very talented man. I would never have thought to try this craft as I wasn’t aware you could do it at home without tons of expensive equipment. Keep creating and blogging you give inspiration to us all!
LikeLike
Fantastic John!!!! Thank you for sharing this with us and the post was so interesting it didn’t seem long at all. It was very clear and understandable. Love what you do.
LikeLike
Wow John these are brilliant! A long post today but well worth reading! I think I need one of these!! You are certainly one very talented man and I think we need you demonstrating more on Create and Craft! Love Jean x
LikeLike
Wow I love these, you are very talented xxx
LikeLike
I love the very clear instructions you give and the results are lovely.
LikeLike
Wow I was trying to figure out what I wanted for Xmas for my craft room and thanks to you Jim I now have my answer. This looks amazing and I really want to give it a go. TFS. Have a safe and wonderful Xmas.
LikeLike
These are beautiful John
LikeLike
John thanks for this, I think you are truly talented and have a knack of sharing your knowledge so that others can do this too! I for one will be having a go. The cabochons are beautiful. Where did you buy your equipment and glass bits?
LikeLike
They all look so pretty. It seems really complicated. I may have to give it a go. I like the metalic looking ones and of course the purple ones. :-)
LikeLike
Wow! I have been to a couple of glass fusing workshops where you leave your work for the teacher to put in a kiln. Then you pick up your creations later. This a looks fantastic. Something to try in the New Year. I can feel a new hobby coming on…
LikeLike