
Been having a lot of good feedback regarding the mini tutorial videos that I have been making for Scan N Cut Canvas so thought I’d make another little quickie for you.
This time around I will be showing you how easily and quickly you can create a circular chain link frame, together with a mat layer, in Scan N Cut Canvas.
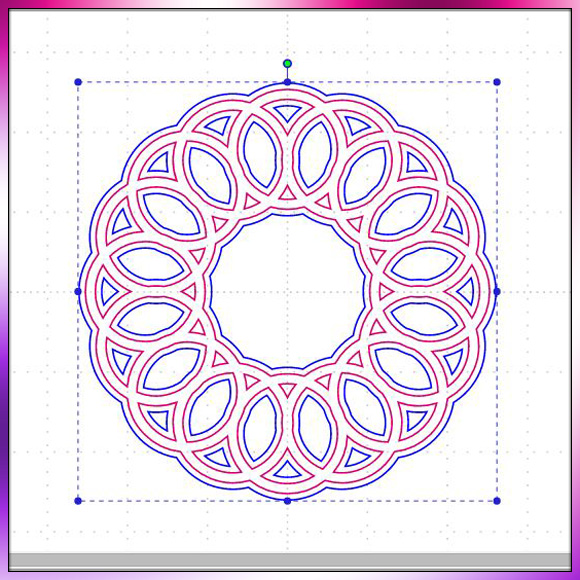
Here is what you’ll end up designing.
And here is the video to show you how …
In the video I mentioned about the increments with which to rotate the pairs of circles. They are:
- 0
- 22.5
- 45
- 67.5
- 90
- 112.5
- 135
- 157.5
As ever, if you have any questions or comments regarding this post then please feel free to use the comments section below.
Many thanks for visiting and watching. Hope you find this post/video useful.
See you next time.
J :)

What an amazing tutorial John, I have spent the weekend in bed, lost my voice but managed to watch most of your videos – can’t wait to have a go, even managed to do my updates.
Thank you
Lesley Buckle, Stowmarket, Suffolk
LikeLike
Great news! Not about the voice though.
LikeLike
Thanks John I will have to have a go at this it looks great.
LikeLike
Thank you
LikeLike
I had trouble duplicating what you had done but then I spotted the sizes on the bottom left and used the same, .. it worked. I tried the same process on hearts, it worked out well on Canvas. Now I just have to cut it. Thank you for these videos.
LikeLike
Thank you again John for a great video,the way you show us how it’s done makes it look so easy.
Jackie
LikeLike
Another great video I learn so much from watching them thank you so much 😀😀
LikeLike
Hi John, Wow thank you for this video I enjoyed it and loved what you did…I did replicate what you made and it inspired me to have a go at something myself â I am trying to make a ring of anchors! â using your method â all went really well UNTIL I tried to weld them â Iâm getting an error message of : part of the line overlaps with other lines, slightly move the line and then try this operation again….ErrS12
I have tried a few things, but donât want to mess up the % of the pairs in the ring too much â I tried moving the pair further apart from each other! Could you please give me a pointer in the right direction as to how to make this work for my anchor ring? I am have enclosed the file Im working on if that helps…..I imagine you will need to see what I have done! I would be eternally grateful if you could set me straight….I am a waiting for some spare money at moment I love some of the sentiment files you have made and want to get some of those as soon as I can…I pointed a friend of mine in your direction and she has bought several of your files….
Sue Smith
LikeLike
Hi Sue, Sadly files don’t get attached to these comments. Please would you email these over and I’ll take a look. J :)
LikeLike
Thank you – very impressed – very clever idea and love your technique to do this…I learnt a lot – AND i actually managed to o it – Thank you Love your videos they are so helpful.
LikeLike
Wow that is so cool – thank you John – a great video again….thank you….love it…you make it look so easy it inspires me to have a go…and Obviously if it works with a circle it will work with other shapes too!
LikeLike
Great video John. Very helpful. Incidentally, did you know you can duplicate a shape by clicking on it and holding down the ‘alt’ key. Saves keep going into edit. I use a Mac but assume it will work on a PC
LikeLike
Thank you John. A very good informative video. I shall certainly put it to good use. Also thanks for the measurements. That is most helpful, maths definately isn’t my strong point!!
Carole
LikeLike
Another great video , can’t wait to try it, thanks
LikeLike
Thank you so so much for that, only this morning I was trying to work out a very similar design but in a straight line and could not work part of it out, now I know where I was going wrong, question though, if the two pieces were welded together would this cut out in one piece?
LikeLike