
It certainly feels like yonks since I last wrote a blog post so I just wanted to do a little post to let you know that I am still around and thinking of you :)
So as not to just pop in, say hi, and pop out again I decided to make a quick card to show that I have been thinking of all of you lovely people.
Now, I say “quick”. What I probably meant was “intended to be quick however it turned into a ‘most of the afternoon’ card”. Lol. Ah well, I had fun and I hope that you like the finished result.
Anyway, let’s crack on shall we?
For this card I decided to use the Essential Flower Stamp Set from Hayley and Carol (lovely ladies) over at Dreamees.

I’ve had this set for some time now and have been meaning to sit down and use it for ages as I think that it’s a very handy and useful set to have.
To begin the card I drew a large square in pencil onto some Super Smooth cardstock (to act as a guideline into which I should stamp the flowers).
Given that the square ended up being about eight inches square I’m not sure that there was much point but you live and learn.
I then used some black Ranger Archival Ink and stamped out a load of the largest of the five petal design.

I then changed the stamp to the smallest of the three and changed the ink to a grey Stazon and stamped in the spaces left by the larger flowers.

To add a little pop of colour I chose a bright red Versacraft Ink Cube and stamped out the stamen for the larger flowers in that colour.
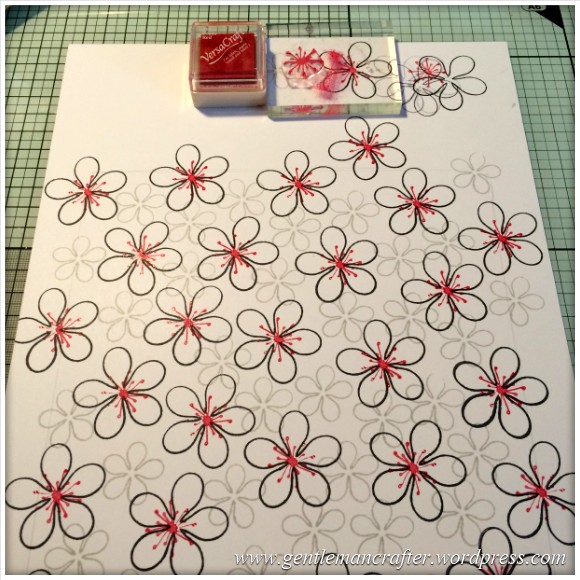

I then changed inkpads to a light grey Versacolor and changed the stamp for another stamen design and added an impression onto each of the smaller flowers.


So that was the background all done.
After trimming the cardstock down to about six and a half inches (the design “worked” at that size) I used the Perfect Layers tool to add a couple of layers of coloured cardstock and then mounted the lot onto an eight inch square card blank.

For the next step I wanted to create some flowers for a little bouquet area on the front of the card so I stamped out the flowers again (multiple times) and then cut these out using the direct cut feature on the Brother Scan N Cut.

To give the petals some shape I used the Tonic Flower forming tools, choosing a different sized stylus for each of the three sizes of flowers.

(reminds me of the three little bears in goldilocks, lol).
I then gave some thought to the layout of the bouquet and worked out what size circle mats and flowers I would need.
The circle mats ended up being 8cm, 8.4cm and 8.8cm. To ensure accuracy I again used the Brother Scan N Cut to cut out the circles.

After layering the circles up with some Cosmic Shimmer PVA glue I positioned the stack bottom left of the card front.

Now, here was my opportunity for some bling! (not that I need an excuse LOL).
I used a placement guide that I had designed and had made in order to put some pencil marks where I wanted the gems to be.

Then, using fine tipped tweezers, I applied a mini gem to each of the pencil marks using a tiny dot of PVA glue.

I chose the “thinking of you” sentiment for obvious reasons and stamped it onto Super Smooth paper. I then trimmed this down and layered it onto black cardstock.

I had originally trimmed off the end of the sentiment banner but when applying it to the card I realised that it would look good if the leftover bit was sticking out of the other end of the circle so I applied that too.
I used Pinflair glue gel for both sections in order to help hold their domed shape and give the banner the feel that it was light and floating behind the bouquet.

Earlier on you may have seen pink flowers however I wasn’t planning on using those, I just had them to hand when I was thinking of the layout.
To create the flowers, that were going to work in with the white flowers that I made earlier, I used the Quilled Creations quilling dies to cut strips of red cardstock and then coiled and stuck them.

Having fanned out the petals I then arranged (and fiddled quite a bit with) the bouquet.
I finished off the white flowers with a central red gem and changed my mind about having some pink in the design and reached for a flower punch from which I created three small blooms that I positioned around the outer edge to help fill out the bouquet.
Then, with a sigh of happy contentedness I decided that it was finished and marched off for a cup of tea and a caramel wafer.
Oh, yes, I did come back later and take some pics of the finished card – here be they me hearties…


Not bad eh?
What did you think? I don’t always think that a single range of smaller stamps are enough to cover the vast majority of the front of an eight inch square card but it really does work.
Anyway, thank you for stopping by and taking the time to read this post.
I’ll try not to leave it so long next time!
J :)

I am wondering how a 3-D card like this would survive the U.S. mail. Love the card.
LikeLike
Being in the UK I’m not 100% sure.
LikeLike
Lovely card John love the idea of a gem placement template, might have to try to make myself one of those
LikeLike
Wonderful card….TFS Your process!!!!
Jan
LikeLike
What a lovely card and thank you for a great idea…… Am in. The. Process of sorting out my boxes and will definitely look to use my flower stamps in this way……. Thank you and look forward to more ideas and more on the scan n cut too
LikeLike
You have a great eye for a wonderful card well done John it is really nice
LikeLike
Hi John, wow a stunning beautiful card. Love the way you explain everything you do too. Thanks for sharing.
Carol. (Dreamees)
LikeLike
Gorgeous Card John!
I love everything about it.
Happy Crafting!!! :) X X
LikeLike
Have missed you and thanks for sharing. You realy should take your gems template too the masses, we all need this x
LikeLike
So pleased to see you back again, missed your inspirational projects. This card is so delightful and I love how you put the colourways together. Thanks again for being so generous in your sharing. Missed Scan Saturdays of late too! Looking forward to hearing of your next projects.
LikeLike
What a beautiful card. Just using simple stamps , it looks gorgeous. I love the gem guide you made how do you make something like that, it is so useful. x
LikeLike
Beautiful card yet again John, I too have missed you, xx
LikeLike
Lovely card John. Love the colour scheme. I really enjoy reading your blogs.
LikeLike
Wonderful work, simply done but so so beautiful.
LikeLike
Stunning card , love the dramatic colour.
LikeLike
Maybe you should take the gem guide you designed further john
as I almost many would buy one :-) there is a shortage of them for placement of gems on circles,swirls etc…:-)
LikeLike
Lovely to see you work again John. So many things to learn in just a short blog as always. Thank you for sharing.
LikeLike
Hi John, what a great idea to use some of the smaller stamps we all must have. Did you make the placement guide with the rhinestone feature on the Scan N Cut?
You have been missed, hope you will be back soon.
LikeLike
Thank you. No I designed this and had a prototype made a long time ago but did nothing with it.
LikeLike
Thanks John, I am waiting very impatiently for C&C to sell the rhinestone addition and the other thing I can’t remember the name of at the moment, lol. Do you know if they will be doing that soon?
Diane x
LikeLike
I dont know I’m afraid.
LikeLike
Great card and lovely to have you back, really miss your fabric Fridays, but I know you are a very busy man. Keep up the great work
Tracey x
LikeLike
Really lovely card John, I was extremely impressed that you included all manor of techniques, ranging from stamping, Scan n Cut, ball tools, layer rulers I could go on…..so something for everyone to have a go at.
LikeLike
Thanks for sharing & explaining all the steps—I love the details on the card!!
LikeLike
Welcome back John. A beautiful card! Love your design.
Sheila
LikeLike