
My collection of Tim Holtz Distress Inkpads has grown a fair bit over the last 12 months and until recently they have been stored in a plastic box which I have to wrench out from under other boxes in order to get to them.
After a recent craft stash avalanche, whilst trying to get to the inkpads, I thought that I would have a try at making some storage for these so that I can access them at anytime without causing a disaster each time.
The starting point for this was a quick trip around the internet. There were lots of tutorials and different ways of doing things.
Me being me, I did take in some of the info that I saw however I felt that I could maybe do it my way.
I did try a couple of attempts using lightweight card, but these were just not sturdy enough so I paid my local craft shop a visit and got a large (about A2 I think) sheet of foam board.
I measured, drew, doodled, drank coffee, ate a bag of mini cheddars, deliberated and eventually worked out a plan.
The plan was as followings…
- Cut 1 piece 25cm wide by 11.5cm high for the back.
- Cut 2 pieces 26cm wide by 7.5cm high for the top and bottom.
- Cut 2 pieces 7.5cm wide by 11.5cm high for the sides.
- Cut 3 pieces 25cm wide by 7cm high for the shelves.
- Cut 2 pieces 7cm wide by 11.5cm high for the struts.
I transferred these measurements to the foam board, making sure to label each piece as I went so that I didn’t get confused. Here is how I laid out the pieces on the board.
- At the bottom you have the three shelves and backing panel.
- Next up you have the two side panels and two vertical struts.
- At the top you have the top and bottom panels.
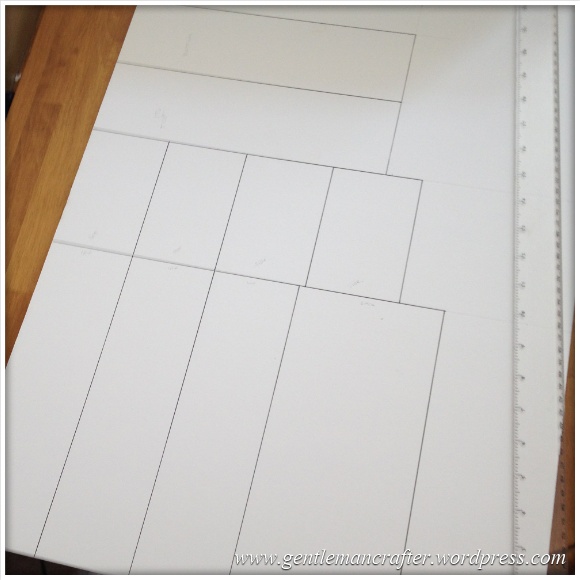
Not shown in this image is the addition of the slots that I needed to cut to fit it altogether so here is a quick guide for those.
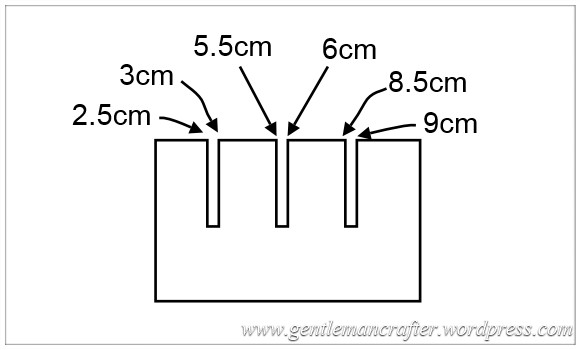
On the two vertical struts, I first made a line disecting the piece in half (in the longest direction). Then, from the left edge, I made marks at the following points – 2.5cm, 3cm, 5.5cm, 6cm, 8.5cm & 9cm and then connected that all up … oh hang on, this is getting a bit wordy isn’t it? Why don’t I just do a picture, that’ll probably make more sense won’t it?
Ok, *shakes magic glitter pot* – kapow!
 Better?
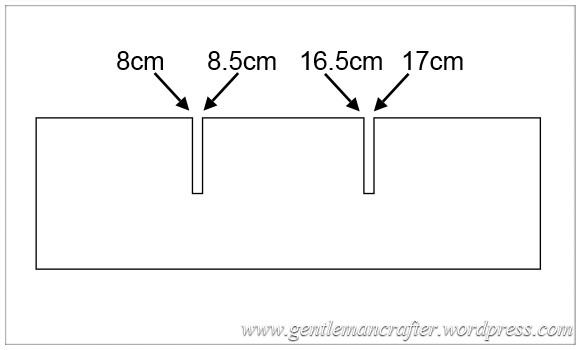
I did a similar thing for the shelves only this time the marks, from the left edge, are as follows – 8cm, 8.5cm, 16.5cm & 17cm. Another picture perhaps?
Ok :) Paff!
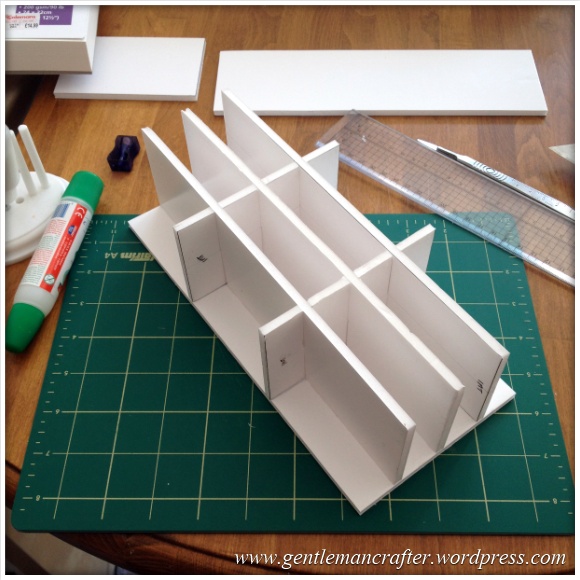
I then went on to cut these all out, and cut the relevant notches so that the shelves and columns could slide into each other.
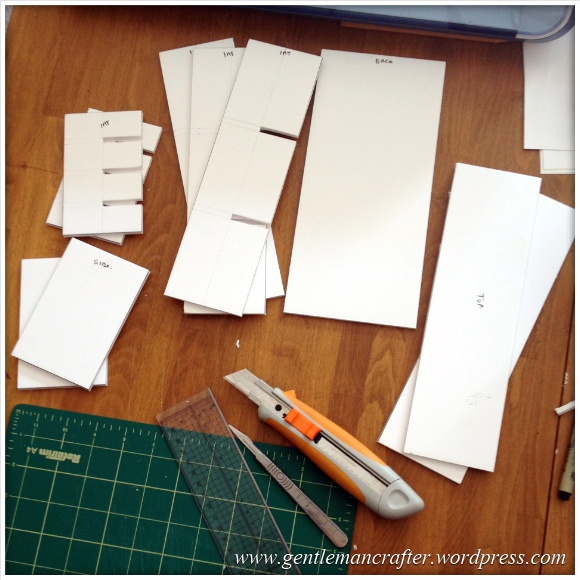
Ooo, I feel like I’m back at college doing a mock up of a 1980’s concrete block building (not something that I did but we did use foamboard to mock up building projects).
Anyway, from here it’s all down to gluing sticking and decorating, the measurements are over – *breathes sigh of relief*.
For the next stage I slotted the shelves and columns together, adding a little PVA glue at the joints and then stuck this to the back panel.
I then added the sides.
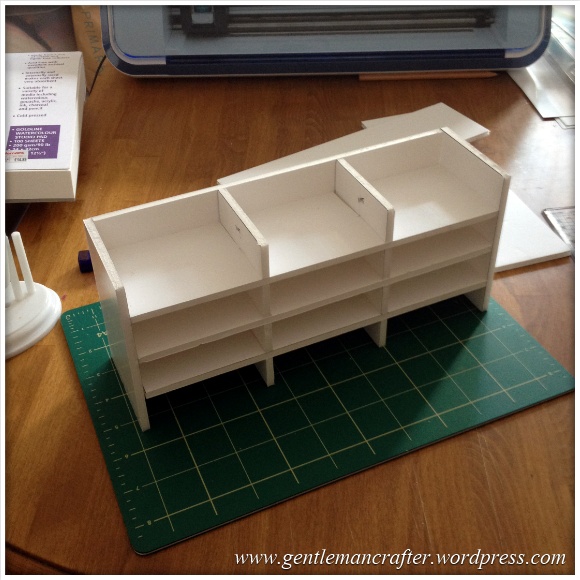
And finally the top and bottom pieces.
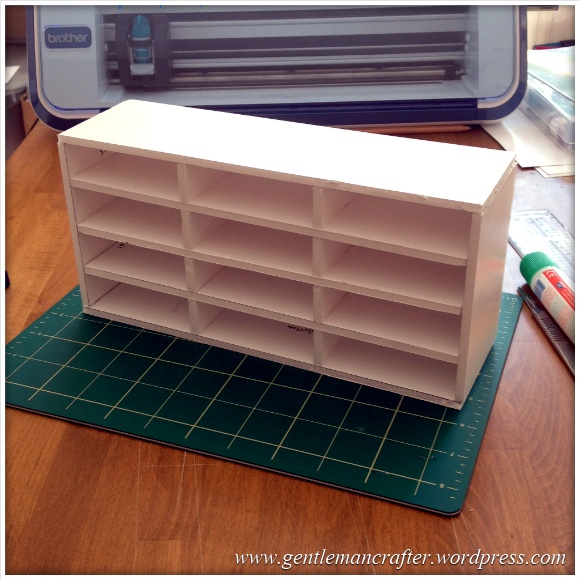
So that was the basic shell all made up.
I then decorated it by adding some docrafts Madame Payraud’s Tissue Paper with some Mod Podge and painted the inside of the shelves with black acrylic paint.
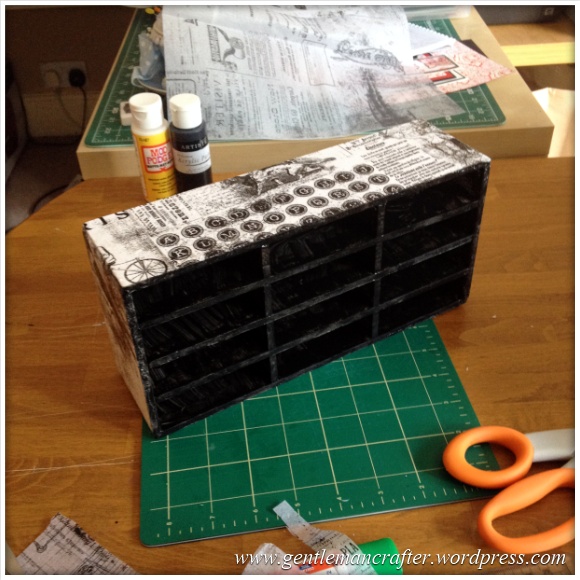
This did however need a second coat of paint, so I went in again after the first coat had dried. It probably would have been easier had I used black foam board, but hey ho, you live and learn, lol!
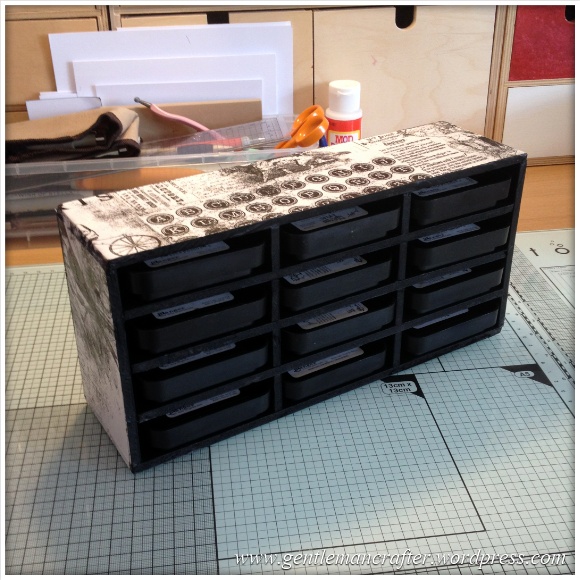
And that my dear friends is how I put together some storage for my distress inkpads. There is even enough room to pop a piece of cut n dry blending foam on top of each inkpad so that they are to hand and don’t cross contaminate.
This is only half of my collection of inkpads at the moment and I by no means have a full set. I understand that there are 48 in the range so I’m going to need to get collecting and am also either going to need to make 3 more of these or make one four times the size.
So this was just a little fun tester project for myself but I hope that you’ve enjoyed it.
How do you store your ink pads? I bet you’ve got lovely shelving and a labeling machine… ;)
Anyway, that’s it for this post. If you’ve any questions about this post, please feel free to get in touch via the comments section below.
See you again soon Monday Mashers!
J :)

My Distress Ink pads all live in a Really Useful storage box, but I have blender pads attached with velcro to the bottoms so they do an amazing impression of the leaning tower of Pisa, so your storage solution is much better!!
LikeLike
Great storage – love your instructions (I’ve been sitting here giggling!). Not sure I’ve got the patience to do this myself – my inkpads are all in a couple of drawers in my craft room – a wall full of kitchen units holds quite a lot of stash….but I still can’t see a single work-surface in there for all the projects-in-progress. Thanks for sharing :)
LikeLike
Hi John,
Fab idea! However I have so many ink pads I had to really get them sorted. I won’t send a picture as it isn’t so fantastic as yours but I bought a double fronted bathroom cabinet from my local recycling centre a few months ago. I took all the doors off gave it a good clean and disinfect and now store all my pads in there. It already had some small shelves built in. I didn’t have the time to decorate it but seeing yours I will get around to making it a feature. What a fantastic idea and I love how you worked out all the dimensions.
Thanks as always for sharing with us!
All the best.
Carol
LikeLike
Well John you never cease to astound me, great idea but where do you find the time!!! Is it a magic secret, if it is do share.
LikeLike
Very clever john. My husband made me one. Really need something for my spectrum noirs now….can’t afford their storage racks.
LikeLike
This is excellent John, but my skills are not up to this level!! Instead, I buy Candy Box Crafts’ Ink Pad Holders and decorate them. Probably a lot more expensive than your efforts, but a lot less effort! x
LikeLike
really nice an simple way to store Tim Holtz an not expensive!!!
LikeLike
Hi John
I store my DIs in 12 x 12 plastic boxes. They are just deep enough to store one layer and take 16 ink pads. I use the lids of the boxes to store another 16 ink pads . They do not take up much room this way and are easily accessible
Maureen Fox
LikeLike
Ow wow! That sure beats my plastic bag :). You are SO clever x
LikeLike
Thanks for sharing that John, I will show my husband, John, and see if he can build one for me for all 48 colours. Yes I am addicted to them. By the way I used some sticky backed velcro (the scratchy part) dots and cut in half and stick the half on the base of the ink pad. The foam pads fit under there perfectly and just need to pull off when I need to use. That way there is no loosing them or getting them mixed up.
LikeLike
Great tutorial and instructions, thank you John:-)
LikeLike
Wow, that’s great, John. I don’t have too many ink pads right now and they are stored in an empty icecream tub…yes, there is such a thing as an empty one!!! I would love something like this to store my A4 card an paper…any chance of you working out the dimensions for me :) xx
LikeLike
Excellent piece of work! I just need the space in my ‘craft room’ to make one! Think I’ve seen a company that makes stout card ones similar to this.
LikeLike
John i don’t know where you buy your DI’s from but they are 4 for £12 with 3 with free postage from oyster crafts. You can also download the side labels for free from ranger. Hope these help you or someone else.
Hugs
H xxx
LikeLike
Your amazing. Lyn
LikeLike
Great storage solution John – not sure my art shop has that foam board. What we need is someone to come up with a similar thing in plastic, rather like the storage Crafter’s Companion did for the pens
LikeLike
That’s really great, John! I made a similar one, with 300gsm cardstock, with my electronic cutting machine. I don’t know where to upload photos here so can not share with you? I made mine because I got fed up wasting precious crafting time trying to find the colour I wanted when they were all on a storage box! I have labelled the front of each die pad with the colour and coloured the tabs used to pull them out so I can see the exact colour. Time to try and make a more permanent option now, I think! LOL! :-) x
LikeLike
Brilliant idea John. Mine are in a plastic deep bucket shaped plastic container so stacked about 8 high in columns. I’ve not come across plastic board before – can I ask where you can buy it please? Thanks again for such a continuing interesting blog
LikeLike
I got my foam board from Colemans but it should be available via most stationary shops.
LikeLike
The storage is great John. Thanks for the instructions. My son has said he will make me one tonight when he finishes work. At the moment mine are stacked in a plastic box which I dare not move!!!
LikeLike
Great idea John I bought a similar one for my paper stash. I’m off to buy some foam board to have a go .
LikeLike
What a brilliant idea John. Having downsized a few years ago, I craft in my dining room and TRY to hide things away!!!!! I am very lucky that my dad used to rescue abandoned pieces of furniture. He found a solid oak apothecary unit years ago and renovated it. It currently stores loads and loads of my crafting treasures. The only problem is he only found one,3 or 4 more would have been wonderful.
Deborah XX
LikeLike
This great john , I am definitely going to have a go at this. My ink pads are stored in a drawer so I have to get them all out to find the ones I need which is a real pain. With your idea I thought that maybe a strip of paper colour by each pad and stuck on the edge would make it easy to see at a glance the pad you want to use. .
LikeLike
You need to patent this invention (maybe to sell) it is brilliant. I have been looking for something like this for a long time but unfortunately I don’t think I can make it as I am a senior citizen with very arthritic and useless hands and unable do any of this type of cutting and assembling anymore. I thought maybe 2 distress inks per shelf would be a good idea.
Patricia
LikeLike
WOW John, I´m so impressed. Mine are just thrown in a drawer-I know disgusting isn´t it!! Great instructions. I really think I could follow this. Thank you.
Love Val in Spain x
LikeLike
What a clever bunny you are! Could I have three of them please??? lol I store mine in a 12 x 12 really useful clear box xx
LikeLike