It’s not often that I have the time to put together such a comprehensive blog post so I certainly took advantage and armed myself the camera (with fresh battery and empty memory card), notepad and pencil and set myself up in front of the Brother Scan N Cut.
During shows on Create and Craft I have previously demonstrated how to make decorative sentiment plaque on the Brother Scan N Cut machine using only two pre-installed shapes so I thought that I would document that technique for future reference.
This (all 60+ pictures) together with a whole load of words, is the result of a well spent morning … Enjoy!
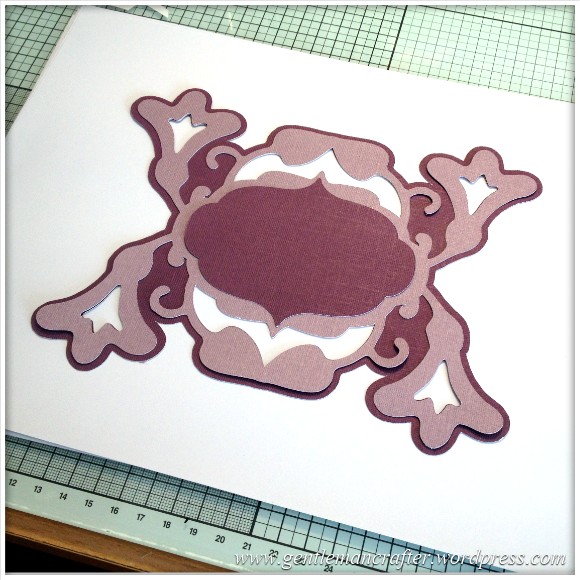
So, first up, a quick picture of the kind of thing that I am talking about.
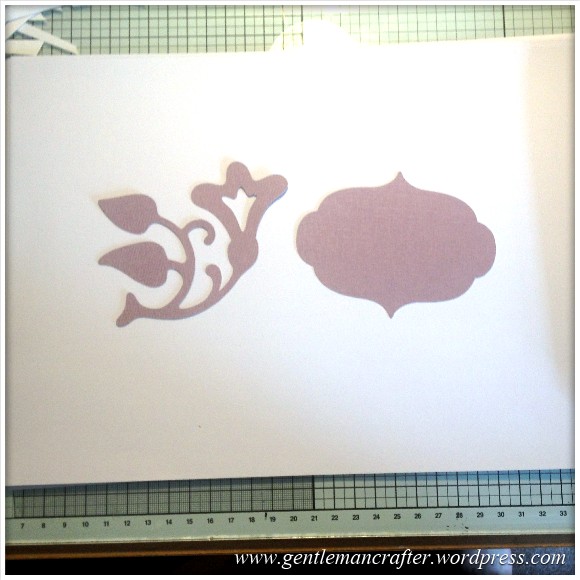
This was created from just two different pre-installed shapes. These two in fact.
(You may need to know that I am using the CM550 model however this technique is replicable on any of the Brother Scan N Cut models – you might just need to choose different shapes).
For the benefit of this post I make no assumption and have detailed practically every single step with a picture.
If your machine is not in the same room as your computer (one of it’s advantages) you may like to print this post off so that you can work through it step by step.
Ok, let’s get cracking.
Oh, hang on, just need me tea … *slurps*, ok, let’s go. :)
Step 1
Switch the machine on and bring up the HOME screen.
If you have not yet turned off the animated splash screen that appears when you first turn on the machine then just press the Home button on the left hand side of the operation panel and click OK when you get the calibration message.
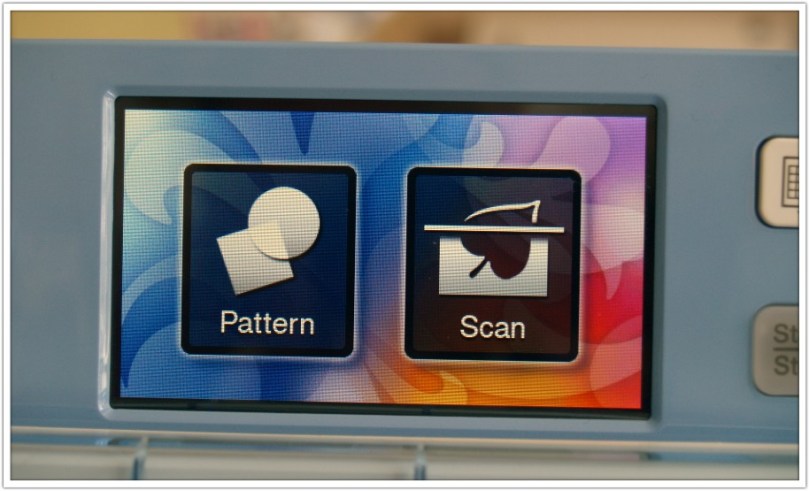
You will then have the following two icons on screen.
From the HOME screen tap your stylus on the “Pattern” icon to get to the pattern browser.
Step 2
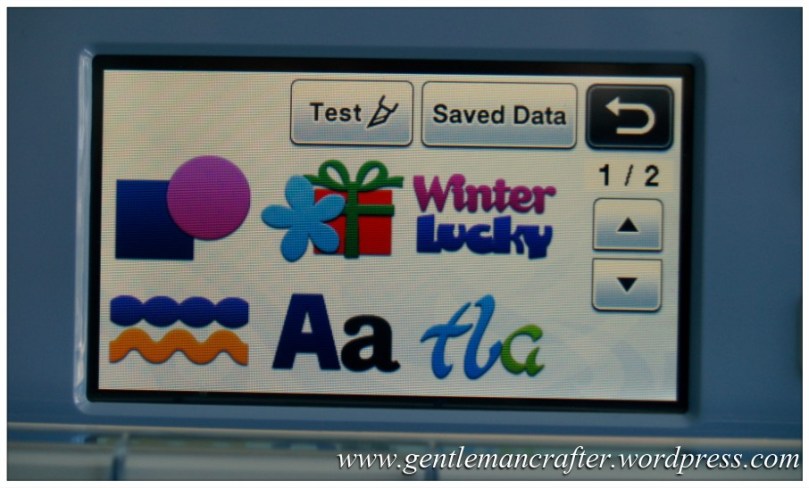
This is the Pattern Browser screen.
As mentioned I am using the CM550 model so have a couple of extra shapes to play with however the rest of the six categories are the same for the UK CM600 model. Other models may differ by location.
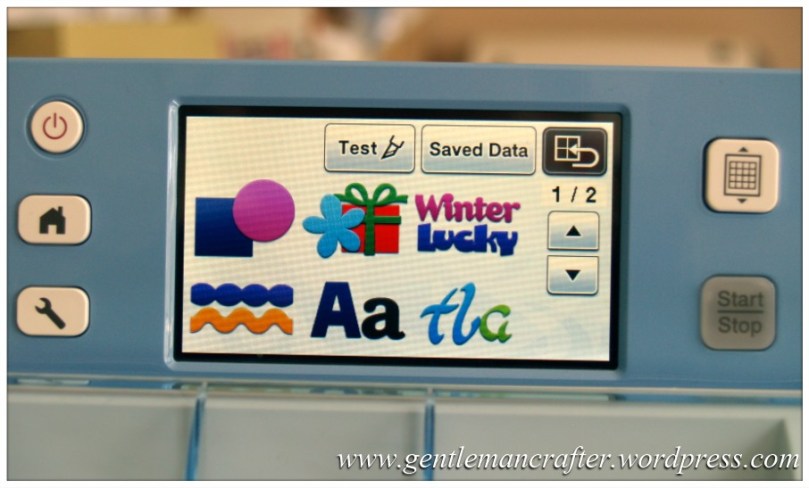
From the options shown in the Pattern Browser screen, click on the Themed Shapes icon. It’s the one that looks like a flower sitting in front of a wrapped gift.
Step 3
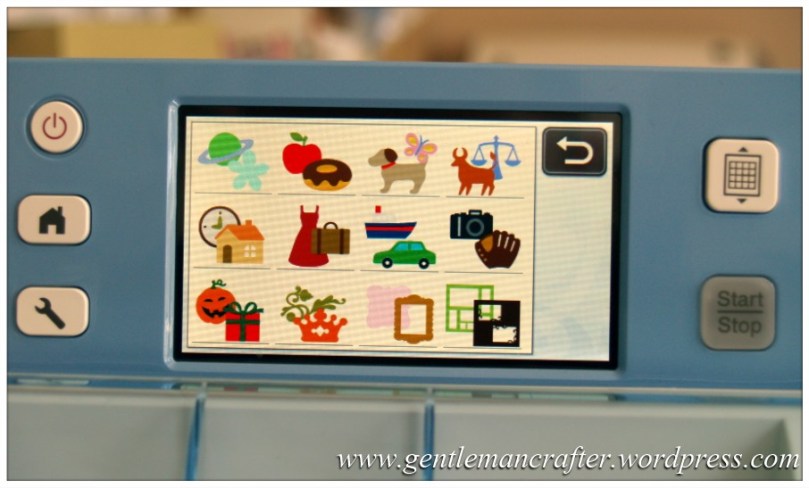
This is the Themed Shapes screen.
From this selection I chose the Heraldry section. It’s the one at the bottom that looks like a crown sitting in front of a leaf.
Step 4
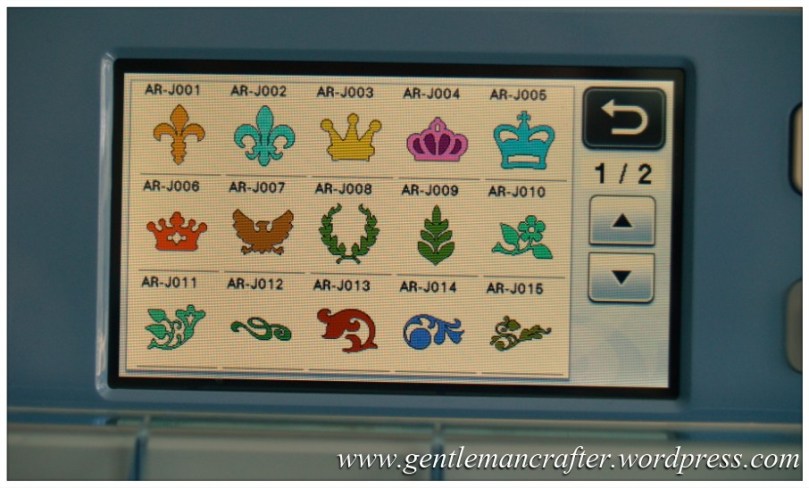
These are the choices in the Heraldry section.
For the design that I made I chose the one that you can see bottom left of the screen – it has a file name AR-J011.
Tap on that design.
Step 5
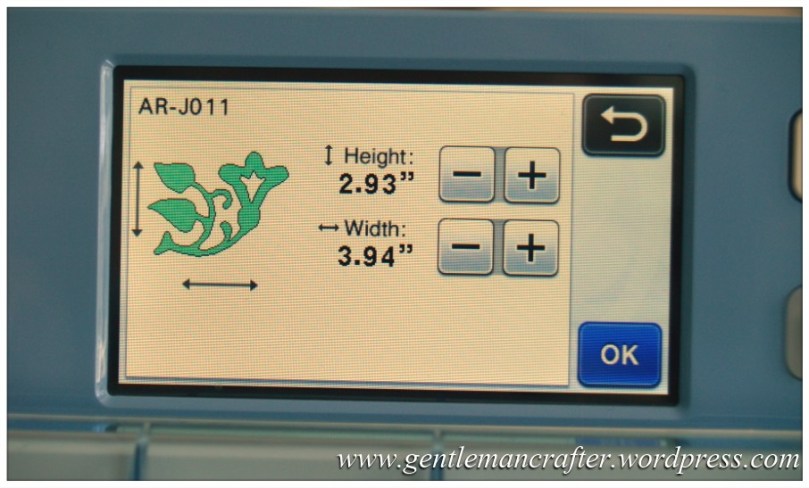
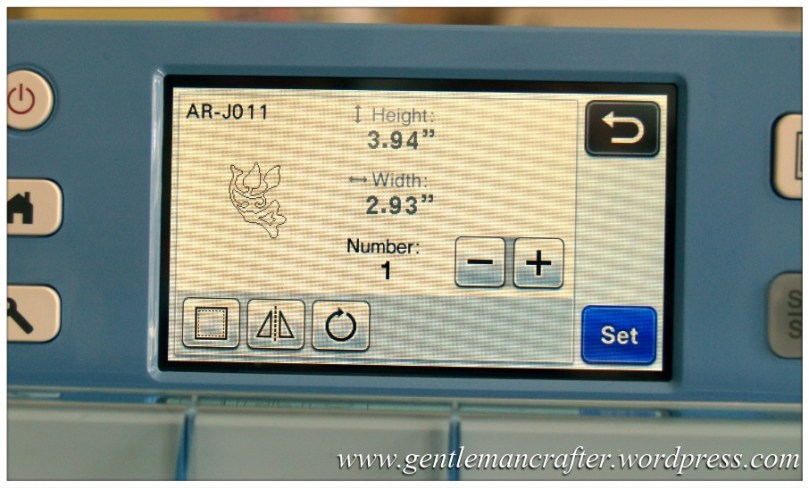
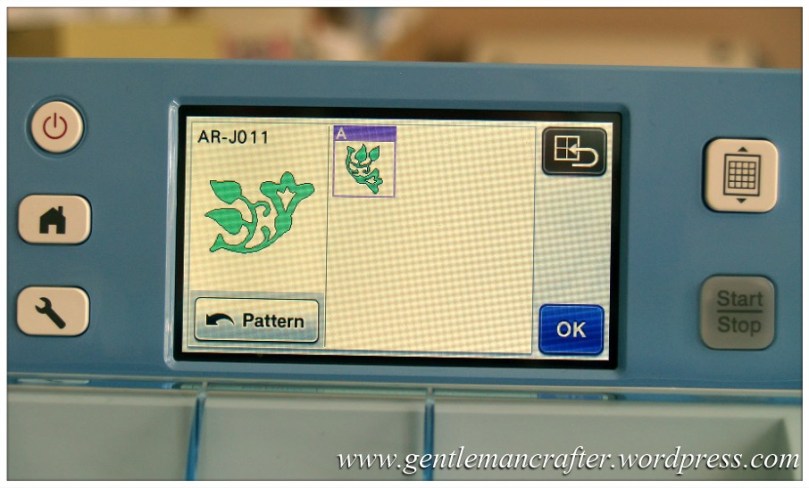
You will now get this screen.
It’s a way of setting the size of your shape before putting it on the Virtual Mat. For this tutorial, there are no changes to make here.
Tap OK.
Step 6
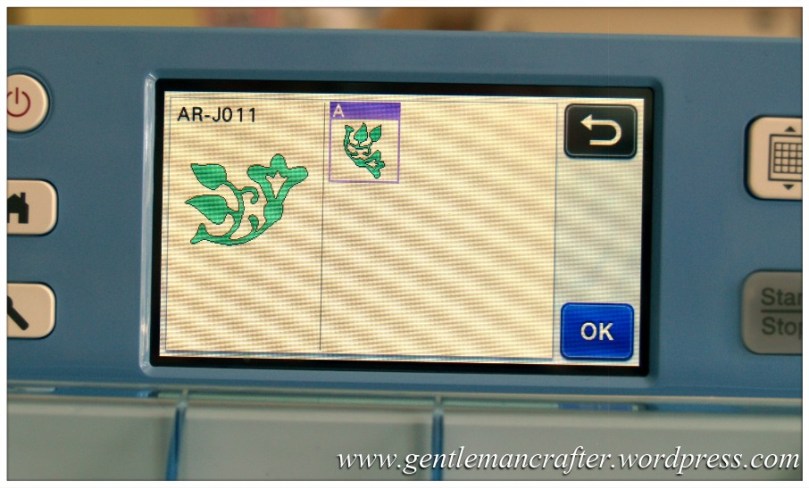
You will then get this screen.
For single layer shapes this screen is a quick check and you can tap OK and move on.
For shapes with more than one layer you will be presented with the different layers here and will need to choose which layer you wish to load first before tapping OK.
Step 7
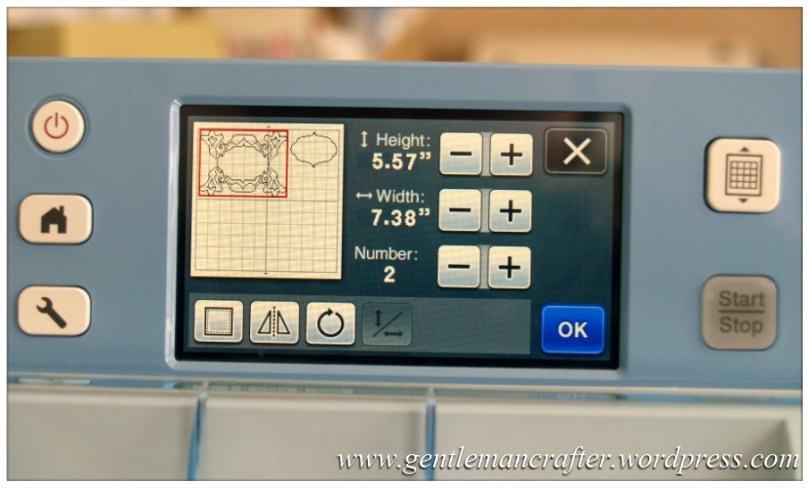
You will then be presented with further adjustment options.
As you can see, the sizing options are greyed out. On this screen however you can increase the “Number” in order to replicate this design as many times as you like.
The other options at the bottom of the screen are –
- Seam Allowance – This will add a seam allowance according to the size set in the Settings Screen (which you can access at any point by clicking the button on the left of the control panel that looks like a wrench or spanner).
- Flip – Will flip the design right and left. Good for doing designs in reverse if your project calls for it.
- Rotate – Set the angle of the design before committing it to the Pattern Layout Screen.
Tap Set.
Step 8
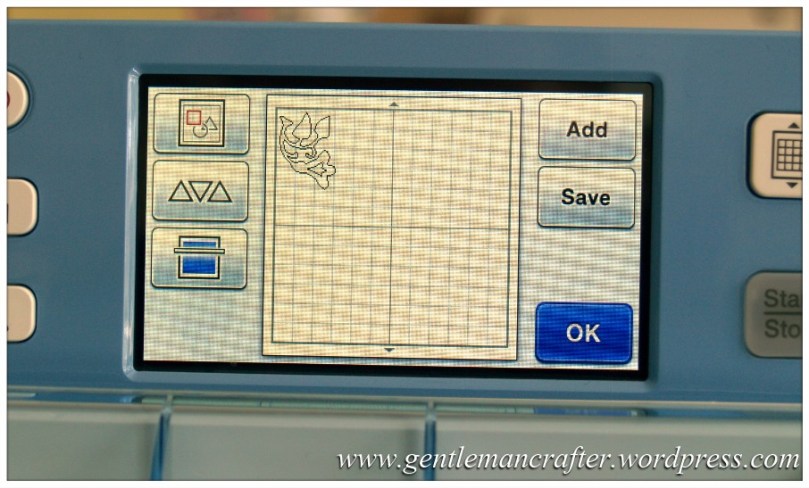
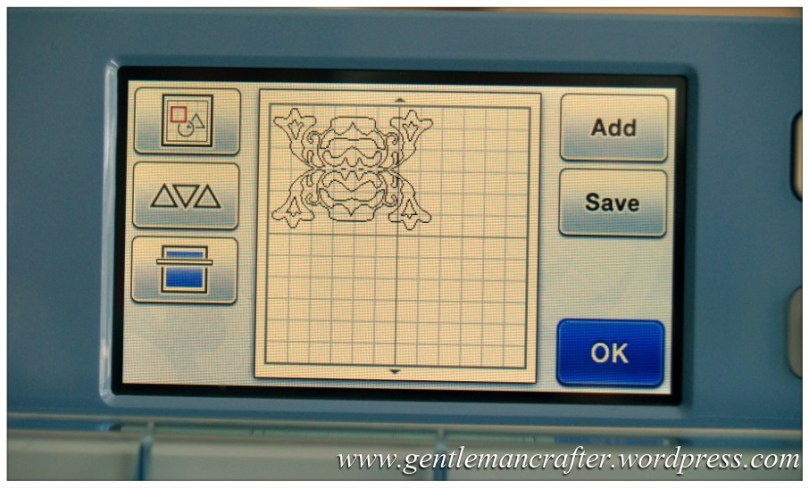
The design is now placed on the virtual mat in the Pattern Layout Screen.
From the Pattern Layout Screen you have access to various additional functions.
On the left, the icons are:
- Editing Screen – Advanced editing features for manipulating shapes.
- Auto Layout Screen – Automatic arrangements of shapes on the virtual mat to get best use of space.
- Background Scan – Scan the cardstock that is on the actual cutting mat to get a preview on screen so that you can precisely position items to be cut or drawn.
On the right, the icons are:
- Add – Continue adding shapes to the virtual mat.
- Save – Save the design to the machine’s memory or to a USB device.
For the next step in this tutorial, click on the Editing Screen icon.
Step 9
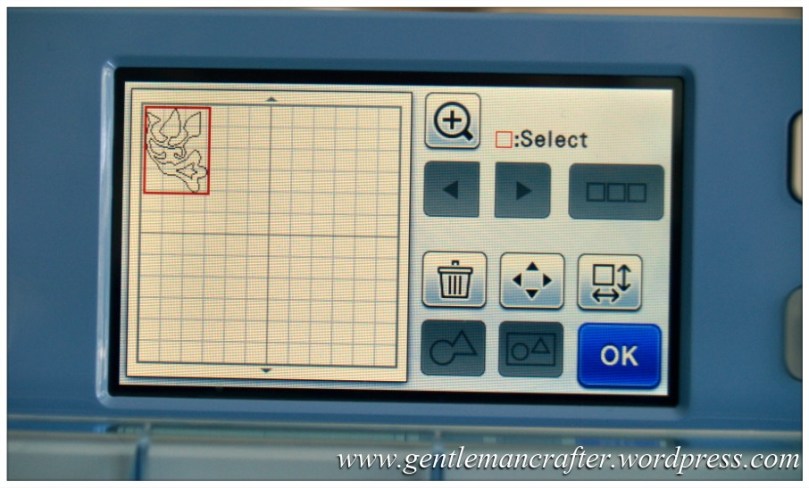
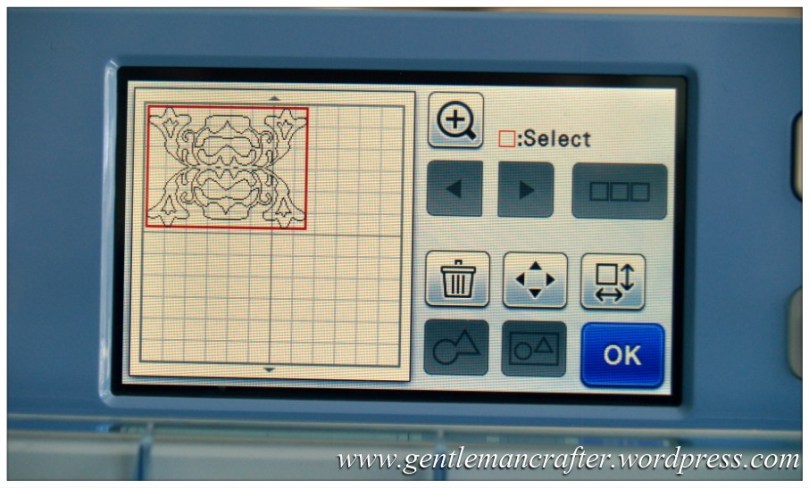
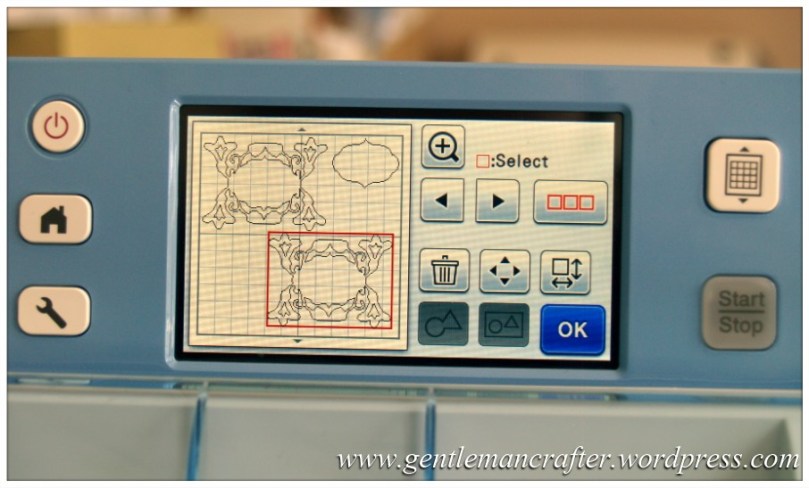
The next screen that you will see is the Editing Screen. It looks like this.
Next up, we need to start replicating and welding. Don’t worry, I’ll talk you through it step by step.
First, a quick talk around this screen.
On the left you have the virtual mat. Same as on the last screen and you can still directly interact with items on this screen.
On the right, from the top:
- Magnifyer – Zoom a design so that you can get a closer look when editing.
- Selection Tools – The two arrows will move the selection box (shown red in the image above) from shape to shape, if there are more than one on the mat. They are greyed out here as I only have one shape. The three red boxes are for when you need to select more than one shape at once – more on that later as we will be using it.
- Delete – The little bin is a way of deleting individual shapes from the design. Also good for cleaning up scans where you have some extra bits that you didn’t want.
- Moving – The four arrows in one icon are for nudging shapes around the screen at small increments – this is great when you are trying to align or overlap something.
- Editing Individual Patterns – The icon that features the square box with two double ended arrows is for when you want to get back to the editing features that you saw earlier such as re-sizing, adding seam allowance, flipping and rotating.
- Welding – When you have two or more shapes overlapping and wish to weld them together to create a new shape (as we are going to do in a while), then this is the icon that you need.
- Unifying – Otherwise known as grouping is the little icon that has two shapes in a rectangle. This is great for when you need to resize or move together.
- OK – this is the button that will commit all of your changes to the Pattern Layout Screen.
To get to the next step in our project, tap the Edit Individual Patterns icon (reminder – it’s the one that features the square box with two double ended arrows).
Step 10
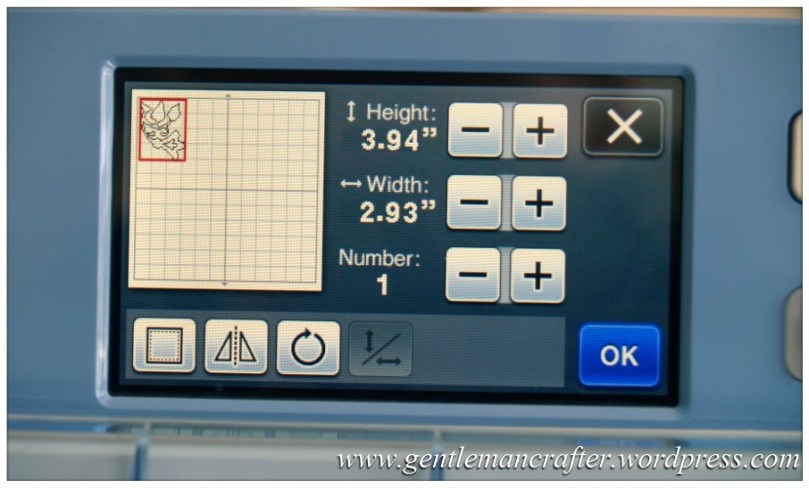
The Editing Individual Pattern (going to call it edit screen now) Screen looks like this.
So, you’ve seen this screen before so I’ll not give an overview on this one.
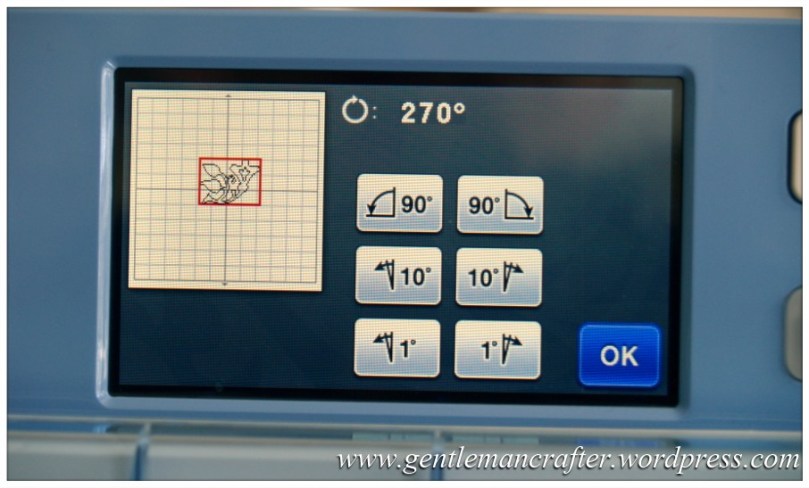
Using your stylus, tap and drag the design into the centre of the virtual mat and then click on the Rotate icon.
Step 11
In the rotate screen you will have various options.
Tap on the icon with the arrow pointing to the left and the number 90 on it.
Now, tap on OK.
Step 12
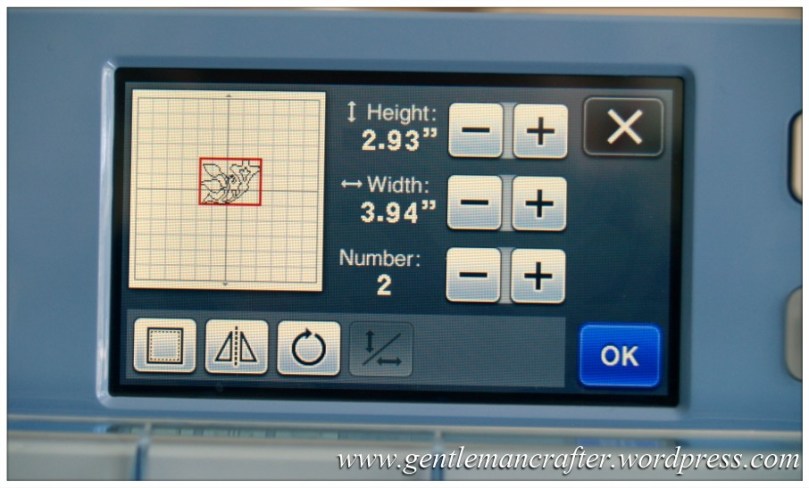
You will then be taken back to the edit screen.
Now, tap once on the + symbol next “Number:”
Tap on OK.
Step 13
You will now be back on the main editing screen and have two of your shapes on screen.
Next, select just one of the shapes.
Now tap on the Edit Individual Shape icon again.
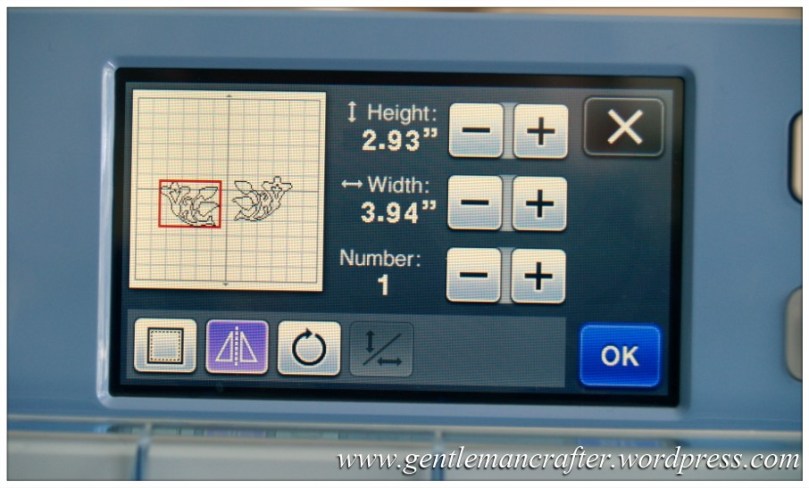
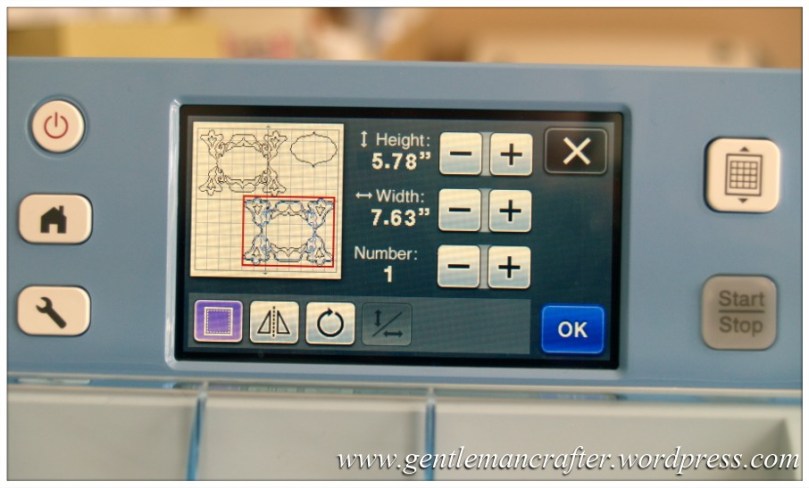
Step 14
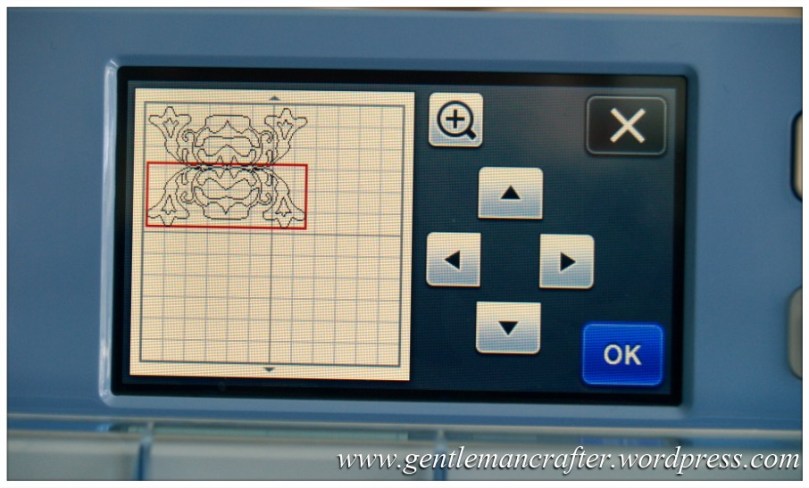
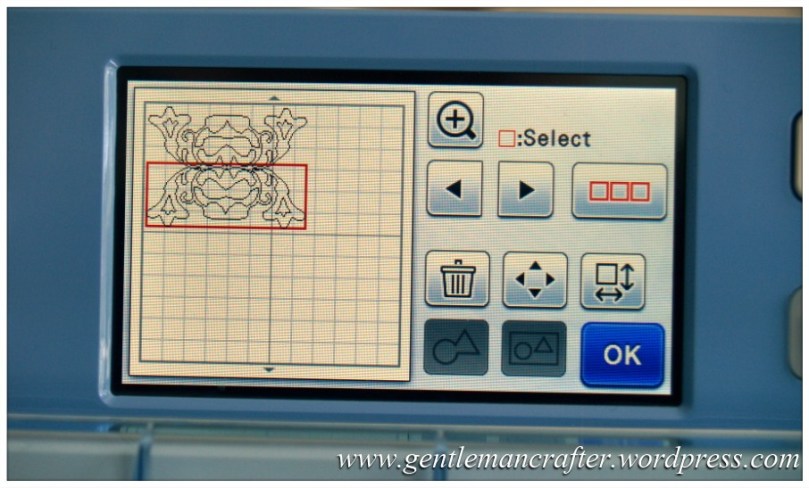
Back in the second editing screen tap on the Flip icon. It’s the one that you can see highlighted in purple below.
Tap on OK.
Step 15
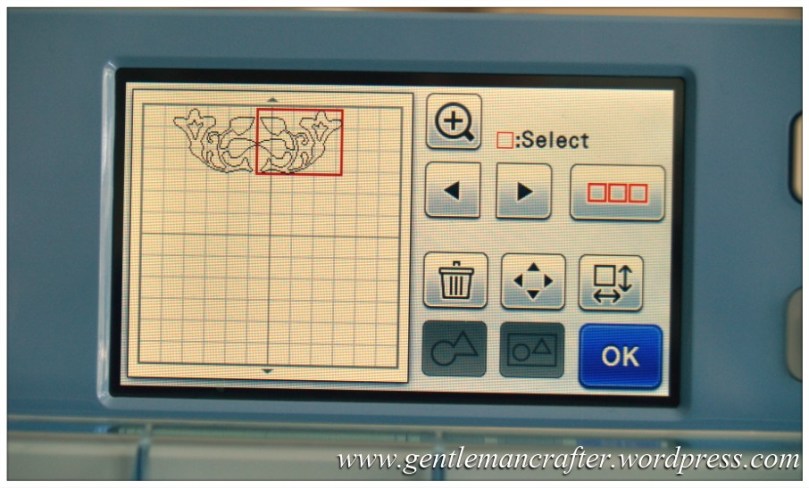
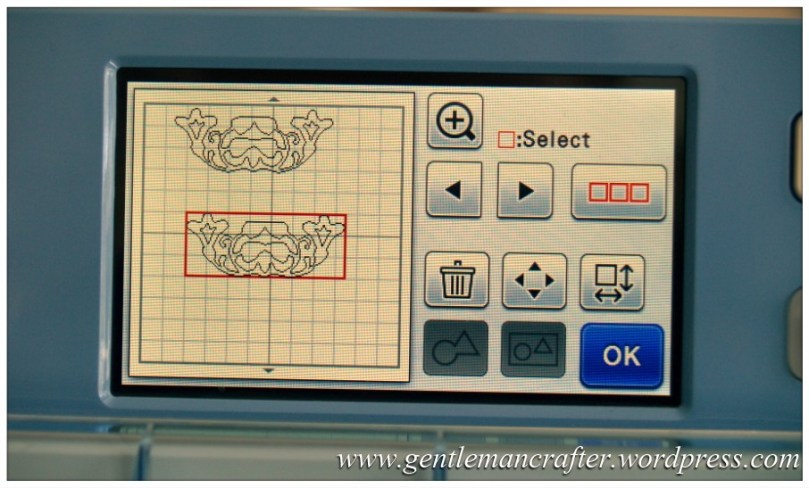
Now, use your stylus to move both of the shapes to the top of the screen.
We are being clever here and using the top of the Virtual Mat as an alignment guide because the shapes won’t go over the edge.
Make sure that the shapes are fairly close together and then tap on the Moving icon (the one with the four arrows in one icon).
Step 16
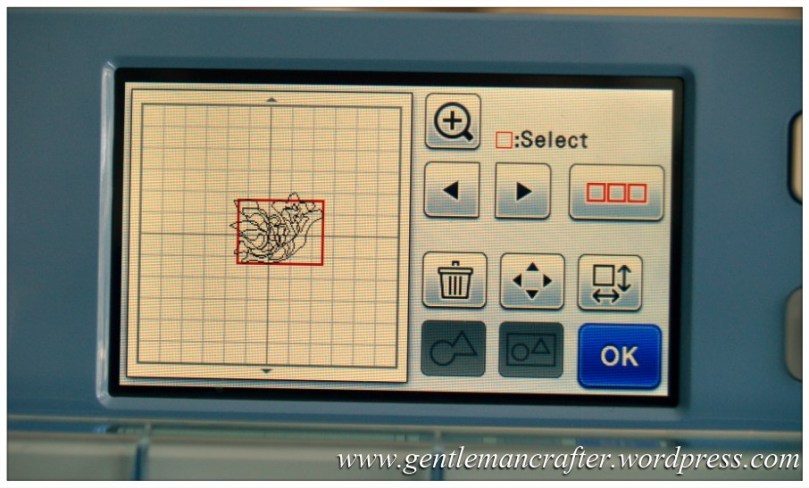
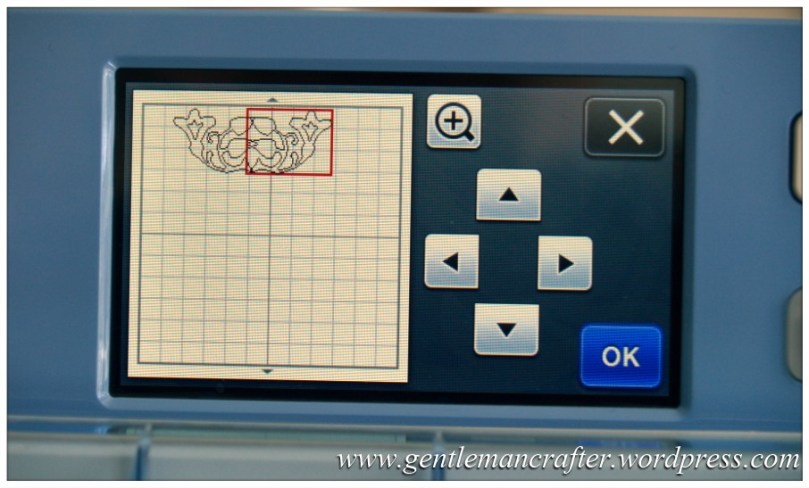
Using the stylus, tap on the left facing arrow a couple of time until you can see that the shapes are overlapping at the tips as shown in the image below.
If you need a closer look, don’t forget that you can use the Magnifyer icon at the top of the screen.
Tap on OK.
Step 17
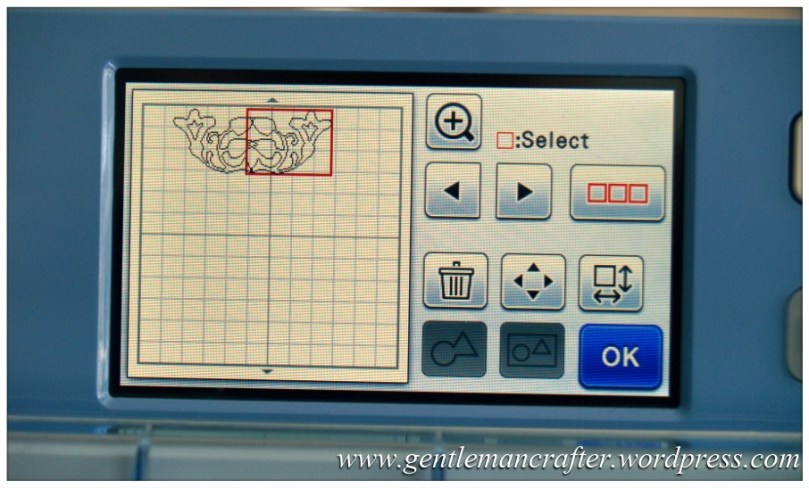
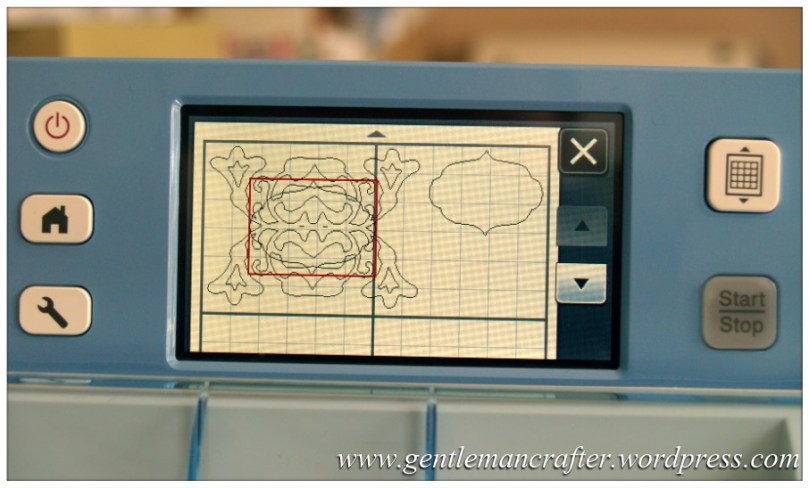
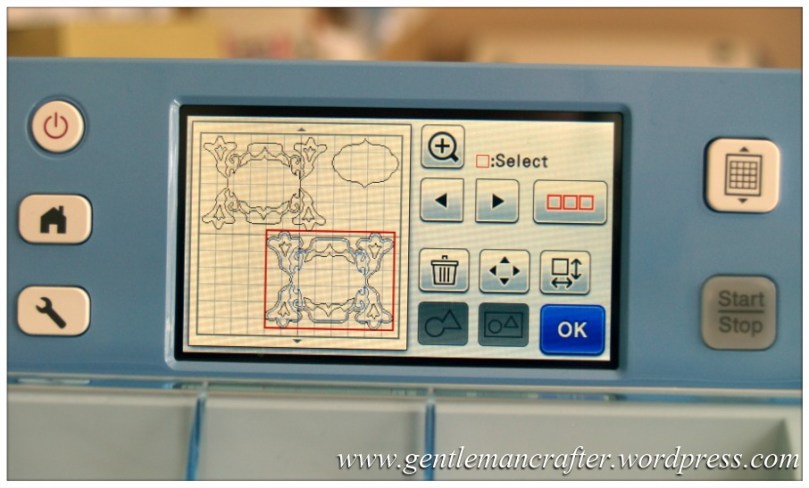
You’re now back at the main edit screen.
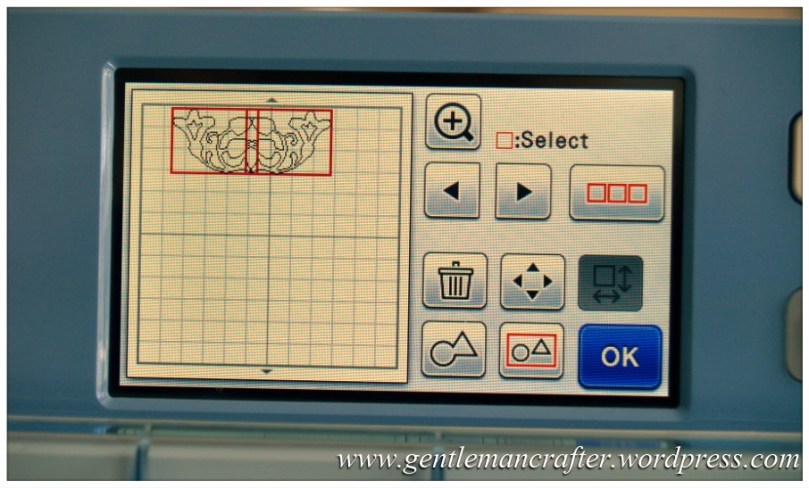
Next we need to weld the two shapes together but there is only one shape selected and the weld icon is greyed out.
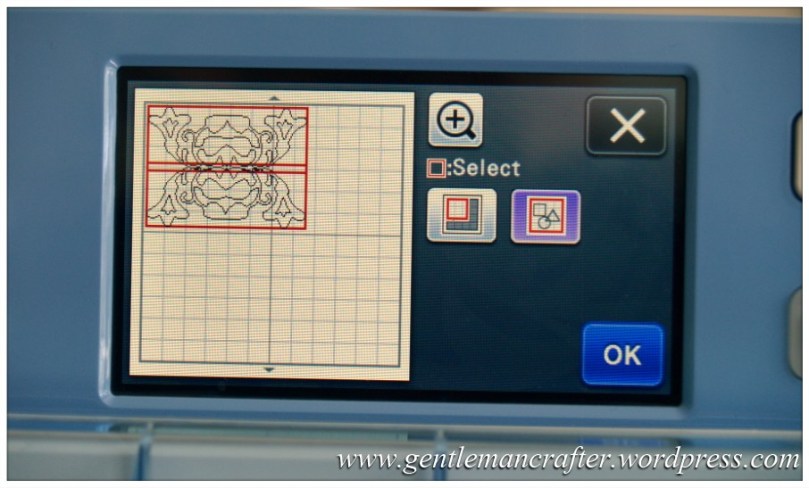
Tap on the icon that has the three red square boxes.
Step 18
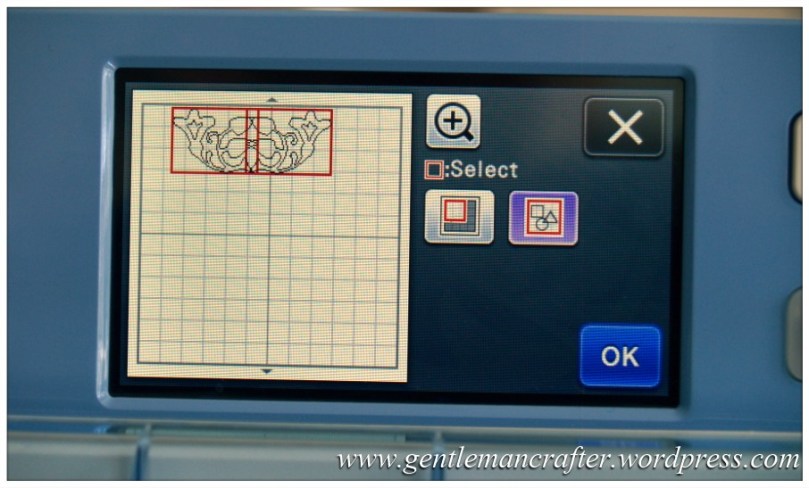
On the Selection screen you only have a couple of icons as you can see.
The one on the left allows you to isolate a small group of shapes whereas the one on the right selects everything on the mat.
As there is nothing on the mat that we don’t want to include I tapped the one on the right. Feel free to try either one.
Tap on OK.
Step 19
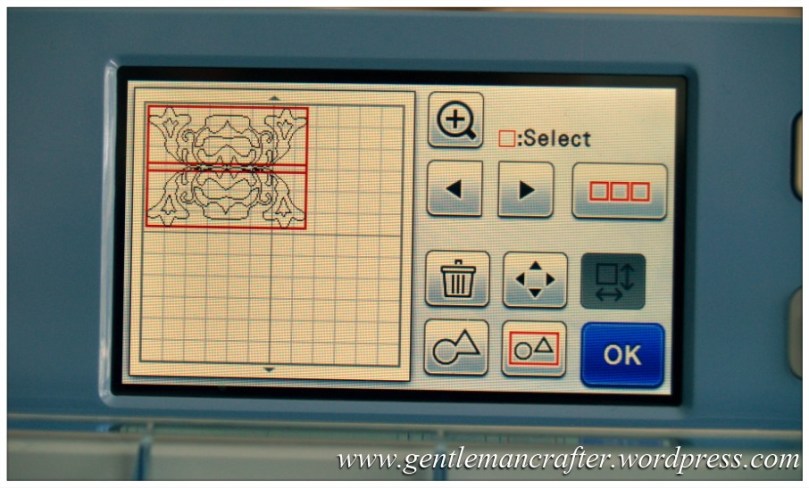
As you can now see, both shapes are selected and the welding/unifying buttons are now lit up.
Now, just tap on the Weld button (it’s the one on the left that looks like a circle with a megaphone, lol).
Step 20
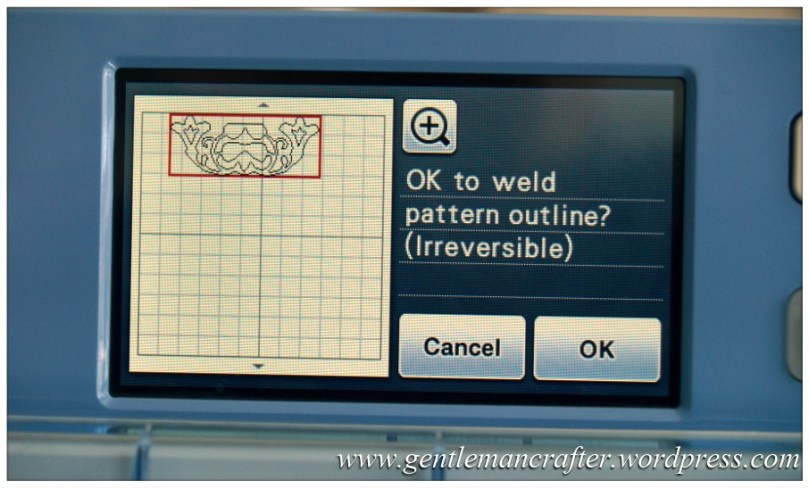
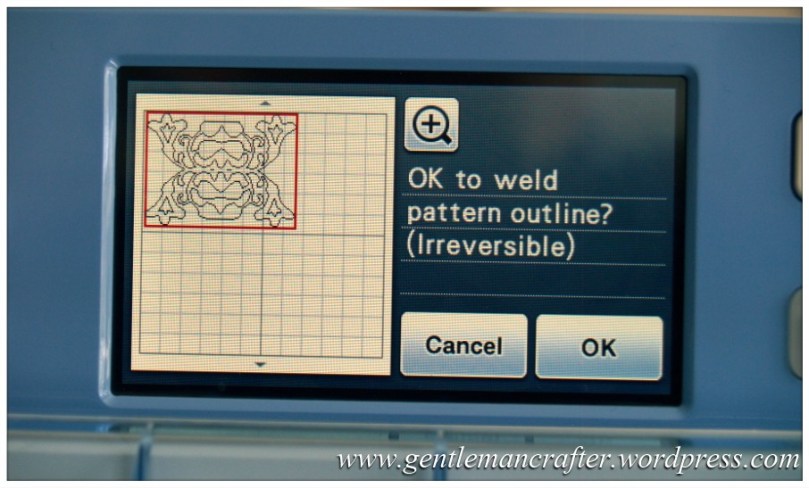
If you have done the last few steps correctly then you should get this confirmation message.
If the shapes do not overlap then you might get an error message saying so. It’s ok, just go back and use the Moving tools to try and make them overlap, then come back here.
Tap OK.
Step 21
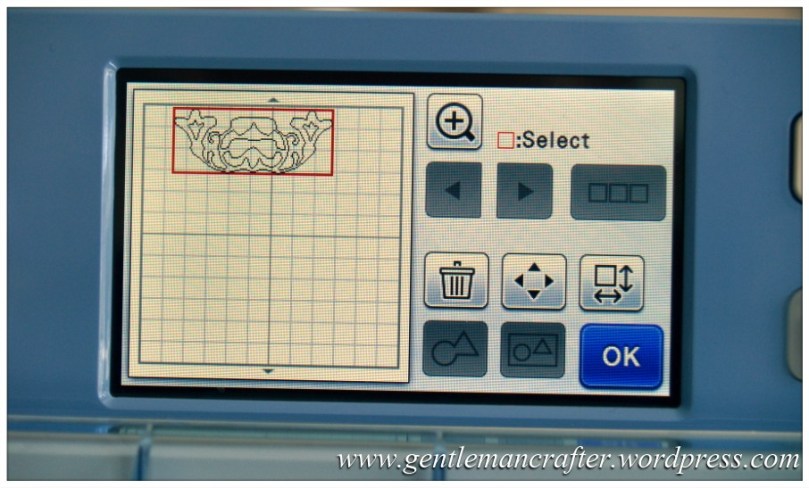
Success! We now have our newly created shape on the Virtual Mat.
Ok, we’re going to do something very similar with the new shape.
Tap on the Edit Individual Shapes icon.
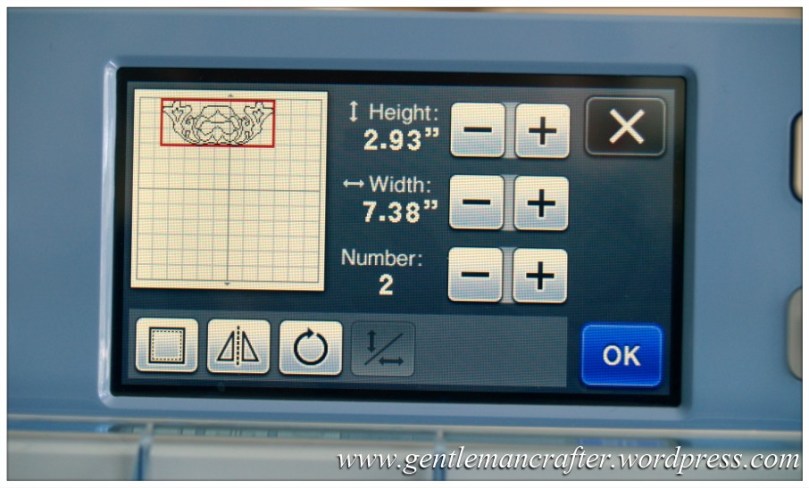
Step 22
Tap on the + icon next to the word “Number:” once in order to increase it to 2.
Tap OK.
Step 23
You now have two of the new shapes on screen. Use your stylus to move on the shapes to the centre of the screen.
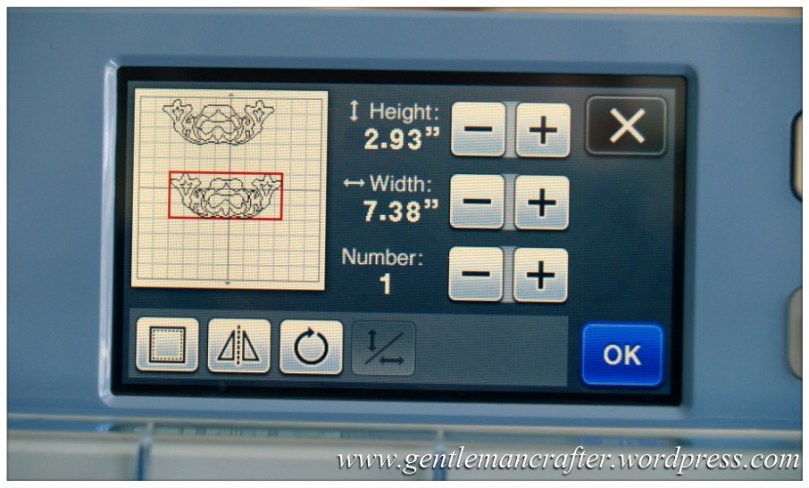
Then tap on the Edit Individual Shapes icon.
Step 24
We’re back at that second edit screen.
Tap on the Rotate icon.
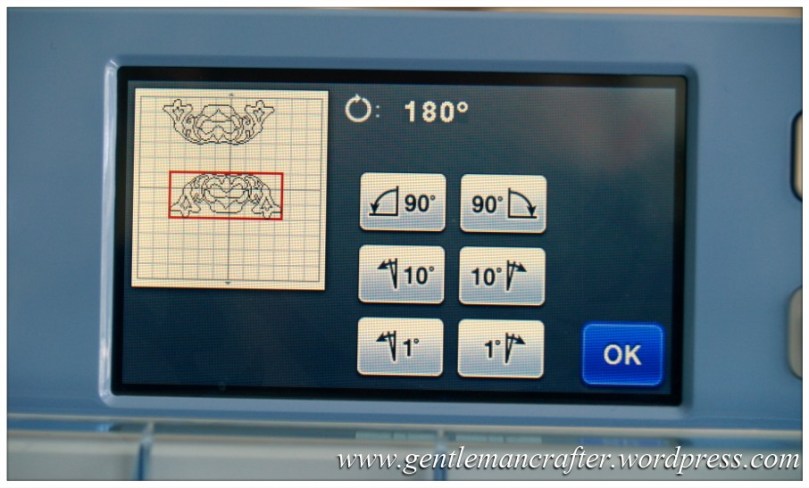
Step 25
Same options as before, this time though, click on the “90 to the left icon” twice. Sadly there is no horizontal flip, so this is the way that we have to do it.
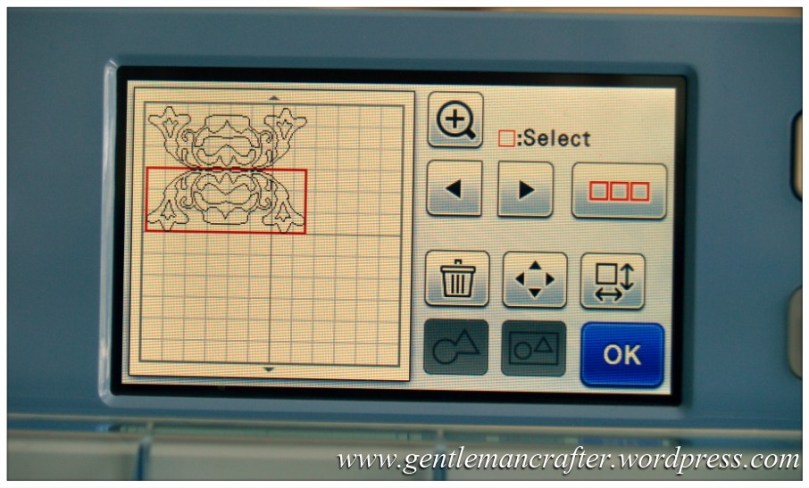
Tap OK.
Step 26
Back on the main edit screen. As before use the side of the Virtual Mat as an alignment guide and position the two shapes fairly close together as shown in the image below.
Tap on the Moving icon.
Step 27
Move the bottom shape until using the up arrow icon until the shapes slightly overlap.
Here are mine just slightly overlapping.
Tap OK.
Step 28
On the main editing screen again.
Tap on the icon that has the three red square boxes.
Step 29
In the Selection Screen choose the Select All button (on the right).
Then tap on OK.
Step 30
Both shapes are now selected.
Now click on the Weld icon.
Step 31
As before, if you have done this correctly you will get a confirmation message.
Tap OK.
Step 32
Success! That’s the first part of our decorative panel complete. :)
Give yourself a pat on the back but before you make that cup of tea, tap on OK.
Step 33
You will then be taken back to the Pattern Layout Screen.
Ok, we’re getting there. The next step is to create the panel in the centre of the design that will house our sentiment and then create the layers.
With me so far?
Ready for the next bit?
Ok, let’s do it :)
Tap on the Add icon.
Step 34
You will then be shown the shape that you previously loaded.
Tap on the icon at the bottom of the screen that says Pattern.
Step 35
You are now back at the Pattern Selection screen.
Tap on the Themed Shapes icon (flower and gift).
Step 36
The next menu will appear.
From this menu tap on the icon that looks like two frames on top of each other.
Step 37
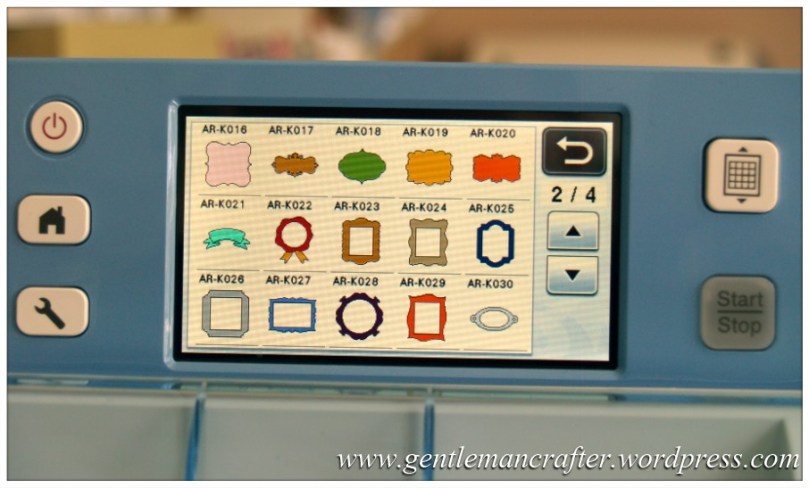
There are a few appropriate shapes in this group that could be used.
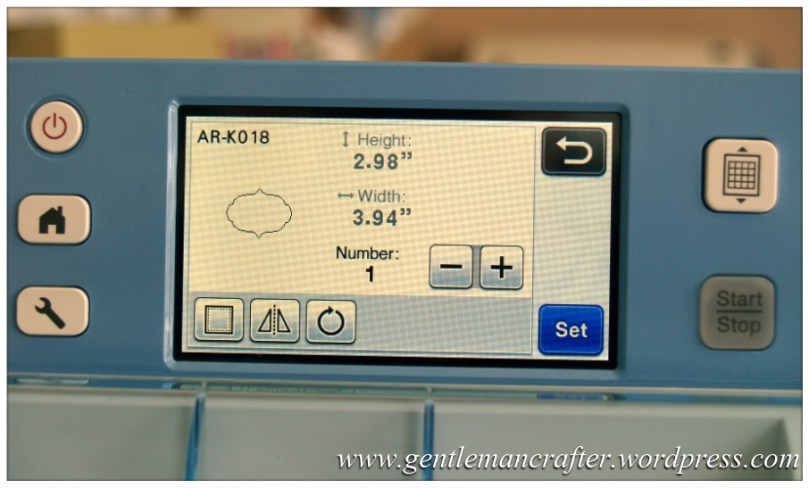
The one that I chose however was labeled as AR-K018. On my machine, it is the green one in the middle at the top of the second page of shapes. To get to this page, just tap on the down arrow at right of the screen.
Tap on that.
Step 38
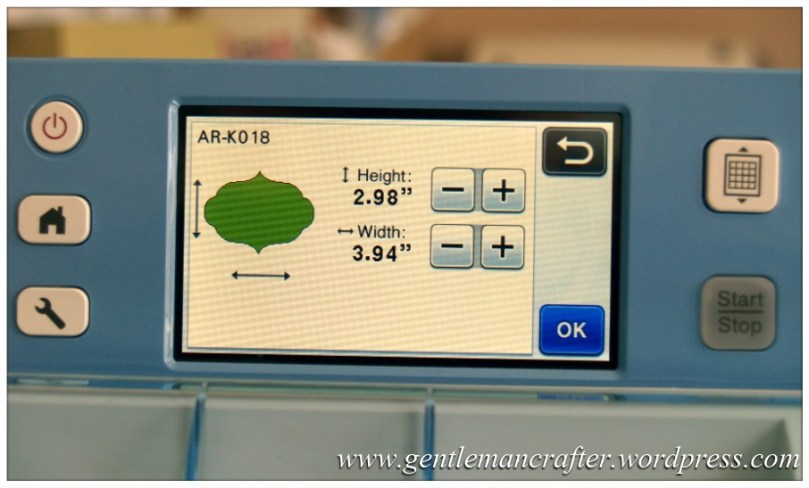
We’re now going to go through the Pattern loading sequence.
Tap OK.
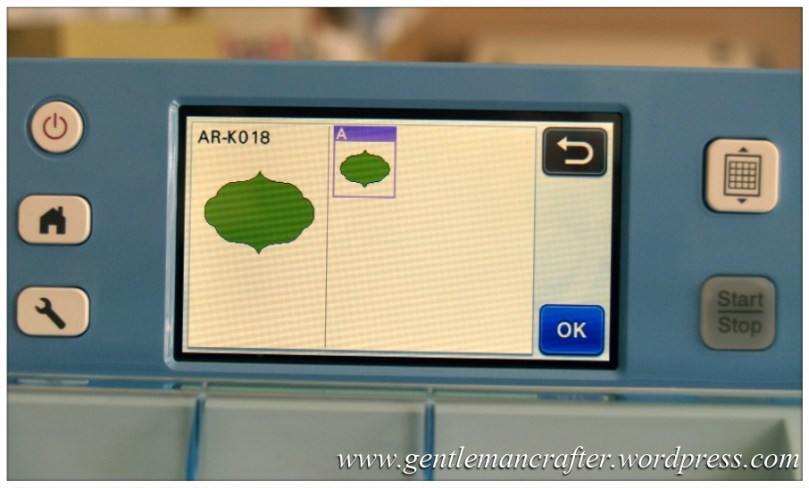
Step 39
Tap OK again.
Step 40
Tap on SET.
Step 41
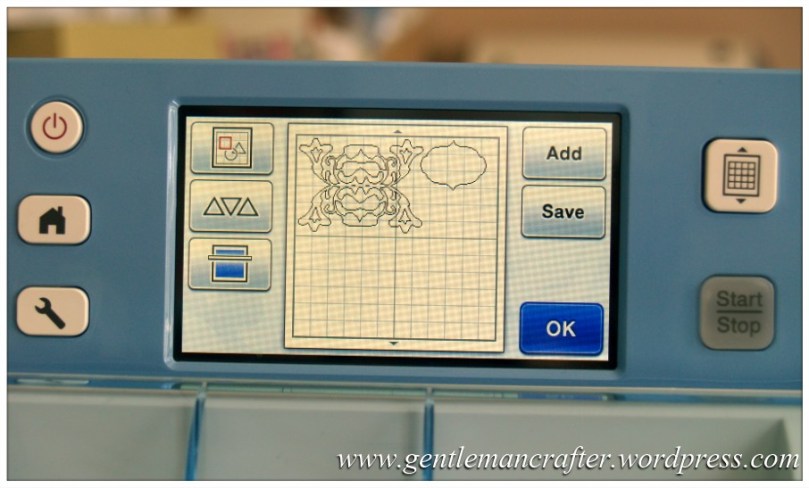
The design is now in the Pattern Layout Screen.
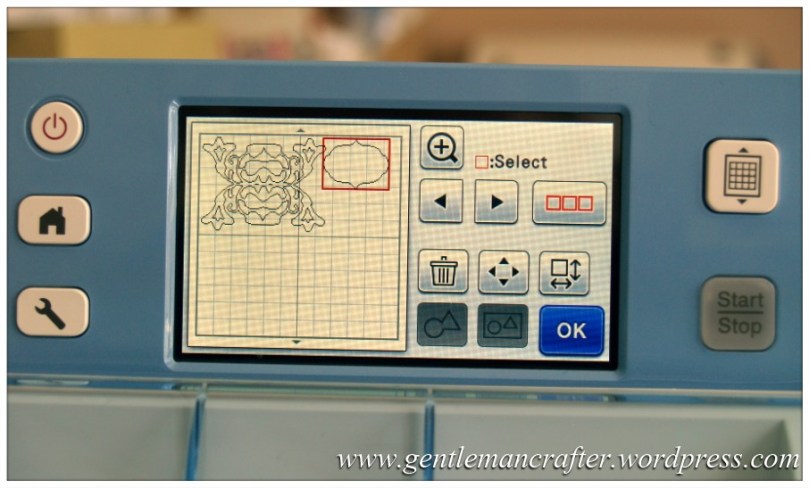
Now, tap on the shape that you just loaded to select it and then tap on the Edit Screen icon at the top left of the screen.
Step 42
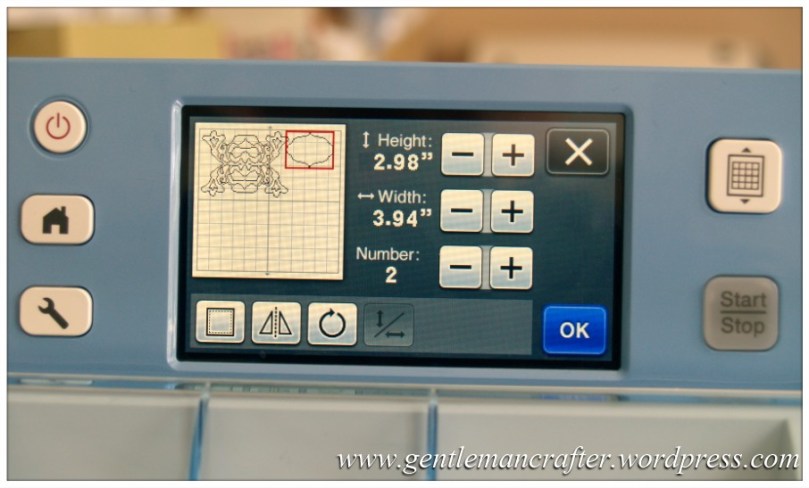
Next, tap on the Edit Individual Shapes icon.
Step 43
Tap on the + icon next to the word “Number:”, once so that you have 2 as the number.
Tap on OK.
Step 44
As before, we now have two of the panel shapes on screen.
Now, tap on the Edit Individual Shapes icon again.
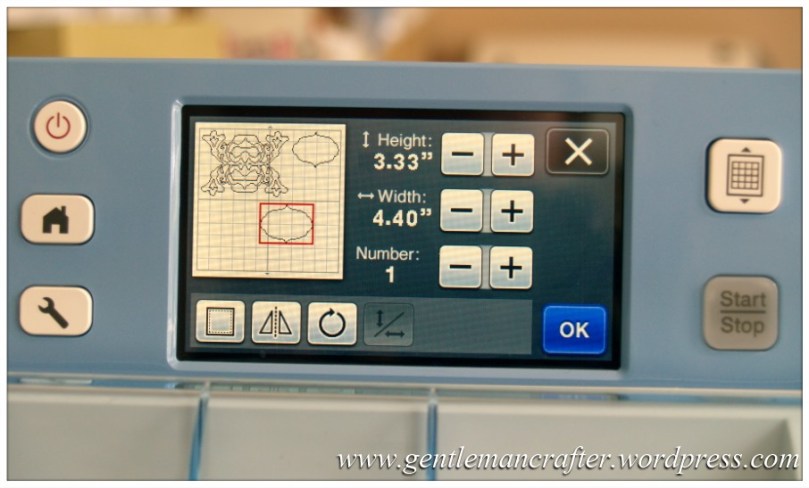
Step 45
This time, we need to change the size.
Drag just one of the panel shapes to an area that you can see it.
Tap on the + arrow by the word “Height:” until you have added arrox 0.25 inches to the number. I.e. increase it from 2.98 to 3.33.
Remember, you can change the measurement units to mm in the Settings Menu if you prefer that. If doing that, you’ll need to add approx 3 or 4mm to the height.
Tap OK.
Step 46
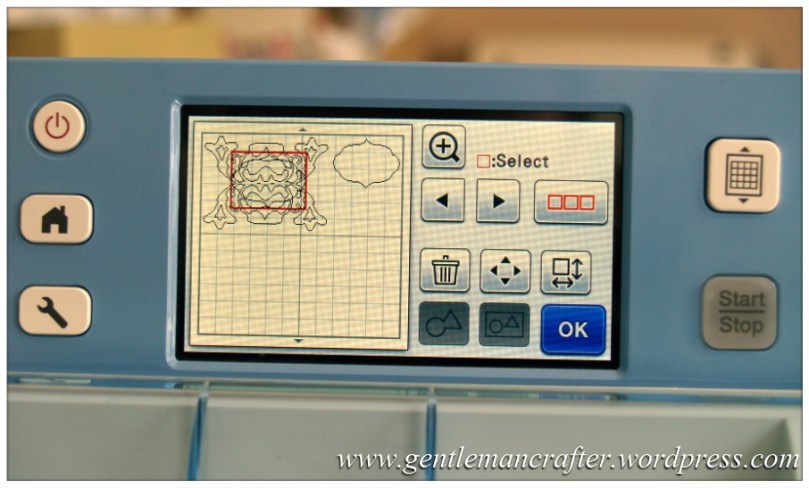
Now, position the shape over the design that we made earlier. Try and get it as central as possible.
Don’t forget the Magnify icon if you need it.
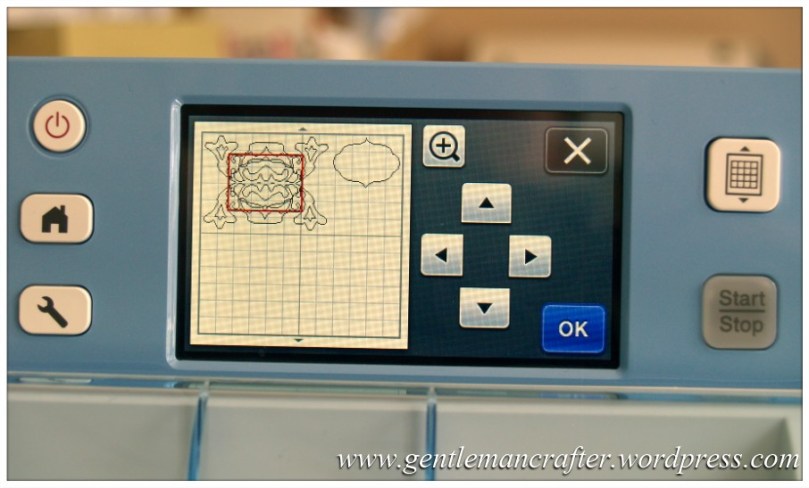
If you need to make further adjustments, you can tap on the Moving icon and make further small changes as shown in the next image.
As there were a lot of lines involved, I did use the Magnify screen in order to get a better view.
If you do use this screen, just click the x to come out of it. You can actually do any editing on this zoomed image however it’s good to pop in and out of to make sure that you have things aligned.
If you did use the Magnify screen, tap OK and then OK on the next screen.
If you didn’t, just tap OK.
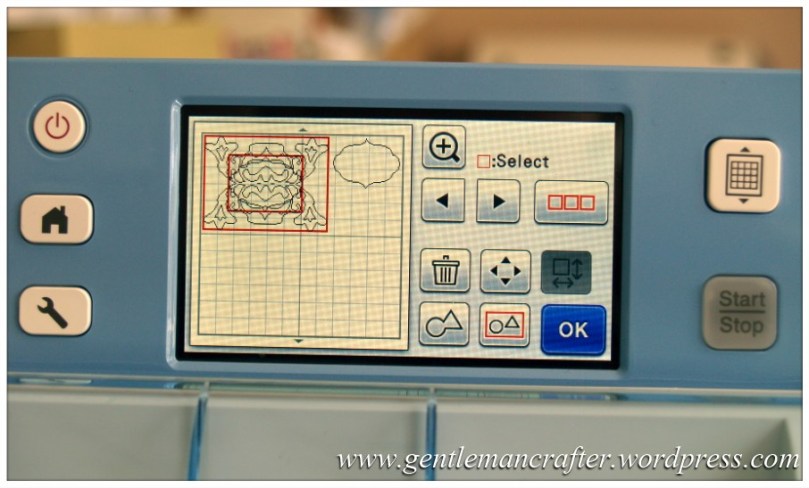
Step 47
Back on the main edit window we can now see things coming together.
Next, we need to weld the larger panel that we have just resized to the shape that we made earlier.
To do this, tap on the triple red box Selection Screen icon.
Step 48
This time, instead of using the Select All icon, I used the one on the left.
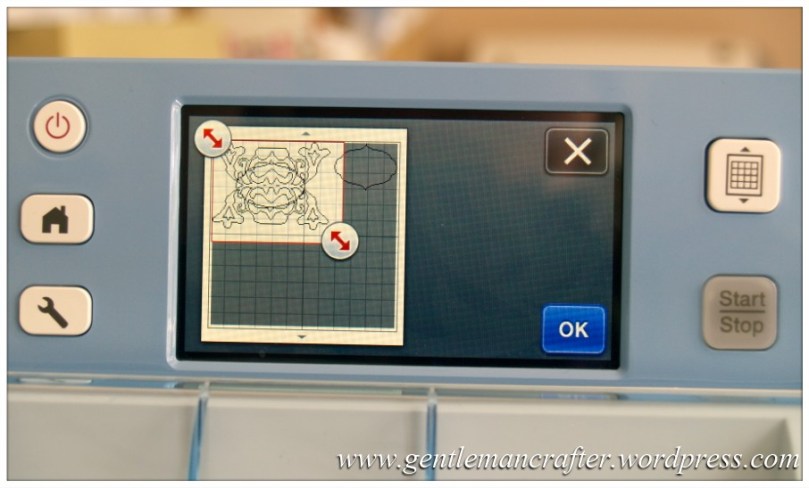
The screen then gave me a large box covering the entire Virtual Mat with two “handles” at opposite corners. I dragged the bottom right one by tapping and dragging with my stylus until only the shapes that I wanted to weld were selected as shown below.
Tap OK.
Step 49
Back on the main edit screen and you can see that only the shapes we want to weld have been selected.
Tap on the Weld icon.
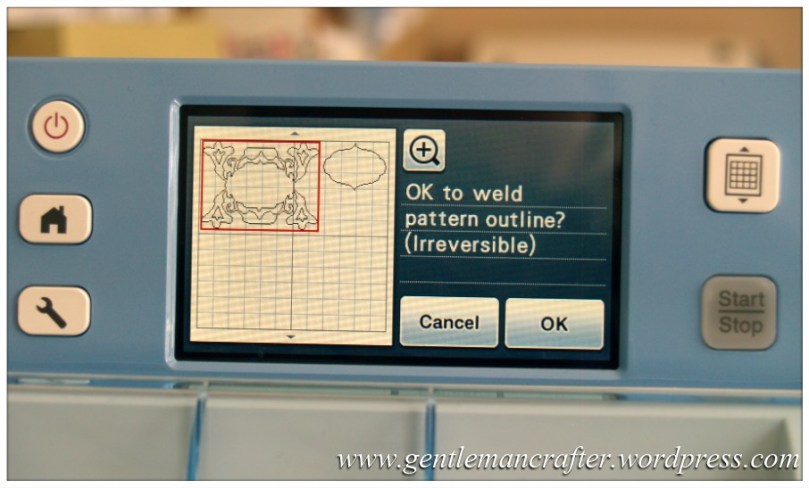
Step 50
As before you will get a confirmation message.
Tap OK.
Step 51
Now, select only the larger shape and tap on the Edit Individual Shape icon (no photo for this as we’ve done it a few times.
Tap on the + icon next to the word “Number:” once so that you have 2 as the number.
Tap OK
Step 52
You now have two of the larger shapes on screen.
Drag one into an empty space on the Virtual Mat.
Tap on the Edit Individual Shape icon again.
Step 53
This time, tap on the Seam Allowance icon. It’s bottom left (highlighted in purple in the image below).
This will set an offset outline on your shape according to the Seam Allowance set in your settings menu. If you wish to change this, press the Settings Menu button on the left of the control panel, scroll down until you reach the seam allowance settings, press the + or – to increase or decrease and tap OK. You will then be brought back to this screen.
Tap OK.
Step 54
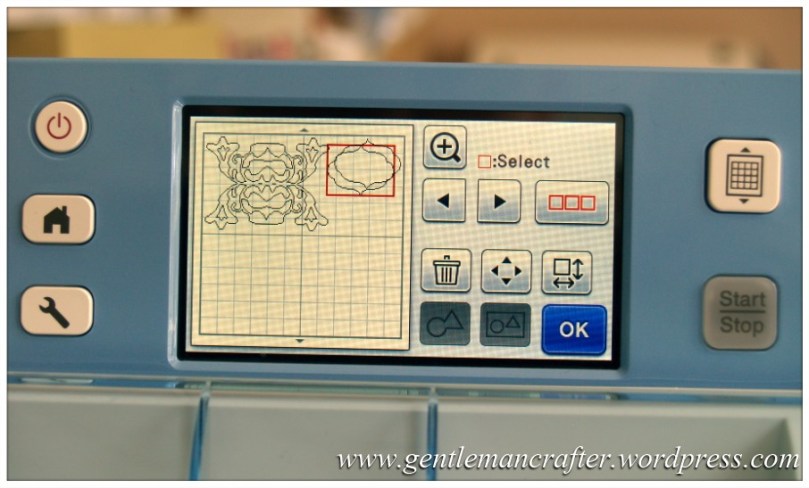
Right, we now have all of the elements that we need for our design.
Just one final adjustment though as you might want to cut these all at the same time.
Using your stylus, move the small panel shape from top right to bottom left.
Tap OK.
Step 55
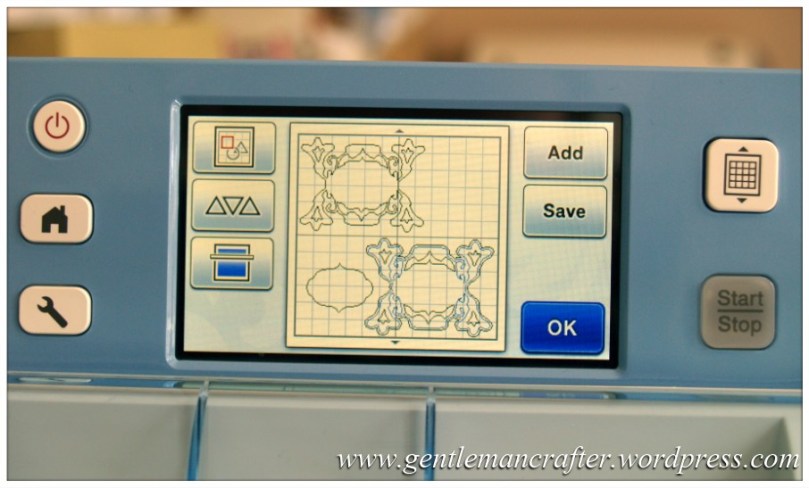
This is roughly what your final screen should look like.
You are now ready to cut or save.
And there endeth the longest tutorial that I have ever written! lol :)
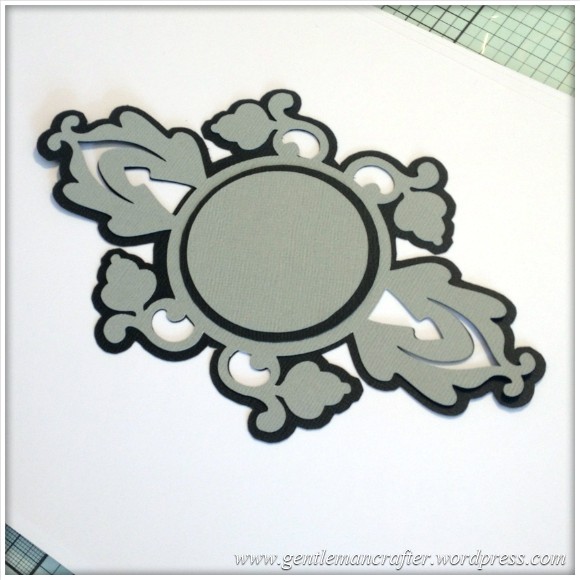
Ok, so what does it look like when it’s all cut out?
This.
Not bad really.
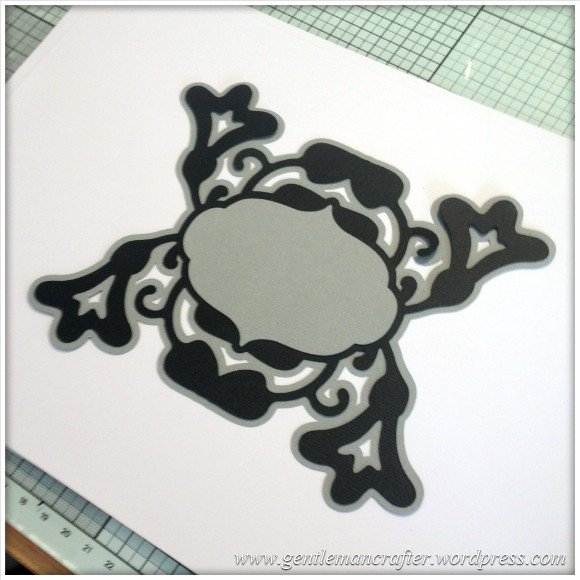
Here’s an alternative using two different shapes.
Now, something obvious may have come to your attention. That is that, even though we added a seam allowance, that the inside areas don’t have a border.
This is totally normal. At this time there is no offset or border feature on the machine so we are actually using a feature that was design for adding a seam allowance to the outset edge of a shape for crafting with fabric.
For me, this isn’t an issue. I quite like the idea of cutting out little scraps of patterned paper and popping those behind the apertures – it’s defo one way of using up that bit box! ;)
Anyway, if you are a stickler for the all-over uniform bordered look then you will need to transfer your design to Scan N Cut canvas (after step 50 above) and add the offset in canvas and then re-save and bring back to your machine to cut.
This is what it will look like if you did it this way.
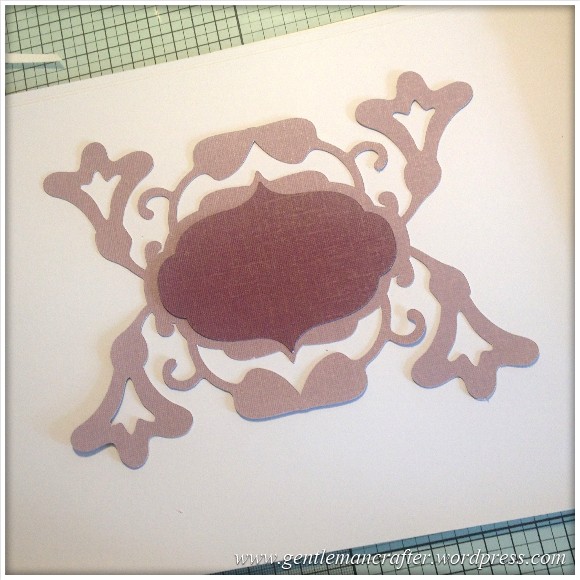
There again, if you’re not fussed about borders or mats, you could always just leave it at step 41 and end up with this…
Which I think you’ll agree, is equally as attractive.
If you are after a speedier solution and have no issues accessing a PC, then you can do this type of design in Canvas also but just bear in mind that not all of the pre-installed shapes on your machine will be there. You may need to load them on your machine, save them to a USB and import them into Canvas in order to use them.
You can of course add a sentiment in any way you like; a pre-installed sentiment, a rubber stamp or some peel off vinyl sheet.
I’m sure that you can manage the first two however If you would like some tips on how to use peel off vinyl as your sentiment, please visit my Scan It Saturday – Creating And Using Vinyl Words And Sentiments blog post.
Now, it may seem like a long process to create this however once you learn it, you can whistle through the screens in no time. I just didn’t want to leave too much out or take your knowledge of the machine for granted.
Right, it’s taken me all day to create the photos, edit them and then write this post up so I’ve got a choice between making a card or scoffing several bags of mini cheddars, so I’m sure that you can guess what I’m going to do … lol ;)
As ever, if I have created more questions that answers, please feel free to use the comments section below to ask away and I’ll do my best to respond to all post related questions.
If you have liked what you have read and know someone else that would like to read this post then please feel free to share a link or use one of the social sharing icons below.
Ok, until next week, thanks again for reading – see you again fellow Scanners!
J :)


Thank you so much John for your help you are just so clear for myself with the Brain Injury again Thank youi.
LikeLiked by 1 person