So I’ve had mine for a couple of months, and it’s now only just over a week until the Brother Scan N Cut machines start shipping from Create and Craft TV so I thought that I would try and do a post per day this week to try and bring you up to speed with all of the things that I have tried, tested and discovered since I have had more time to work with it and to hopefully give you a head start for when yours arrives.
Most of the things that I will cover in this series of posts will also go on to cover a lot of the questions that you have sent to me via Facebook, Twitter and also this blog (thank you for all of those – you have kept me very busy indeed!)
First up I should say that I will be covering Working With Fabric and also The Brother Canvas design suite in more depth in separate posts later in the week, so if these interest you, please don’t forget to subscribe to this blog for email updates of when these posts are released.
Anyway, lets make a start …
Q: How Intricately Can The Machine Cut?
There are going to be a number of variables here.
- Complexity of design.
- Strength of medium being cut.
- Line Weight.
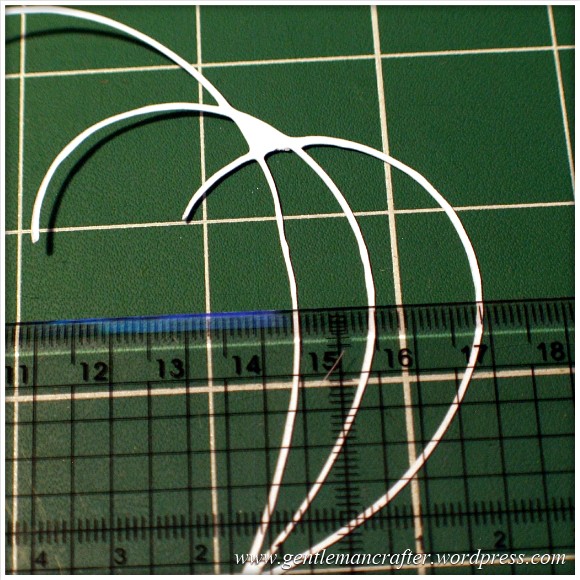
I decided to do quite a basic test for this post. I drew a few curved lines with an 0.5mm Pigma Micron pen and then used the Scan To Cut Data option.
I used a lightweight cardstock to test the cut.
This is the result.
I did increase the size of the scan by about double in this test so the lines that were cut were approx 1mm thick as you can see here.

The machine even picked up the varying line thickness of the ink against the textured paper which I think was quite cool.
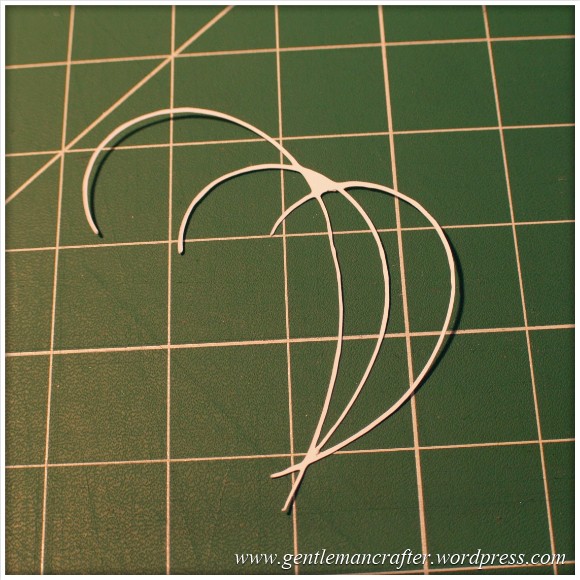
Anyway, here are the two side by side.

Conclusion: Not a bad result. I would however recommend starting bigger and decreasing the image rather than starting with a small image.
Also, unless ‘freehand’ is the look that you are going for, you will want to be fairly precise and use a ruler, french curve or other guide against which to draw your lines when hand drawing the design.
I used the standard mat as I was using cardstock. You will need to be very careful when removing intricate designs from the mat in order to prevent them from tearing – or perhaps do your design so that there are lots of overlapping lines so that there is more ‘structure’ to the overall design.
Q: Do I always have to stamp or print in black?
No. You can use most colours as long as there is a good contrast between the colour and the paper against which it is printed. Here is an example where I used four different colours to stamp a flower.
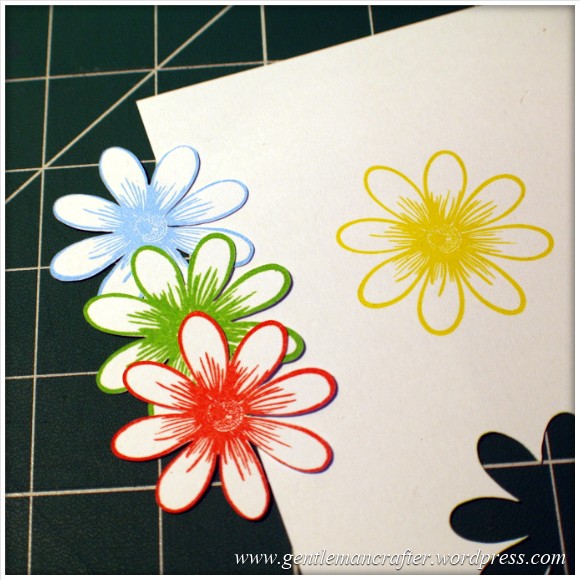
As you can see, the machine picked up three of the colours very well but sadly did not recognize the yellow as there wasn’t enough contrast between it and the paper (in all fairness, this image makes it look a lot brighter than it is in real life – even I was having trouble recognizing it with my eyes).
Conclusion: You don’t have to always print or stamp in black but should consider using ‘bolder’ colours to create the outlines for things that you wish to scan and cut.
Q: Do I have to colour my stamped images in after I have cut them or can I colour them before using the Direct Cut feature?
You can do either, but will need to remember the point above about having a good contrasting outline for the machine to recognize.
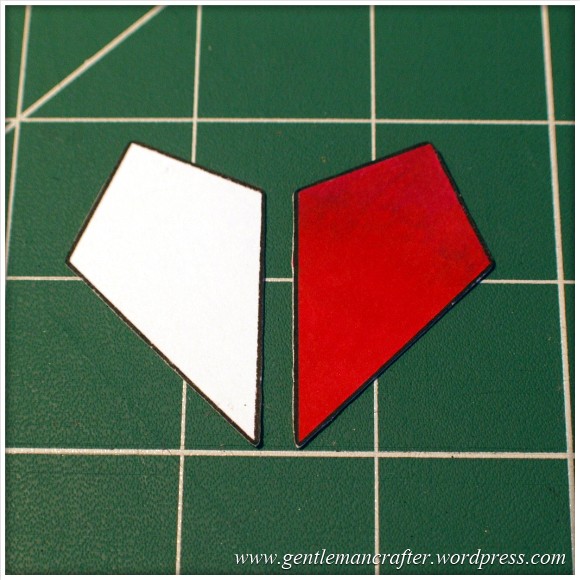
Here is the test that I did. One of the kite shapes was coloured (with a graduation of reds from my Spectrum Noir pen set) and the other was left blank.
I also did the Direct Cut process on these shapes at the same time (i.e. I didn’t do one sheet coloured and then one plain).
One point though, you will need to be a tidy colourer if you are going to colour before cutting. You can see in the next image how I went over the line and the machine thought that this was part of the outline.
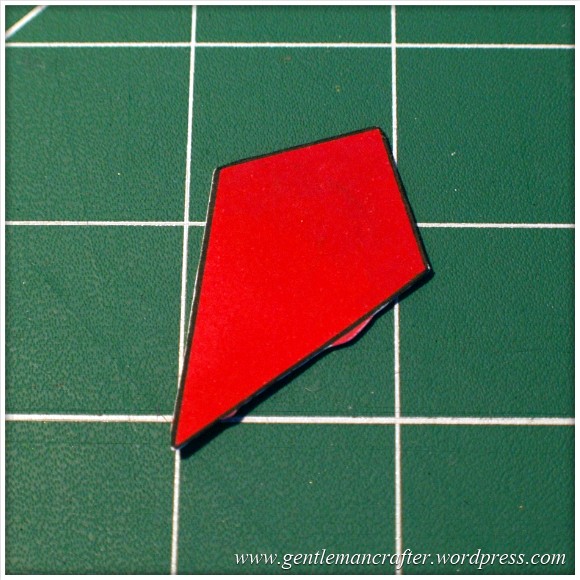
Conclusion: It should not matter if you are colouring before or after the cutting process takes place as long as you have a nice solid outline to the image for the machine to recognize – but stay inside the lines if you plan to colour first! (Lol, flashback to colouring as a child then…)
Q: Can I Use The Direct Cut Feature To Cut Out A Stamped Image That Has Been Heat Embossed?
Yes* (I put the asterisk thing here for two reasons, one, I have only tried it twice and it may depend on a number of things).
The first time that I tried it I used black embossing powder and there were a few flecks out of place. This test did not work.
The second test that I did I used clear powder over a coloured impression. This one work perfectly as you can see here …

Conclusion: I haven’t really done enough testing to give it a 100% tick but initial results look good and testing will be ongoing and I will report back on more results in the near future.
Q: Can I Use A4 Cardstock And Scraps Of Paper And Card?
Yes. Just use the scan preview feature on the cutting mat screen to see where they are on your mat and then you can position your shapes precisely where they need to be – as shown in this image (which could be better – I really need to figure out a way to photograph this screen better).

Q: What Things Will The Machine Cut?
Oy! This list could go on forever! Ok, here are a few that I have tested and seen to work.
- Copy Paper, Vellum, Parchment
- Light (160gsm), Medium (220gsm) and Heavy (350gsm) Cardstock
- Mirror Card, Pearlescent Card, Satin Card
- Crafters Chipboard
- 100% Quilting Cotton Fabric
- Felt (with a fused backing applied)
- Lightweight Faux Leather
- Oil Cloth
- Denim
- Thin Magnetic Sheet (like the kind you print onto to make family photo fridge magnets)
- Shrink Plastic
- Doeflex Template Plastic
- Modelling Sheet (A thin plastic sheet that is maleable when heated).
- Acetate
- Project Acetate
- Craft Metal
Phew, and that’s just a few things!
Conclusion: It’s VERY versatile and will work with you no matter what craft you are into.
Q: Can I Export A Design That I Have Scanned Into The Machine And Then Edit The Lines In The Canvas Design Suite?
Yes. You can see the example below of the scanned image that I used earlier to test intricacy loaded up into the Canvas design suite and the line editing tools selected.

Q: Can the Brother Scan N Cut cut out sheets of printed decoupage?
Probably one of the most frequent questions that I have had.
Tests have been inconclusive. Whilst theoretically possible, it is proving more complex in practice.
As the machine recognizes outlines via contrast between areas of a page, when you have a complex design with multi tonal areas (i.e. a countryside scene or flower) the machine will always do it’s best to find as much as possible but doesn’t always detect the entire outline. In addition, as we would only really want to use the direct cut function, this would not recognise landlocked areas.
There is potentially a way by using an acetate overlay that you can give the machine a helping hand to recognize the overall outline, but again, not sure it would work with landlocked areas. You can see the process I mean by watching this video.
I don’t for a minute believe that it is a fault of the machine, as it has been doing exactly what it was designed to do which was recognize areas of contrast. Instead I think that this might just be a dream featured that has been transposed onto it by our combined desire not to have to cut out all of those fiddly bits.
Conclusion: Tests still ongoing.
Now for some quickfire questions.
Q: Can I ‘Direct Cut’ Multiple Stamped Images In One Operation?
Yes.
Q: Can I Cut A Shape Within A Shape To Create An Aperture?
Yes. Just position them one on top of the other in the design screen on the machine and cut as normal.
Q: Can I Weld A Word Into An ‘Aperture’ So That The Word ‘Hangs’ In The Aperture?
Yes, but you will need to do this in Canvas Workspace and will first need to “subtract” one shape from another to form a frame with an aperture in it before attempting to weld a word into a frame.
Coming Up…
Ok, That pretty much concludes this ‘test lab’. There is clearly much to explore with this machine so I will be doing more in the Test Lab series in the future.
Here are just some of the questions that I have not yet tested but will be looking at in the future …
- Scanning Multi Coloured images
- Direct Cutting With “Busy” images
- Direct Cutting with light ink on dark card
- Can I Cut ‘One Stroke’ Paintings
- 3D creations
- Will it cut foiled designs
- Is there a score/perforate feature?
- Can I cut Zentangle designs?
- What is the test cut button for?
- Can I cut swing cards?
- Is it possible to cut boxes?
I also have other posts planned for this week that will cover using fabric and using the Brother Canvas design suite.
Right, well thanks for reading and I hope that it has helped you in some way.
Look out for more on the Brother Scan N Cut this week.
As ever, if there are any questions that you would like me to add to the list then please feel free to use the comments section below.
John :)

I have been wanting to try scanning and cutting heat embossed images, but have been a bit hesitant. I worried that if some EP chipped off and got into the machine it would be a problem. I saw a video in which one woman put a sheet of acetate over her embossed images to keep that from happening as the machine scanned, and then removed it for cutting. Did you protect your embossed images in any way before scanning them in?
And also wanted to thank you for this very useful Lab Test post.
LikeLike
I didn’t but it might be worth it if you think it is likely to chip and flake :)
LikeLike
could someone help me i have a apple mac laptop how do i get the updates onto my usb stick please.
LikeLike
Download directly to the USB rather than trying to open the file on your computer might be a solution.
LikeLike
HI John. Thank you for all your demos and information for the ScanNCut. I thought you might like to know that I have just successfully saved and retrieved a design to a USB hard disk. It saved in the root directory, but after I had moved it into a folder via the PC the retrieval part showed up the folders on the ScanNCut’s screen, so it could be loaded from the folder.
LikeLike
Great news!
LikeLike
Hi John. Now that Create and Craft have the exclusive rights for one year to be the only Seller of the ScanNCut. Does that mean Create and Craft will not be Selling any of the other Die Cutting Machines for at least a year. Because Provocraft are advertising thier New Cricut Explore to be available in March 2014. Which I am sure Create and Craft Members would like to see demonstrated too. Regards Edna
LikeLike
Hi. I’ve been playing with my scan n cut, but have been experiencing some problems with scan to cut. I used silhouette designer and printed out my design in black. When I scanned it in I too had what appeared to be extra thick lines show up on the screen, when I test cut the design the extra thick lines were cut as a double line. I also saved the design using the suffix .svg. When I tried to import the design into canvas to convert it I kept getting a message ” Failed to connect to server Err S90″. I got in touch with Brother who have replied that a solution will be available as an update to Canvas in March. This will be version .1.1.2.
LikeLike
Hi John – like everyone else I’m really grateful to both you and Mel for all the help and inspiration. Love the machine, but suffered one little niggle. When I unpacked it the clear sheet covering the front flap had been taped (with very strong tape) to the lovely design on the top. Even with careful removal it has wrinkled. Being an Aries this shouldn’t bother me, but I have been married for 46 years to a Virgo, and I guess it’s rubbed off. Just a heads up to recipients of the next batch. Also I have just received my memory sticks to update the machine. I think I read that the stick should have nothing on it – does that include the security file already on it? My machine says it has been updated, but as I have no idea what the update includes I can’t tell if it’s correct. Keep up the good work and thanks again. Ann
LikeLike
Hi Martha,
Being a Virgo myself I can appreciate your comment – and congratulations for making it to 46 years with a virgo, they aren’t the easiest to live with.
If the machine has successfully been updated, it looks like the security file wasn’t an issue. On the download page where you got the update from will be a description of the updated features so you can always visit that again to read up on what was updated.
J :)
LikeLike
Hi Martha, This happened to me too when I carefully took the tape off, it looks very scruffy and irritates me every time I look at it……I know it’s only cosmetic but I’m Libra and I am a perfectionist, everything has to be done to perfection, which is one of the reasons I love the SNC as it cuts everything cleanly, Ann
LikeLike
Martha, you can tell if your update was successful by choosing the ‘Tools’ icon (Wrench/Spanner) on your flip-up screen and page with the arrows to Page 5. If it says Version 1.10 … your Update was successful.
p.s. not sure but don’t think Brother ‘insisted’ on the USB being empty. I have only 2 usb sticks here and my 4GB was full to the brim. I could have temporarily unloaded it to my laptop but instead, I had a very very old 250MB (doubt they make them so small any more) and it worked great for the update.
LikeLike
I had the same problem,but then noticed that there is a clear plastic film over the design which just peels off .
LikeLike
Hi
please can you help I am having problems with my scan and cut-:
1. it won’t scan and cut templates cleanly – it seems to go over and over certain parts of the cut spoiling the end result. It seems that the scanner is picking up varying thicknesses in the line even though the templates are printed and not hand drawn. (for example templates purchased on line and printed and from CDs including the Dreamees ones purchased especially.
2. If scanning a 12×12 sheet it picks up different areas each time I scan- but never all of the sheet and seems to pick up more in the centre than the periphery.
please can you help.
kind regards
Deborah
LikeLike
Please can you email pics of what you are trying to scan and let me know which of the scanning features you are trying to use?
LikeLike
Dear John attached are some photos showing the problem with scanning- I have deliberately chosen paper with a clearly defined pattern. I scanned to direct cut and did it twice to illustrate that I got different results from two separate scans and different cut outlines also- but neither cover the whole sheet well. I will reply separately for the other problem. I do hope you can help. kind regards Deborah
LikeLike
Dear John this is the second problem I am having- I hope you can see from the photos- A photo of a template I tried to cut downloaded from the internet and printed. you will see that all the lines are of equal colour and thickness. Also attached is the photo of the scan – you can see in scanning the machine has made the lines of different thicknesses and this is where the problem arises as when cutting the machine goes over and over the darker lines. Please can you help? kind regards Deborah
LikeLike
I am looking to do a blog post soon with various tips and techniques for working with all types of fabrics. I will aim to include felt within that post.
J :)
LikeLike
Hi I would really appreciate some help- I am still having the same problems- if I print off and scan a template the machine overcuts the images completely ruining them. i the purchased a USB key and put svg file onto it but my machine doesn’t even recognise that I plugged in a USB. Do I have a faulty machine? I am considering returning it. kind regards Deborah McCAnn
LikeLike
Deborah, I don’t recall your original issue. If you could possibly email me some images of the type of things that you are experiencing I might be able to help better (and track out conversation better).
In relation to your second point, you may have a non compatible USB stick. There is a link to compatible USB sticks on this blog and also people have been sharing their USB details if they have been found to work, so you should be able to find one.
LikeLike
Hi John
please see below the issue I have scanning 12×12 paper
LikeLike
Are you adding images? If so I can’t see them. It would be better if you could email them.
LikeLike
Hi no not adding images just scanning a piece of patterened 12×12 paper
LikeLike
Deborah, please can you email me.
LikeLike
Hi John Any luck with finding a solution to my problems? kind regards Deborah
LikeLike
Deborah, haven’t we emailed?
LikeLike
Hi John this is the only email I have for you- I sent you photographs and a description of the problems- is there another email I can use to re send? I appreciate that you must be receiving hundreds of questions/comments. kind regards Deborah
LikeLike
If you send everything to gentlemancrafter@gmail.com I’ll take a look tonight :)
LikeLike
thank you – will do
LikeLike
Hi John please see email and images below kind regards Deborah
LikeLike
Reblogged this on eyecandycraftsblog and commented:
This is the most fantastic piece of equipment ever I have had mine two weeks now and the ironing pile is growing gonna need to take a day off crafting to do some housework loving using my Serif programmes to create artwork to scan and cut out
LikeLike
Laurol’s screen problem. I have found if I do not first pull it to the upright position I can get it to stay in a position otherwise it flops down. Maybe that is the answer.
LikeLike
I had this problem I thought I had broken in as I was resting my pen and spare blade in the cut out at the back of the screen just need to make sure the little pips havent come out of the channels. hoe this helps
LikeLike
My standard mat has lost its stickiness after only a few uses. Has anyone else had this problem?
LikeLike
Yes, this has happened to me too. I am having to spray the back of my card with prepositional glue. My blade seems to be going blunt too because I have to keep putting the blade to a higher number on a further cut on the same cardstock:-( I am also having to increase the pressure to get my blade to cut through on subsequent cuts.
LikeLike
Are you removing the blade holder and lightly brushing it ,as told to do in the cleaning section of the Manuel. Hope this helps
LikeLike
I did initially – but this works so far. I spray the cutting area very very lightly with water. Leave it for a while, and then gently wipe over in sections with an alcohol free, moisturiser and perfume free baby wipe. Lifts debris and seems to rejuvenate the adhesive. I use a temp spray with heavier items. HTH Dee
LikeLike
I think my SNC is already sorry I bought it – I can almost hear it saying .. ‘OK, managed that as well, hope you’re happy now leave me alone!’ My other machines do single sided print and cut no problem but making double sided hang tags of my own design for wedding and communion favours was a real pain as I’d never been able to line up the designs and ended doing a front and back print in my graphics program then cutting out with either a punch or a die .. so I had to keep to the shapes I had, and cutting 200 tags like that isn’t fun . With the SNC I’ve managed to design my own tags – scan them in, make a template and save it to the machine. Now I can do a front and back print using that template in my graphics program ( using non printable layers) put the print out on the mat making sure I line it up precisely, send it to cut and voilà 48 beautiful little tags in one pass! Little things pleasing little minds and all that ..
LikeLike
Hi John, took the plunge and bought the scan and cut, and yes it does cut cardstock great, but I’m getting so frustrated cutting material. I really wanted this to do appliqué letters, shapes etc and having seen the demos, it seemed it would cut everything I needed, but not so. I’ve tried cottons and poly cottons, and it is either not cutting (though use the recommended guides) or if I’ve increased the settings, I’ve nearly gone through the mat! It’s also dragging the material,though I’m using the spatula to press it down. I really need some help as I’m just ready to send it back, as can’t afford to pay all this if it doesn’t do what I need. Thanks
LikeLike
Please could you tell me if you are using a backing on the fabric.
LikeLike
I’ve tried the normal iron on interfacing, suitable for cottons, which I use on larger pieces that I can sew around, and Bondaweb, that is washable, but the cotton still drags and tears
LikeLike
Some more questions –
Have you starched the fabric?
What cut speed, blade depth and pressure have you got set?
J :)
LikeLike
Hi John, yes I’ve starched the materials, and tried different depths, up tons 6, which almost cuts the mat, but I still get a lot of dragging and it doesn’t cut all the letters fully. I’m not sure what speed I should be? What effect does different speeds make, I couldn’t find anything in the instructions
LikeLike
Can you please tell me when the standard cut blades and fabric support sheets are likely to be back in stock as I do not know product numbers customer services can’t help
LikeLike
I am afraid that I don’t know. Demand is clearly outstripping supply at the moment. The buying team are working hard to try and get these back in.
LikeLike
Hi John. Just by chance I found a Brother ScanNCut USA Website that gives you Project Ideas and Videos for using the ScanNCut Machine. The Link is:- http://www.brother-usa.com/ScanNCut/Projects.aspx Thoughht maybe you and other Crafters might like to take a look. Edna
LikeLike
Thank you Edna :)
LikeLike
Hi John,
I want to cut out felt without the heat and bond as I want to be able to sew the pieces together as opposed to using them for appliqué. Any suggestions? Was thinking myself of ironing on freezer ,paper to stabilise the felt. What do you think? Oh and which mat do I use? Last thing, I was cutting fabric and put on the extra sticky mat and the blade cut through it. As I have bought a spare mat I have left it in situ, and was hoping I could just do that and use away at it.
Thanks so much for all the demos and help you have been giving us.
LikeLike
I’ve not tested freezer paper yet. With felt you will need to ‘secure’ the fibre otherwise they will A) Snag/drag or B) stick to your mat.
How much hold does freezer paper give normally?
LikeLike
Freezer paper works fine with 1mm and 2mm felt .. very happy with the results and once you’ve peeled it off you’re good to go. I’ve tried with several types of felt and sometimes the settings which are good for one type won’t work for another even though the thickness is the same so you really need to do a test on each type of felt you’re using.
LikeLike
Thank you for the tips Susan. Will have to give that a go!
LikeLike
hi john, i read the comments on decoupage, as wrote by sandra robins. a great tip. so thank you sandra. i had about 80% sucsess rate with this , but must admit most times it worked. but instead of 0.5 line i wonder if slightly more thicker line would do the rest.thanks for all your hard work john. where do you get all your energy, with your many interests . GILL
LikeLike
I’m not sure Gill, but I’m hoping it continues for the next few months at least :)
LikeLike
Hello John
Can you help? I have scanned and loaded a copyright free celtic image on to scanncut canvas. I need to remove some small lines so the image can be cut and stay in one piece. Is there an erase facility on the site, if not could the idea of having one be put forward?
LikeLike
Have you tried selecting the line that you want to delete and right clicking an choosing cut?
LikeLike
Thanks, it works.
LikeLike
Reblogged this on mhall54 and commented:
I have received my scan n cut and I am very impressed. I tried to register the machine but I keep getting error 500 internal server error would you know what this means thanx
LikeLike
No, I’m afraid not. Technical queries will need to be directed via THE brother support desk.
LikeLike
I also got this message……..
LikeLike
I got this message too, I thought it was my server and have been re-booting my router and going frantic…….so glad it’s not just me having problems registering my Scan N Cut..
LikeLike
I too tried to register my machine and received the same error message, I contacted Brother (UK) and this was their reply:-
Dear Jacyln
Thank you for your email.
Please refer to the below links for further information pertaining to your machine.
For your reference there is no need to register the machine, you must keep your receipt as proof of purchase.
The link to the support page is http://www.scanncut.co.uk/en_GB/service-support
FAQ’s http://www.scanncut.co.uk/en_GB/faq
Tips & Tricks http://www.scanncut.co.uk/en_GB/tips-tricks
Solutions Centre http://welcome.solutions.brother.com/BSC/public/eu/gb/en/model_top/scanncut/hf_cm600dxeuk.html?reg=eu&c=gb&lang=en&prod=hf_cm600dxeuk
Please do not hesitate to call us if you should have any further questions 08444 999 444 option 3
Kind regards
Karen Smith
Customer Service Administrator
Tel: +44 (0) 8444 999 444
Fax: +44 (0) 161 931 2218
Brother UK Ltd
Shepley St, Audenshaw, Tameside, Manchester, M34 5JD
http://www.brother.co.uk
Twitter: @brother_uk
LikeLike
Hi John, I received my SNC on Tuesday. It is fantastic and has already changed my crafting. However, yesterday afternoon the screen refused to stay in the ‘upright’ position and collapsed flat. It works perfectly but I now have to keep the screen in position with a block behind it ! Is there anything I can do to get it to stay up by itself again as I don’t want to be parted with my SNC by having to send it back. Kind regards Laurol
LikeLike
There should be three positions that it will lock into. Is this happening at any level?
LikeLike
Unfortunately no it will not lock into any position, it just falls back into the flat position.
LikeLike
I’m not to sure what to suggest for you Laurol.
LikeLike
My SNC arrived a couple of days ago and so far so good .. the mat is extremely sticky and I did have problems with a piece of 200gsm which got stuck and left bits everywhere but no problems ..just laid a piece of wet kitchen paper of the mat and left it to sulk. Later I was able to scrape off the bits and the mat is as good as new. I’m slowly working my way through my most used materials cutting one of the tags from the machine’s library and writing the settings on the back. When I have all I need they’ll go on a book ring and hang on a little suction hook on the side of the machine. I’m sure Brother wouldn’t mind making us a little container we could suction to the side of the machine to keep the stylus,spatula and spare blade carrier in, it’s much easier if you have all the bits in one place!!! For now I’ve made a small acetate box attached with strong ds tape.. needs must!
LikeLike
Two very good ideas! Thank you for sharing them :)
LikeLike
Yeah made my little acetate box : piece of acetate 21 x 11. Score on the long side at 3,10,13,20; turn and score at 3cm on the short side( makes a little open top box 7x3x8tall), turn sheet over and repeat the procedure ( my sheet was quite thick); cut up the flaps from the 3cm side as they form the base; add red liner ( or similar strong tape ) to the 1cm flap and one of the wide base flaps. Before assembling I cut diagonally down one side from the top, across the front and diagonally up the other side ( like a cigarette packet!) so it was easy to access the box. Assembled the box, added two strips of wide red liner to the back and stuck to the right hand side of the machine. It holds two blade carriers, 6 pens, my spatula and the stylus and there’s room for more .. so happy I don’t need to scramble round looking for bits anymore and the stylus has a home right next to the screen !!
LikeLike
John, I hope I am posting my question in the correct area of your Blog. Loved your most recent demo on C&C (always so efficient and well done, thank you) but have a wee question: Could you have welded Leone’s ‘fine outline’ heart? I cannot quite get my head round that part as the 2 hearts joined together were solid, rather than the lovely fine-line one?
LikeLike
I have worked out a wonderful way to get decoupage to cut on this machine. I take the printed sheet into Serif Craft Artist and use the Cutout Studio, click any where on the page and it will put an outline around all the pieces on the page. click ok. The go to the right hand side and click Colour and select either Black or Dark Grey as your line colour. Then click line and select the line width I use 0.5pt and this puts a black or grey line around all the individual pieces on the page. Print your page out and put through your SNC on direct cut and it will recognise all the outines of all your decoupage. Press cut and away you go. A bit long winded explanation but it works for me, so hope it helps someone else.
No to master Stamped images!!!!!!!!!!!!!!!
LikeLike
So are you scanning your sheet first on a separate scanner or are you taking a decoupage print out from a CD? It’s a lot easier to do if you are working with a digital image from a CD as it’s easier to manipulate .. the test has always been how do you do that with a commercially printed decoupage sheet and apart from the acetate overlay noone has really ever been able to get a satisfactory cut as you are always reliant on a good scan of the image. In the past we’ve scanned in images of commercially produced sheets, used graphic programs to blacken the images, traced and made cutting files but then the exact placement was always extremely complicated. I’m sure we’re nearly there though!
LikeLike
thanks Sandra , I tried this and it does work for about 80% of decoupage. but for the other 20% I wondered if I put a thicker black line.this might help.many thanks .gilly
LikeLike
Hi John. I am sorry to bother you. I have my Brother and I am loving it no problems with it all. However I have a question I am hoping you can help with. I can use the canvas and I love it but I cannot fathom if letters can be welded on the screen. I have welded shapes together very successfully but when I type something in like a name I would like to weld the letters together before adding an offset for matting and layering. Can letters be welded together in the programme? If so can you tell me how to do it please.
Regards
Sue.
LikeLike
Letters can be welded. Type in each letter individually and then move them together.I have found it easier on 100%, also put first letter box on a grid line, so lining up is easier.
Hope this helps
LikeLike
You don’t have to worry about lining them up. Highlight all the letters then align to bottom :)
LikeLike
Mel has just posted instructions on how to weld letters together on her blog, even I understood it lol!
LikeLike
Hi John
Just to say that there is one more USB stick you can add to the list.
It is the Sandisk Cruzer Force 8GB USB Flash Drive
This works O.K.
Keith
LikeLike
Hi again John. Can I Purchase SVG Files and transfer them to the Brother Scan N Cut via a Memory Stick. What Format are the Designs and Patterns already in the Scan N Cut’s memory. Which Formats will be compatible with them and enable me to Scan and Cut them. Regards Edna
LikeLike
Hi Edna
I have purchased svg files and converted to fcm files (which is the file type that ScanNCut uses) using the Canvas software.
Jean
LikeLike
Hi Jean. Can you please tell me how to convert the SVG Files the ones used by theBrother ScanNCut Edna
LikeLike
Hi I may be able to help with this. You have to convert svg files in the canvas software and then save them from there onto your memory stick.
LikeLike