
In recent times, and especially during the All Counties Craft Challenge, I have grown fond of making things with MDF and have been wanting to design some things for a while.
As you may have seen in my recent My First MDF Design – A Brother Scan N Cut Workstation blog post, I have finally got around to it.
In this blog post I look forward to sharing another design with you – this time, a hinged photo frame that is just chock full of spaces to decorate and embellish.
As before, I planned out the design, with many incarnations being scrunched up and tossed into the bin. The hinges caused me many a scratched head moment. Having to think of these in three dimensions and then work them out in two dimensions was particularly challenging – but as I think you know, a design challenge is something that really gets me going and I didn’t stop until I had it nailed.
I transferred the designs over a couple of days into a digital format and then sent the file off for a test cut.
I leapt for joy when it popped through my letterbox – but I was also a little nervous. Why? Because I was worried about whether the hinges would work – had I allowed enough tolerance for movement?!
Also, there were a fair few bits and I realised that I had forgotten how I planned to build it, LOL! Whoops.

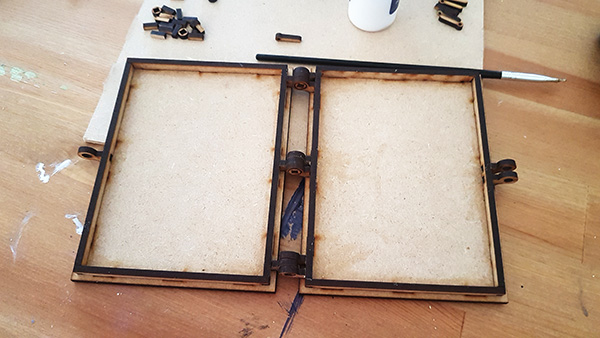
Thankfully once I started sorting through the bits it came back to me and I got the two shell parts put together very quickly with some PVA glue.

Now, on to those hinges!
Calmly and patiently I put these together being extra careful with the glue as I still wanted them to be able to move!

Allowing the three hinges to dry before attempting to put them into the shells was a good move as it made them easier to handle.
So, the construction went smoothly. On now to the decoration then.
Thinking of how the paint would impact on the hinges, and possibly stick them shut, I decided instead to use a sharpie permanent marker to edge the folded frame with black.

This also served to reduce the amount of paper that I needed to cut to decorate the frame with, and, as anyone that has tried to wallpaper around light switches and plug sockets, it also removed the complicated need to measure and mark and cut around.
I could, of course, have used a stain instead as this would have sunk into the wood, but I really liked the look of this.
Next, I cut down a piece of construction card to fit the front and back of the photo frame box and glued them in place with Pinflair Bookbinding glue.

Right, time to get serious with the decorating!
PLEASE VISIT THE NEXT PAGE OF THIS POST BY CLICKING ON THE NUMBERED LINK BELOW

[…] is a quick pic of one of the kits that I decorated a while ago, as detailed in this blog post, and some of the new kits that are also […]
LikeLike
Loved this project John and I was amazed how it looked at the end. It could be used in so many different ways.
Hope you add an mdf range to your shop in the future so we can buy them from you.
You are so talented and we are very lucky that you share this with us so we can learn along the way.
LikeLiked by 1 person
This is fantastic a couple of my granddaughters would love something like this
LikeLiked by 1 person
Absolutely love this piece John. Totally unique and so special. Thanks for sharing every step with us.
LikeLiked by 1 person
You HAVE to start selling this stuff
LikeLiked by 1 person
Fabulous creation
LikeLiked by 1 person
It’s fabulous John, well done :) I wasn’t sure about one part (the front with the strip of lace) but it really works on the finished article.
LikeLiked by 1 person
This is absolutely stunning John, what a masterpiece. I love the journey how you made this from page 1 to 5, thank you so much for sharing this.
LikeLiked by 1 person
I absolutely love this, you are so creative and I really enjoy reading your blogs following your journey and varied artistic forays.
LikeLiked by 1 person