Well hello there and thank you for stumbling up to my little corner of the blog-o-verse. How are you?
Ready for Part 2 of My First Ever Steps in 3D Printing?
Hope you are as that’s what this post is about …
When I left you yesterday I had just successfully printed a 3D Aztec Goddess face.
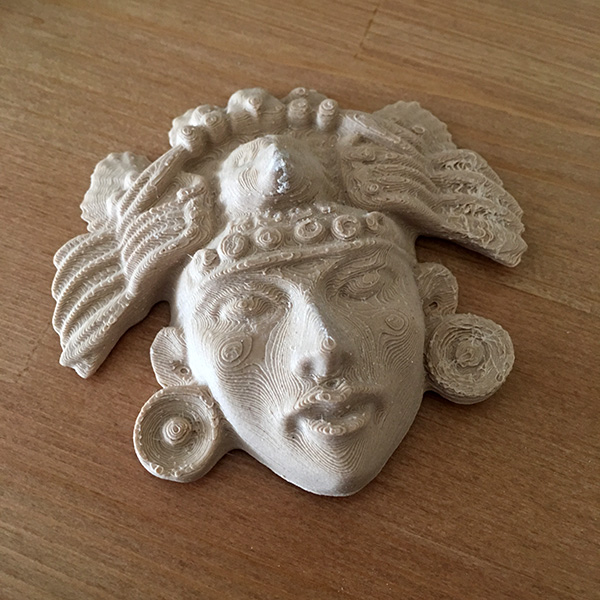
Not a bad mush, is it?
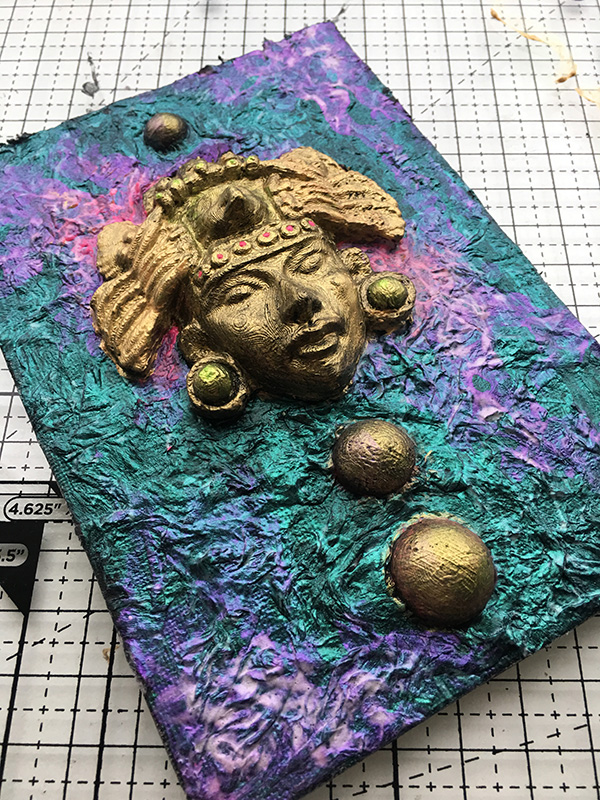
Right, I had had an idea to do something with it so I went to the make-shift craft area – as the ‘real’ craft area hasn’t actually been sorted and organised yet.
I routed out a small canvas board and used some Pinflair Glue Gel to stick the face onto the canvas.

The curve in the design meant that there were a couple of gaps so I filled this with heavy carvable paste. Regular decorator’s filler would have done though.
Not one for waste, I also used some of those test pearls to build up the design.

Next up I applied crumpled toilet tissue to the background with some Mod Podge.

After letting the Mod Podge dry I applied a layer of DecoArt Black Gesso.

The background needs some excitement I think so I grabbed my DecoArt interference paints and coated the background.

Gave it a very shiny finish!
As the Goddess is Aztec, there had to be gold. Basic gold acrylic paint was used to lay on a base coat.

I also added some hints of interference paint to the gold areas to bring the design together a little. Not much, just a very light touch.

Sheesh, it’s been a while since I did this amount of creativity – time for a pie!

There were supposed to be potato wedges too but I forgot about them and burnt them so they went off to the bin :/
Anyway, I carried on tinkering until I was happy.
The final things that made it for me were a black glaze over the whole thing to tone down the vibrancy and also a spattering of brightly coloured acrylic paints.

Now, to me, she looks like an Aztec Goddess of the planets or the universe.
What do you think?
Here’s a good old look around the finished piece.


Right, that just about sums this one up.
I’ve had a couple more things printing so stand by for My First Ever Steps in 3D Printing – Part 3 !!
If you are interested in knowing more about the Print Rite CoLiDo 3d printer from Print Rite then please do head over to Create and Craft TV’s website.
J :) x

Beautiful Really stunning. I quite liked the effect of it being slightly raised too (first photo with “gaps”) Made it look even more 3D – may need a little tidying, it appeared more pronounced – if you see what I mean
LikeLiked by 1 person
That’s fantastic John love it. Jenny x
LikeLiked by 1 person
I think you have done a fantastic job John from start to finish. You aren’t afraid to have a go. Love mixed media but am always reticent about adding the colour hence I have lots of white projects just sitting there. You have inspired me to get cracking.
LikeLiked by 1 person
Wow! Really brave steps. Love it! You are so clever. Thanks for sharing all the stages of your artwork. You are so inspiring. Liz X
LikeLiked by 1 person
John, you and that goddess are amazing – love it. If I could afford/justify the printer cost, this is exactly the type of thing I would be wanting to produce. absolutely stunning 😃
LikeLiked by 1 person
This is brilliant John. I really want to try mixed media. Just need a bit of confidence. Thank you very much for sharing this.
LikeLiked by 1 person
Thanks John, That is really inspiring, I really need to consider some baby steps from papercraft into mixed media maybe once I’ve tried a Dreamees plaque I could try something even more adventurous but I don’t think the budget will stretch to a 3d printer this year at least – I think a roof over our head is a bigger priority!!! x
LikeLiked by 1 person
I wasn’t sure, all the way through. Almost to the end I had doubts, then you did the glaze, and it all fell into place. Anne. x
LikeLiked by 1 person
That’s amazing! Where did you get the mask design from – I would love a 3d printer to create things like this! X
LikeLike
I’ll try and find it again and let you know.
LikeLike