
There are many ways to create scenes with stamps however some of the most dramatic that I have seen have been made with the Stampscapes range of rubber stamps.
Having acquired some of these a while back I thought that I would have a little playtime and see what I could create.
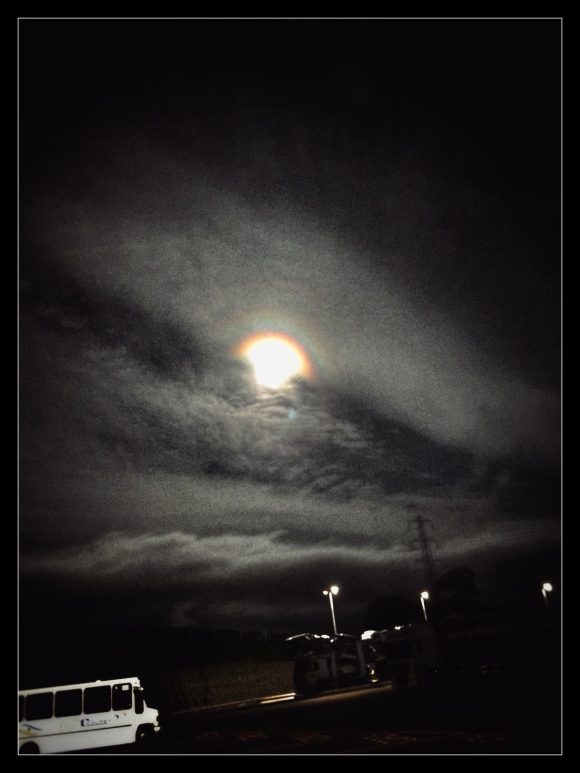
For both of the pieces that I created I took my inspiration from a recent moon sighting – did you know that the moon can cast a rainbow?!
Thoughts in mind, I set up the work area.

Blending mat, inks, etc etc
Next I grabbed my glossy paper. Well, to be truthful I picked up some budget photo paper the other day to try out with this technique.

Lightly taped the paper down and chose the stamps.

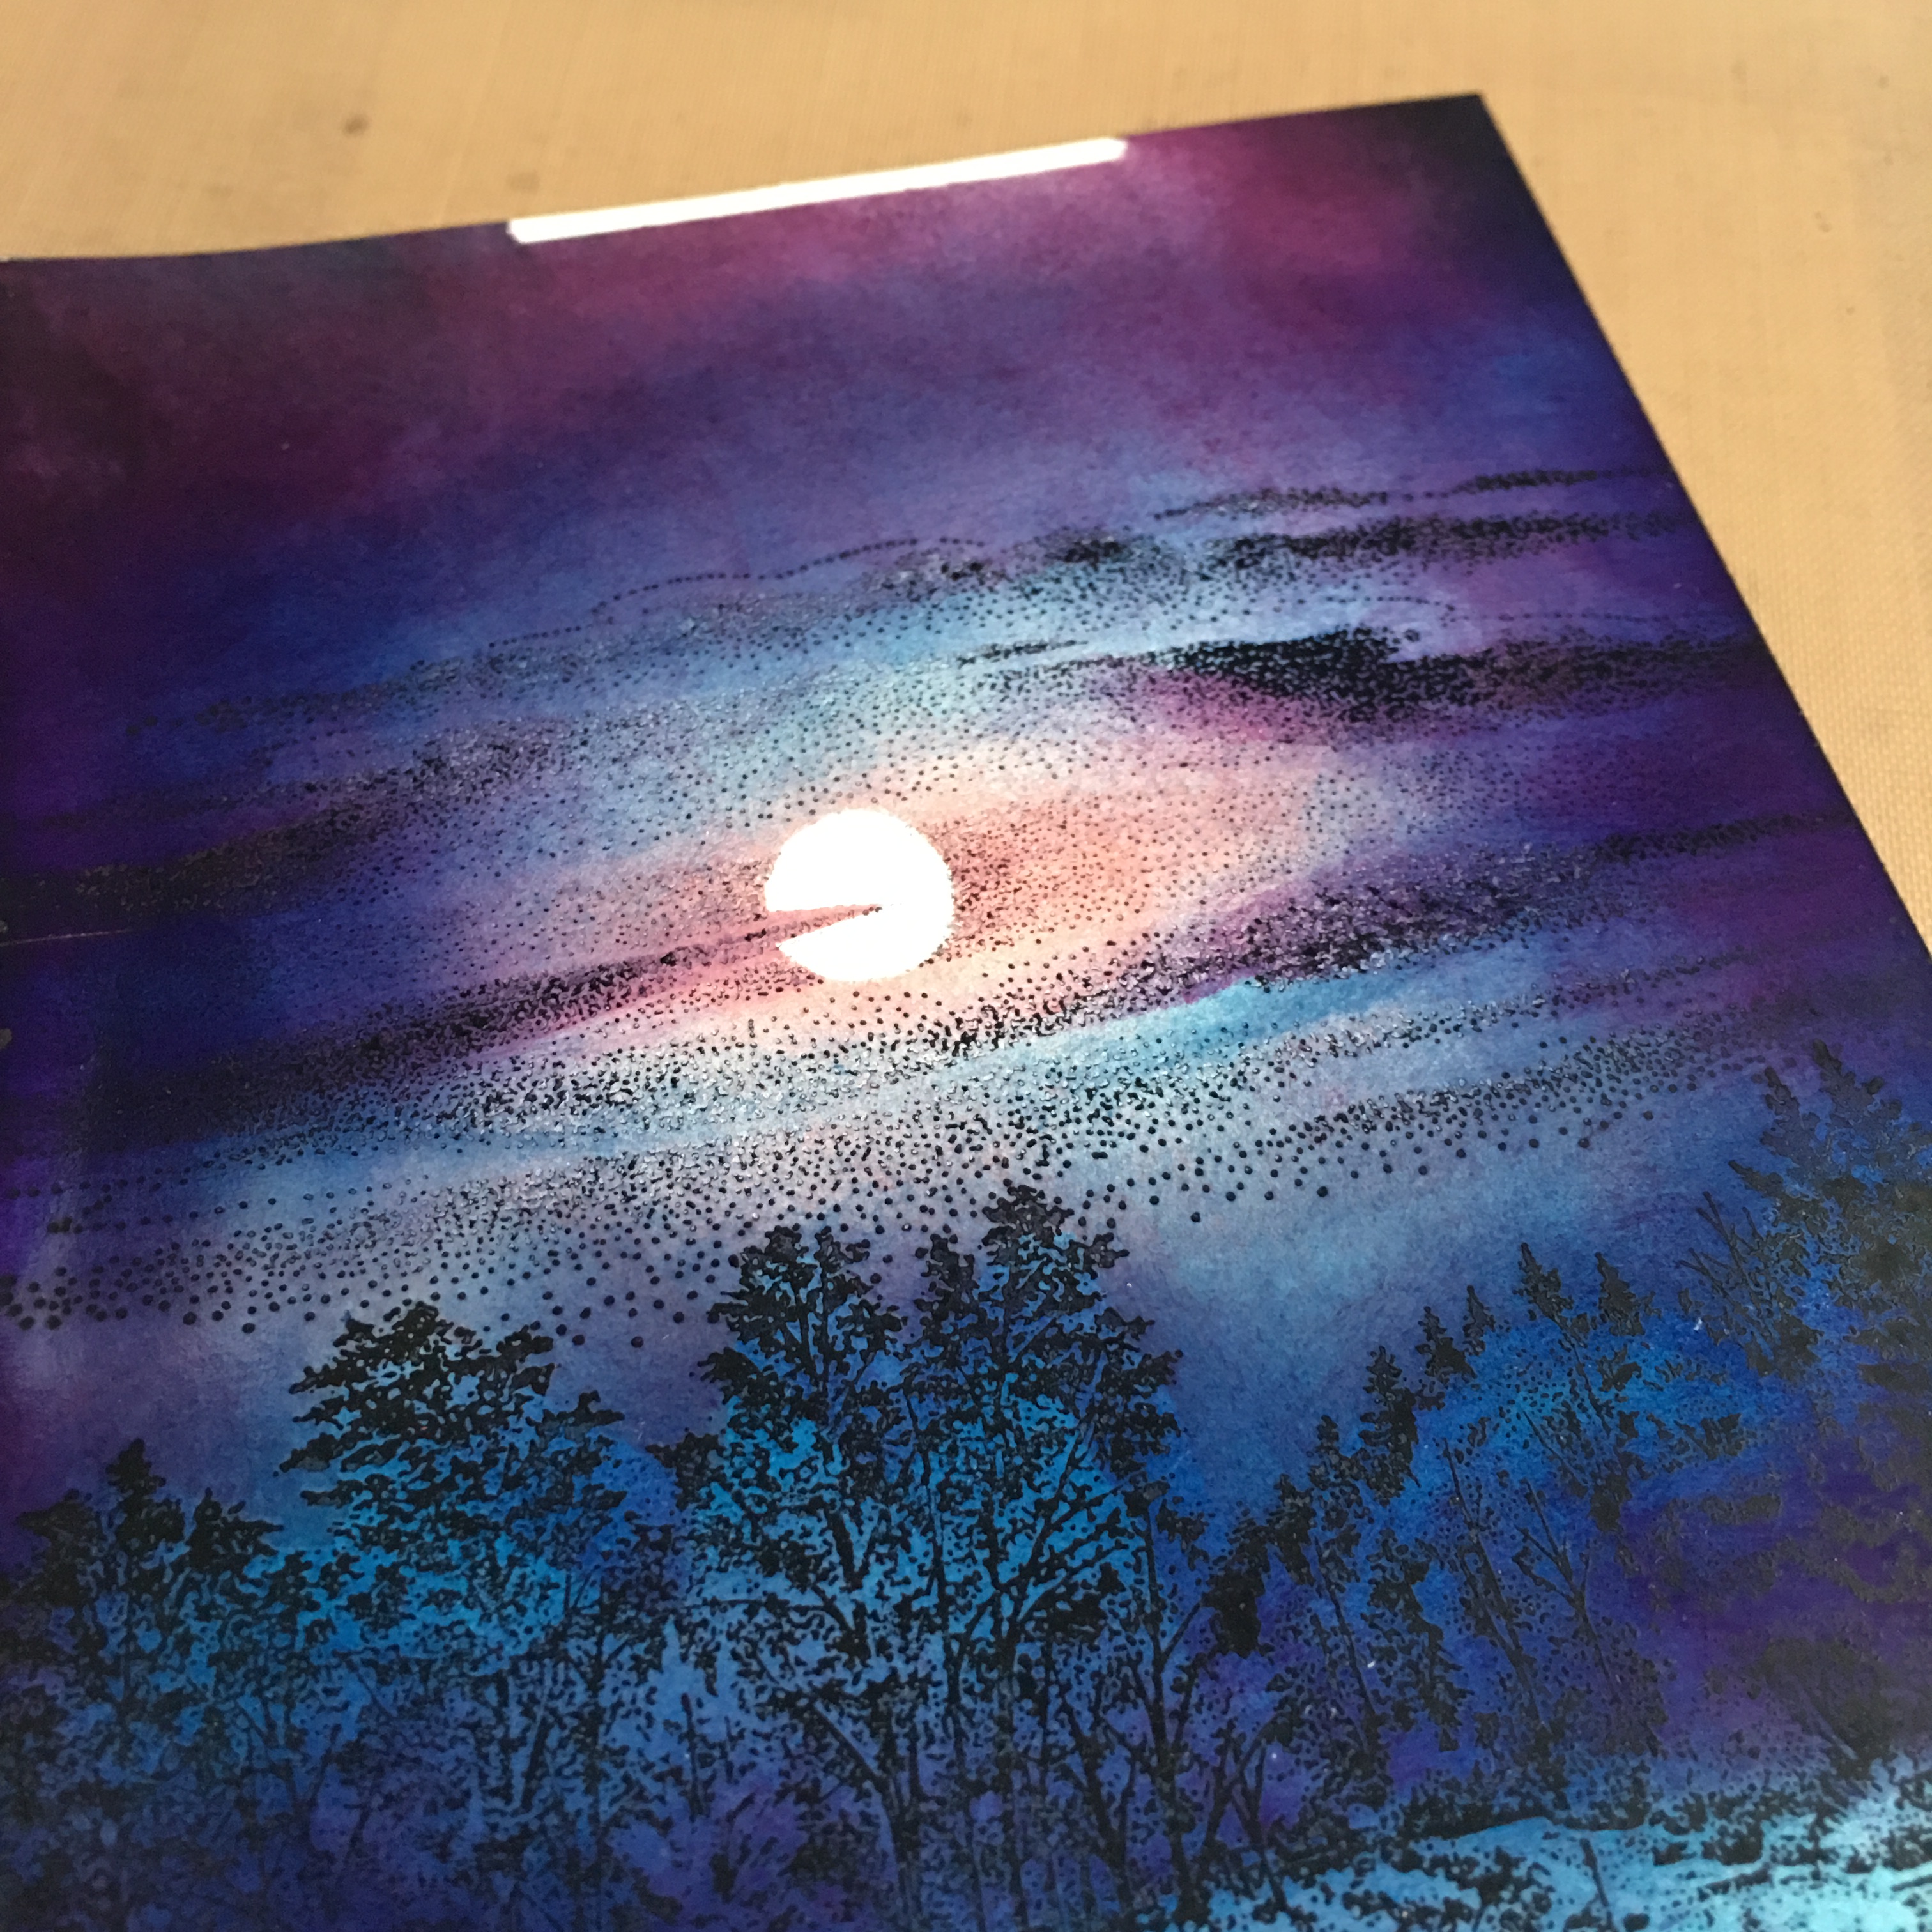
These were then stamped out with Stazon ink.
I also created a teeny mask for the moon as I wanted the white of the paper to give the moon it’s shine.

Next I began applying some ink with a sponge applicator.
Pink first. Because the moon is pink, right? Lol, no, it’s just for dramatic effect.
You can see in the next image hat I have also created a rough mask for some areas of the design.

Next for an all-over blue to give me a base tone from which to grow.

Darker blue then helped enhance the drama by darkening off areas where the moon doesn’t shine – no rude comments please.

Purples to add warmth and depth of tone.

Above a lighter pinky purple was used and then a deep eggplant colour.

Almost there I reckon. Just need some highlights.
These were created by using a pokey tool to gently scratch away colour, leaving the white card (think scraper board).

Also, by applying white pigment ink with a cotton bud.
Time to take the mask off. Doesn’t that moon shine?!

Here’s how the whole thing looked altogether.


Loved that. Time for another?
Yes please.
lol, excuse me while I talk to myself.
Ok, this time around I would still be creating a moon but I wanted to try using just greens.
The design started out as before with a couple of stamps images.

I first gave the whole thing a light brushing of Cracked Pistachio distress ink.
Next I created and applied three masks – foreground, background and moon.
They were even laid down in that order as they needed to come off in reverse order- make sense?
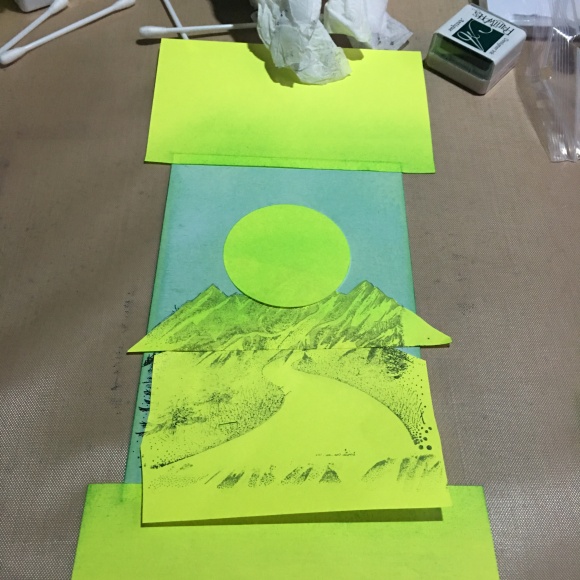
I then applied more of the Cracked Pistachio ink above the mountains and around the moon, then removed the mask.

I repeated this with more ink being laid over the mountains.


And then also on the foreground.
I liked how it looked but felt that it was a little too soft.
I went at the design with subsequently darker greens and finished by laying a sticky stencil (the negative of the moon mask) over the moon and liberally dabbing some white pigment ink over the greeny moon.
Upon reflection a lot of mess was created to achieve these two designs however I personally adore both!

Here are a couple of images of the finished ‘Path To The Emerald City’.


What a fun time! Didn’t want to stop but had to have a tidy and pack up. Might give another one a go tomorrow.
To secure and protect these I sprayed on some Crafters Companion Spray & Shine.
Anyway, what do you reckon? Cool eh? Just a couple of stamps and some ink and you’ve made a dramatic scene – love them!
Right, I’d best get off and get more sorted for the All Counties Challenge.
Hope you are well?
Catch you again soon.
J :)

These are gorgeous. They deserve to bre displayed on a wall
LikeLike
Beautiful work John, I have a couple of sets of these stamps and everytime I use them they turn out quite wonderfully …. if i say so myself ;) Love the dramatic colours you’ve chosen, so vibrant.
LikeLiked by 1 person
Love both of these John, must give it a go :)
LikeLike
You really have a natural talent- beautiful scenescapes, love both but the green is perfect for Emerald city .
LikeLiked by 1 person
You are just too talented l wish ld got an ounce of it they are great.
LikeLiked by 1 person
Absolutely beautiful John. Both of them made me gasp with delight. I love the effect you can get from masking off. It’s such a simple thing to do, but the result looks almost like alchemy! lol
Many congratulations on two really fabulous makes.
Sending squidges to your corner from mine ~ Cobs. x
LikeLike
WOW! And you created those scenes with stamp images and ink…I’m impressed!
LikeLike
Nice. Great moods created in the scenes!
LikeLiked by 1 person
One word “beautiful”!
LikeLike
I really love this piece John. I have a few of these stamps too. You have inspired me to dust them off again.
LikeLike
They’re great John. I love stampscape stamps. I’m just not very good at doing the coloured backgrounds so I’ll give what you’ve done a try. Thanks for the ideas. I got your colouring postcards last week too they look fab. Jenny. x
LikeLiked by 1 person
Love both of these . I have some of those stamps bug haven’t used them for ages. Perhaps I should find them again.
LikeLiked by 1 person
Really good I want to try that when I buy suitable stamps. Is that an ordinary shaving brush you used?
LikeLike
Yes :)
LikeLike
Have worked out most of the stamps you used, just can’t work out which ones you used for the green card in front of the mountains, can you tell me the name please? Thank you x
LikeLike
Hmm. I’m not sure. I’ll try and check as I didn’t store them on their packaging.
LikeLike
Tiz ok thanks, tracked it down, after ordering a selection, so another spend coming on! lol
LikeLike
Love love love them. x
LikeLike
Hi John
I’ve seen lots of “moonbows” as I have spent a lot of time looking at the moon (and the stars) over the years. There’s scientific stuff as to why, moisture in the atmosphere and clouds and stuff, all way over my head, I just like stuff that looks pretty! They are intensified greatly through windows and with smartphone cameras as the lens is small and unable to keep the shutter open for a long time… More stuff I don’t fully understand, refraction or something (it’s not craft so I don’t get it!)
Speaking of liking pretty things, your stampings are fantastic! First off, those stamps are quite something, I had not seen those before, second, what a fab use for photo paper! I got a couple of packs from one of those shops where everything is one price years ago and recently when I found it again (we all do that, don’t we?) There were marks where it had rubbed on the sheet above. Was never going to throw it away but now I have a use for it (did think alcohol inks but wasn’t sure… Will have to be an experiment unless you’ve tried it and can advise me!). I love how you scratched down to the white, I’ve done it with paint and pastels but never considered to do it with inks. Actually, that comment reminded me how much I love scraperfoil… Will have to get myself some!
Anyway, I’m shattered so I’m off. I hope you have a lovely week, take care of yourself, hugs T x
LikeLiked by 1 person
All I can say is ‘Amazing’ gonna have to try this out x
LikeLiked by 1 person
Wow that’s amazing John,
Brilliant.x
LikeLiked by 1 person
Love them both. I can just imagine Dorothy and friends skipping down that road to the Emerald city.
LikeLiked by 1 person