Would you believe that this make started out with something that you would normally have thrown out?
Well, it did! Pull up a chair and I shall explain…
I recently tidied the craft room (no, don’t fall over in shock) and had to wipe the glass mat that had been covered in inks.
After spritzing the mat with water I wiped it down with a kitchen towel. Having a scatter brain currently I put the kitchen towel down, rather than putting it in the bin and moved onto other tidying based tasks.
When I came back to the kitchen towel it had dried and I noticed a lot of cool colours had spread across the surface. I carefully opened it out and ended with this …
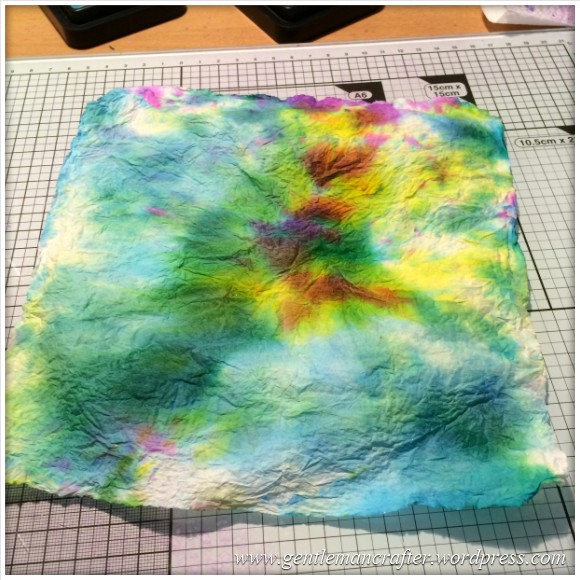
Neat isn’t it?
It reminded me of 60s tie dye style.
I immediately got to thinking about the kinds of projects that I could use it on. In the meantime, drying to one side, was a canvas experiment that I had started a few days earlier.
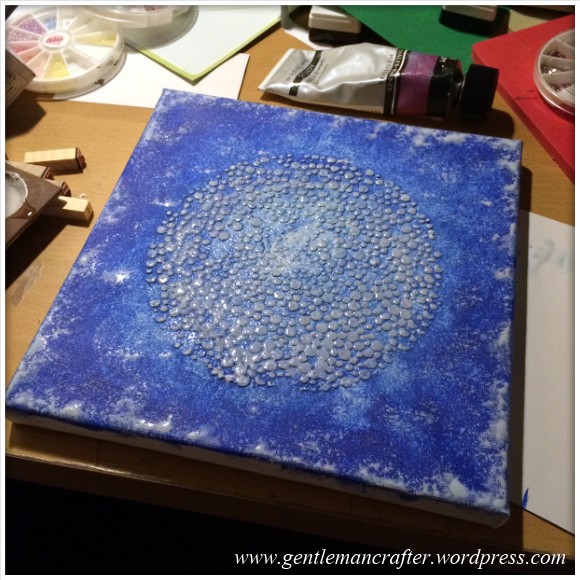
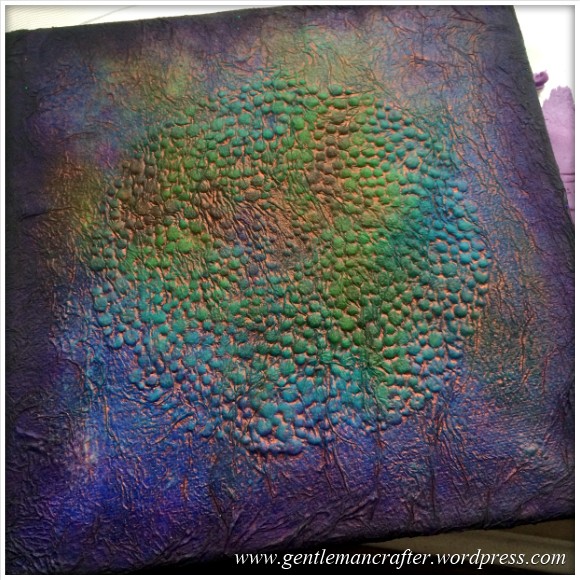
I had covered the canvas in blue acrylic paint, edged it with white paint and then tested some Polyfilla as a texture medium through a dotty mask.
At the time I was please with the result but it was another one of those testers that I didn’t have a clue what I was going to do with it.
A lightbulb pinged on above my head as I realised that I could combine the two things!
Whipping out the Mod Podge I got to work covering the canvas and ended up with this…
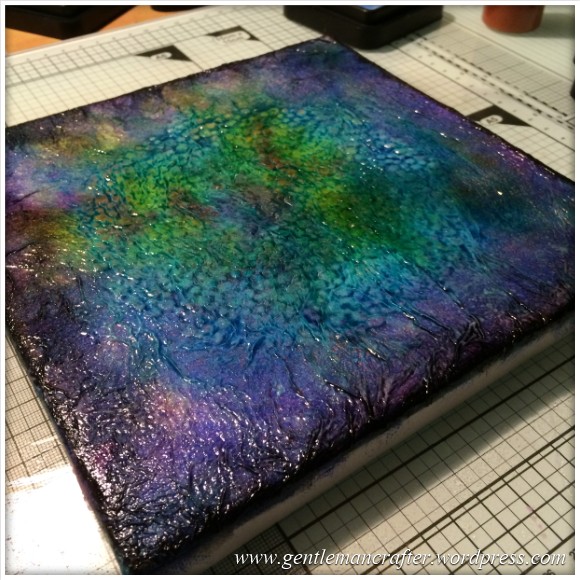
It was pretty cool how the colours of the two things had combined to give quite a dramatic result.
In the spirit of experimentation I also went on to mix up some metallic acrylic paint and water in a spritzer bottle and liberally applied that too and got this …
So, before relegating it to the “I have no idea what I am going to do with this” pile I had a scout around the supplies and settled on a plan of doing a fairy dell inspired canvas creation.
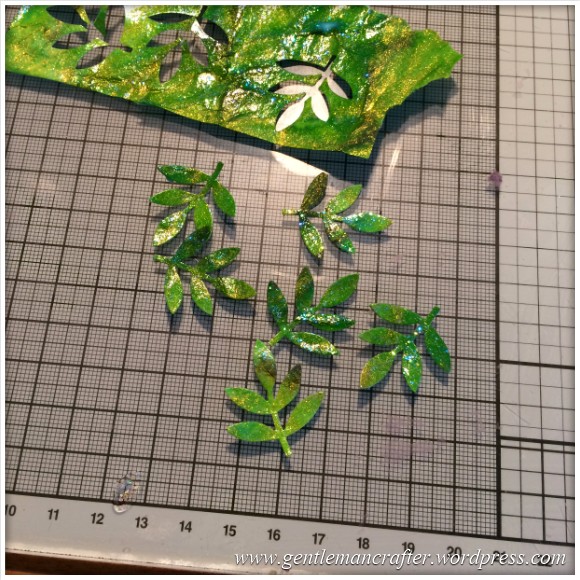
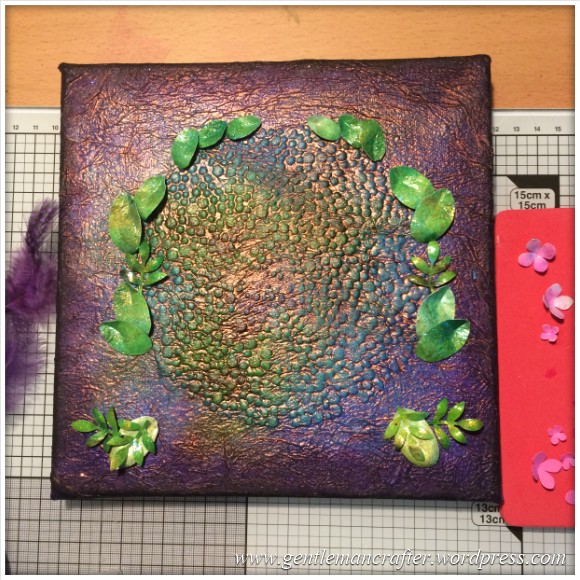
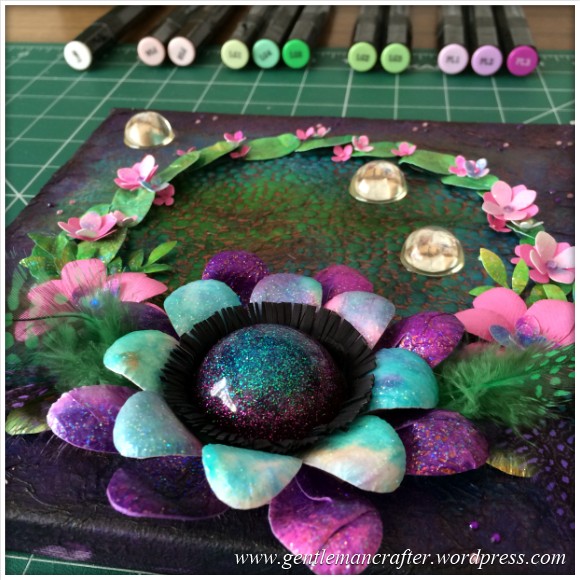
I started by creating some foliage.
To do this I used up another tester, which was some watercolour paper that I had been spritzing inks and gold mica powders onto, and I covered this in sparkle Mod Podge and allowed it to dry.
I then used a Martha Stewart leaf punch to crop out a bunch of sprigs.
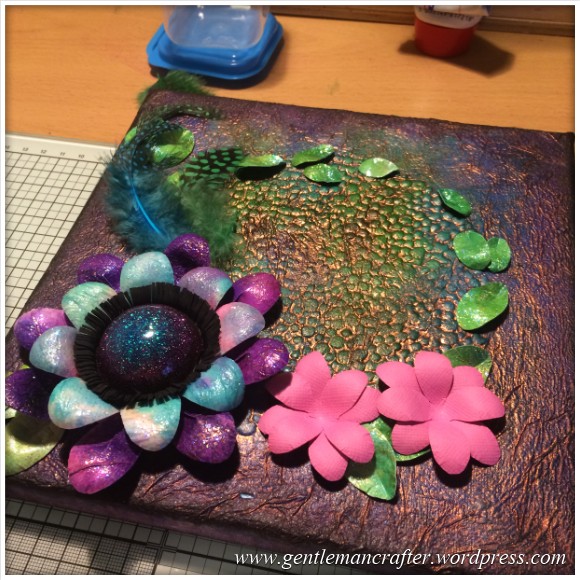
Flowers were going to be a main feature of this design so I made up a load using a variety of techniques including punching, handcutting individual petals and fringed quilling strips.

As you can see from the image above I was already testing out a layout, in order to make sure that I had enough leaves and flowers but I did go on to try a few more layouts.
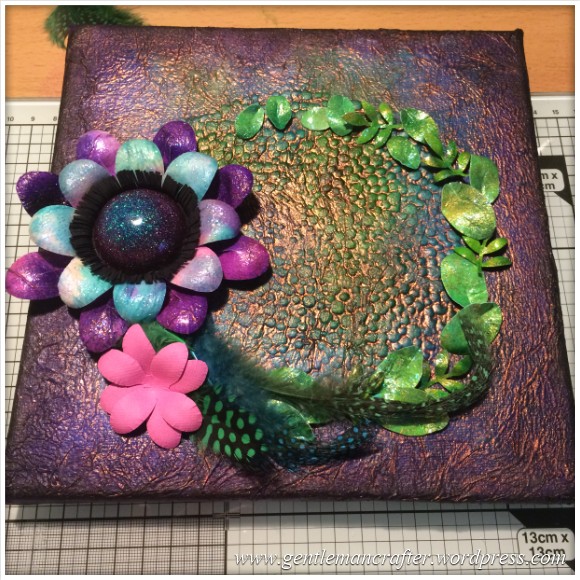
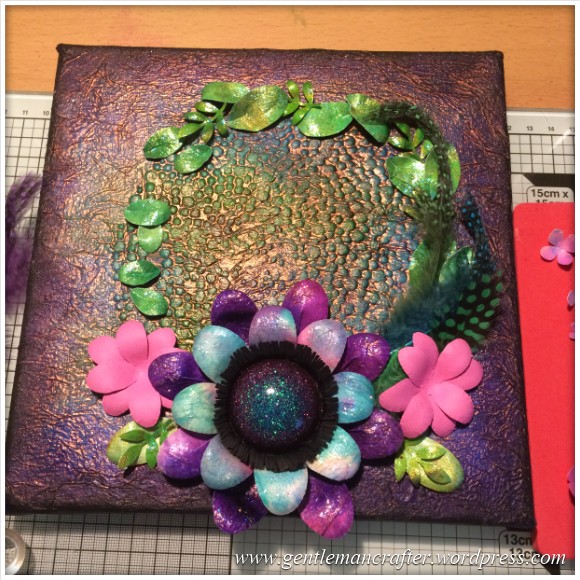
Mostly I went for the central flower layout.
Oh! before I move on, I should mention that the sparkly centre from the main flower was a cabochon that I had made using resin and a cabochon mold into which I had mixed a LOT of glitter – another tester for which I originally had no purpose.
Anyway, layout chosen and I began by making a semi-symmetrical layout of the leaves.
I went on to build up the flowers as well but forgot to take photos of the stages but you’ll get the idea later on when you see the finished piece.
Now, I am sure that you will agree that no fairy dell is complete without a fairy so I printed out (in draft) a design from the Here Comes The Girls Brights and Lights CD ROM.
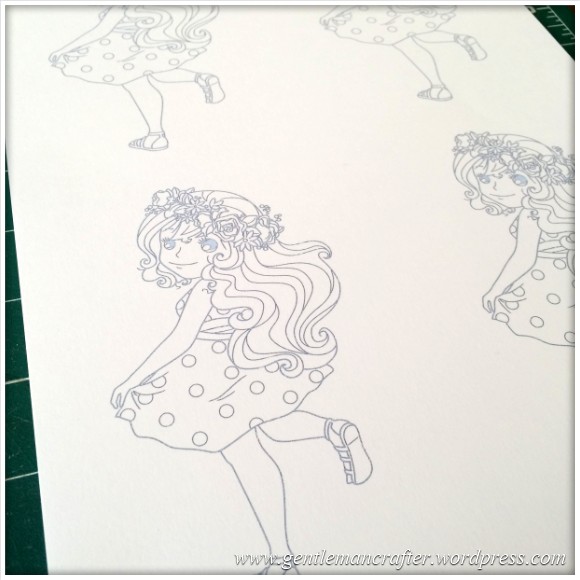
There were four copies as I had already decided that I wanted to do some DIY decoupage.
I also printed a spare sheet onto which I tested some colour combos from my Spectrum Noir pen collection.
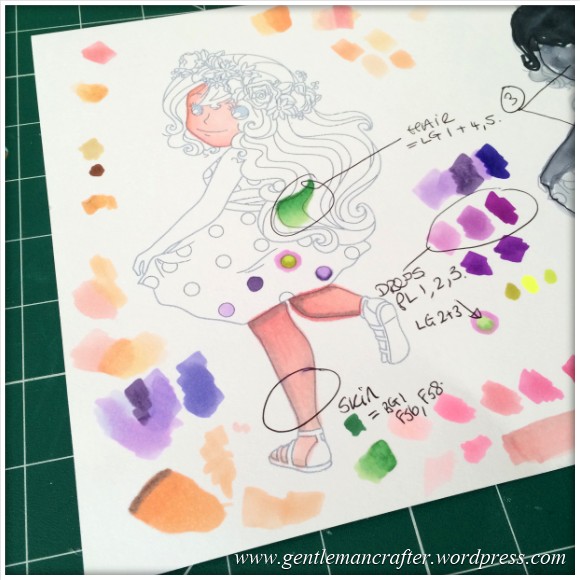
As a little thought I also planned out the layers of the decoupage so that I didn’t end up fully colouring all four layers as there would have been no point in that.
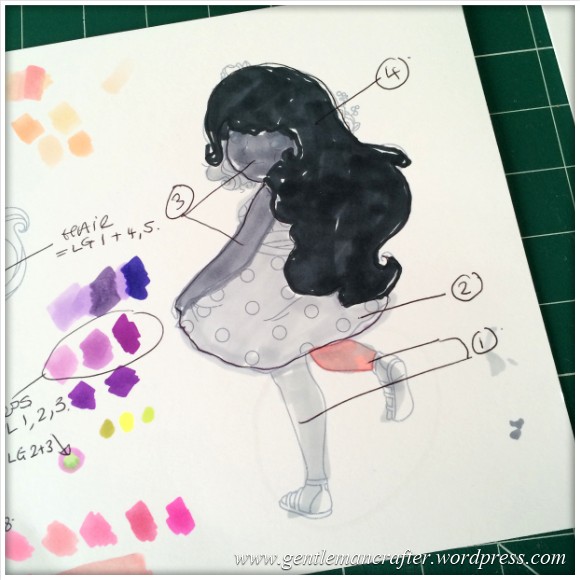
You can see (hopefully) from the image below that the colours of pens were also chosen to coordinate in with the colours already present in the main creation.
Choices made and I got to colouring.
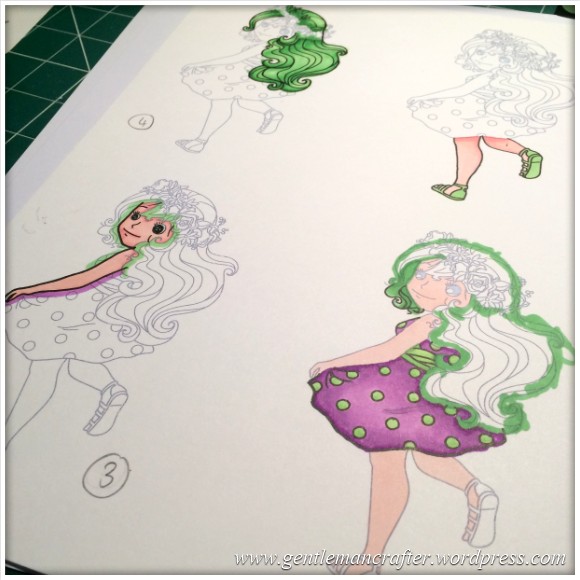
I had remembered to number each layer so that I didn’t forget which bits I was supposed to be colouring.
After cutting out the fairy and assembling her with Pinflair glue gel I also went on to add some more finishing touches to the canvas.
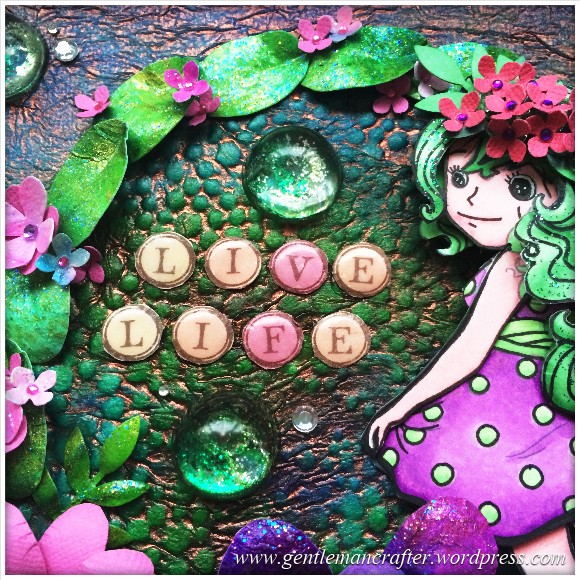
There were little gems to add some mystical sparkle; clear resin cabochons with sparkle glue underneath; lettering spelling out, “live life” and some feathers added to the floral centre piece.
Anyway, long story short, bish bash bosh and job done!
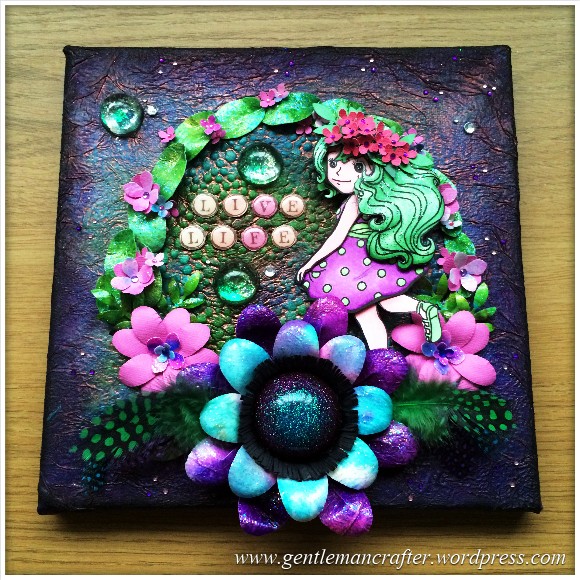
Pow! That’s some dell action going on there isn’t it?!
Here are a few more pics of the finished piece to browse upon.


Thanks ever so much for visiting today. It was great to have your company and I hope that I will see you at the next post.
As always, if you have any comments or questions about this post then please feel free to use the comments section below. Also, If you know of anyone that would appreciate reading this post, there are handy sharing icons below.
Many thanks for taking the time to read about my little creations.
I’ll see you again soon!
J :)

I so enjoyed seeing this tutorial John and really loved to see the final creation that came from other experimental techniques. It really does serve to teach me that there is nothing wrong in spending time experimenting with medias just to see what I get. Thank you so much for the inspiration. Where would people like me be without people like you that so freely share ideas.
LikeLike
One of your best. thank you and keep going.
LikeLike
Wow John this is fantastic, you’re such a clever man, I love the colours they’re fantastic, I bet you could incorporate this technique onto a card. I wonder John do you ever sleep lol
LikeLiked by 1 person
Very little Gillian.
LikeLike
This looks fabulous – and what an amazing background! Will have a go at this technique – my granddaughter will love it! Well done John! x
LikeLiked by 1 person
Hi John, wow this is super, and has given me a great idea for some clean up paper towels from marbling. Thanks for the inspiration. Bx
LikeLiked by 1 person
Wow!!!! love the color. So whimsical!!!!
LikeLike
Stunning, loved the colour and the kitchen roll colours. Did you put the tissue on the canvas, then modge pod or vive versa? didn’t quite grasp the info xx
LikeLike
I did both. On the canvas first to stick it and then over the top to seal it.
LikeLike
Hi John! Once again a beautiful creation! My imagination needs overhauling – perhaps if I just have a go it may work. Keep up the fascinating works of art. This one has all my favourite colours.
LikeLiked by 1 person
Love it John,the colours are lovely,wiish I could come up with ideas like that.By the way John dose your brain ever switch off.Jackie
LikeLike
Lol. No, I’m afraid that it doesn’t :/
LikeLike
Hi John
Love it, have played with kitchen towel an ink a couple of times. Stemmed from seeing Sue Wilson and Julia Watts playing with alcohol inks that I didn’t have on acetate than put on tissue and leave to dry, so I did it with mica spritzers and distress ink re inkers onto tissues then seal it onto acetate. The result is nearly the same but one day I will get alcohol inks (on the list with 500 other things). It looks great on the textured/ painted surface and for dragon skin or a mermaid tail it’d be great I think.
The canvas is lovely, I think with the cute little character it’d be lovely for a girls or teenagers bedroom especially.
Hugs
T x
LikeLiked by 1 person
Hi John, thanks for sharing. Love the design tho I’m not too sure about the green hair! But then I’m rather a traditionalist & maybe she is a punk fairy!! Lol!! It’s all personal choice, right? I can still appreciate the work & the beauty of the design. Well done!
Carole
LikeLiked by 1 person
Love the canvas John, thanks for the mass of photos. I’m having a ‘messy play date’ with a couple of crafty friends here tonight, might just have to ‘borrow’ some of your ideas ;) I actually prefer the item before all the flowers went on but that’s just me, I’m not a very girly-girl I guess.
LikeLiked by 1 person
This one is lovely. Thank you for sharing. Texture paste is fab isn’t it.
Love and Light
Sioux x
LikeLiked by 1 person
What fun you had! Thanks for your step-by-step buildup great inspiration to everyone to dare to go and experiment! Wonderful
LikeLike
Oh! this is beautiful John, thanks for shareing x
LikeLiked by 1 person
Love this John. Not been brave enough to try anything like this yet but have canvas so I should just get on with it I think. Love the colours.
LikeLiked by 1 person
What a fantastic project! I only wish I was brave enough to “experiment” ! Can’t believe how it has all come together so brilliantly.
LikeLiked by 1 person
Love the finished results. I especially like the background and the colours you used.
LikeLike