
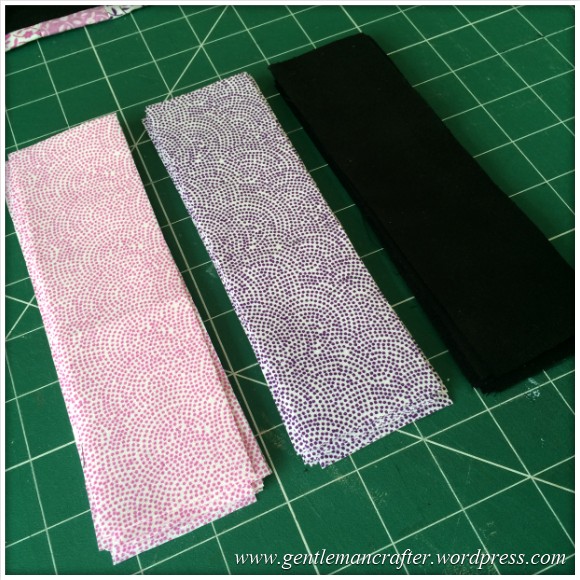
After completing the recent run of Fabric Friday Fat Quarter Fun blog posts I left you with a picture of some of the leftover fabrics.
This week, instead of buying more fabric, I decided to give a new project a go using that leftover stash.
I racked my brains for an idea of what I could do. Although the fabric was leftover I was limited on choices.
Then I remembered that I had had a go at braid quilting quite some time ago, and in fact showed you that creation on this blog. If you missed it then, here it is.

That one used Tilda fabrics in case you were wondering.
Last week I liked how the black had really highlighted and outlined the colours from this fat quarter set so I brought out some of that also.
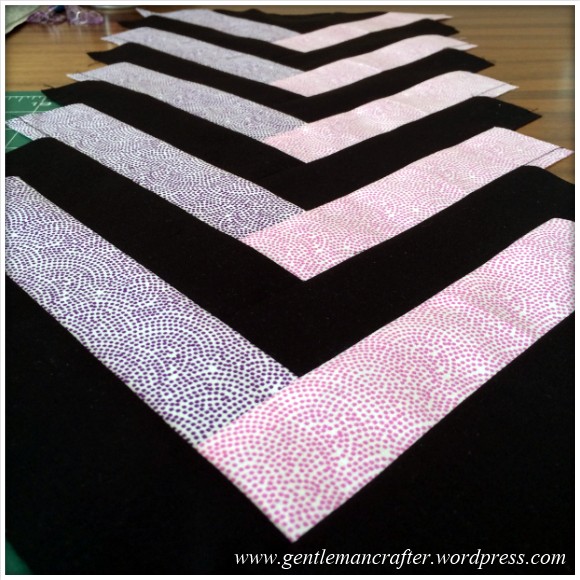
After pressing the fabric I set to work with my rotary cutter and created as many 2″ x 7″ strips as I could from each colour.
I then also cut some small quarter square triangles.

These triangles formed the starting point of each braid strip.
I began the strip with two black pieces.

Then added a purple strip.

Followed by a pink strip.

I then continued applying strips in this order.

After a while I had a braid strip that was about twenty inches long.

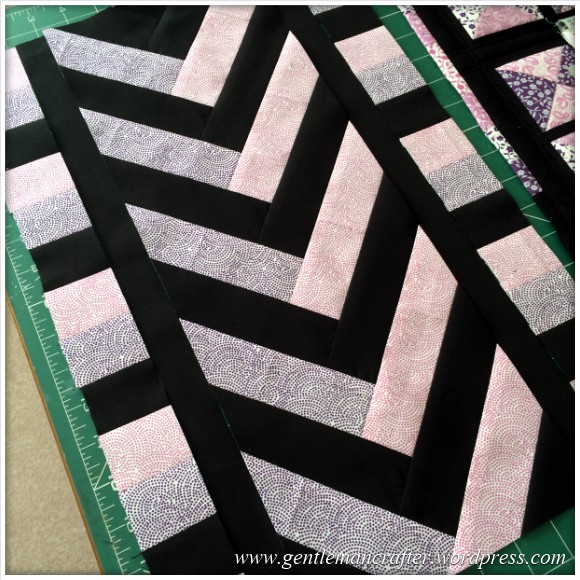
I braced myself for the “peak test”, where you check to see if all of your peaks line up …
Hmm, looks good, but only one way to REALLY tell …

SUCCESS! (which after last week’s debacle was even more sweet).
Anyway, that was one of the braid pieces all stitched together. I just needed to trim the edges and neaten it off.
The piece was about seven inches across so I measured the same distance out from the centre on each side and cut.

Oddly this results in uneven offcuts, but then it’s the bit that’s left behind that I’m interested in I guess.
Here is how it looked when all trimmed and tidied.

After completing the second braid strip, the same as the first, I checked out of the craft room for some lunch.
It was a lovely sunny day, and I’m trying to watch my weight, so I treated myself to a lovely chicken salad with pomegranate seeds.

I can tell you that it was delicious!
Anyway, after munching that down I made a cup of tea and headed back into the craft room.
Now, I didn’t have enough of the 2″ x 7″ strips left to make another braid so I looked at ideas for using what was left.
The idea struck me that I could make strips (like I did last week for the edge of the quilt block) and use these as little decorative stripes down the side of the braid strips, separated by a thin black strip.
Idea in hand, I set to sewing up the strips.
I began by pairing up the pink and purple strips and chain piecing these.

I pressed the seams out from the centre.

Then I added a black strip to all but one of the pairs.

And finally started adding the groups together until I had a long strip, about twenty inches long.
I cropped this into four long strips.
Then I cut four 1″ x 20″ pieces from the black fabric.
Before I stitched it altogether, I thought that I would lay it out side by side to see if my idea would work.
Ok, yup, I think that that works. I’m not fussed that the colours don’t line up, I have the separation of the black fabric to give it it’s own design purpose.
I stitched the pieces together, pressing the seams in-between attaching each piece until I had this…
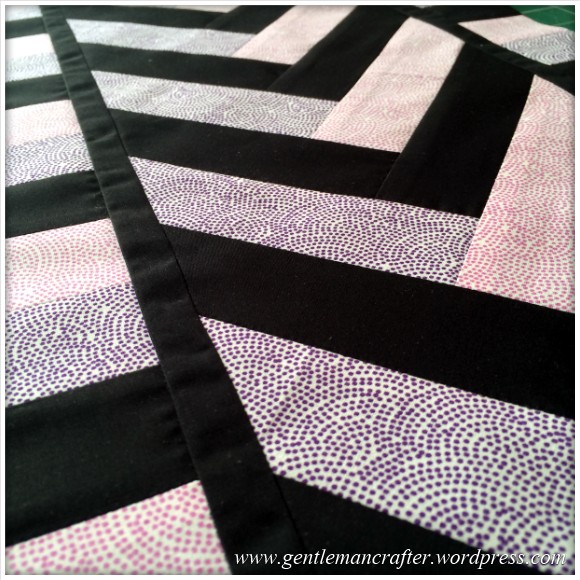

Looking good so far!
I repeated this for the second braid strip and then sadly it was time for me to break away from the sewing machine but at least I’ve got a head-start on next week … I just need to decide what to make with these two panels now – a handbag? a cushion?
What would you make with two of these panels?
Anyway, thanks for reading. Look forward to sharing the final piece with you next week!
If you have any questions or comments about this post, please feel free to use the comments section below.
See you next time.
J :)

Gorgeous. Have you thought about making a cover for your Scan N Cut? that way your beautiful piece would always be on show
Love and Light
Sioux x
LikeLiked by 1 person
This would make a great table runner dependant on you dining room décor.
LikeLiked by 1 person
love the contrast between the pastel colours and the black. Wouldn’t have thought it would work but its amazing. keep it up John your brilliantly talented. I would go for a wall hanging but if you get bored skies the limit I think!!! so many things you could make but sooo little time….lol…
LikeLike
I wish I was just a quarter creative, I would be so proud, you have really got an Astar this week, thank you so much for the information x
LikeLike
How about a table runner?
LikeLike
What great colours, the design is so stylish would suit male or female tastes, it would make a fantastic table runner with matching placemats …. this has given me an idea and inspiration for my next challenge. Thanks John for your really informative blog added to which some really good photos they give an insight into your finished project. Keep them coming is all I can say.
LikeLike
Hi John, these panels look lovely, I think I would make table runners from them, or at least something that would be on show. My brain goes to mush in this heat, so can’t think properly at the moment; perhaps you should just await your muse, it seems to be a rather good one. Take care XX
LikeLike
Yet another fab tutorial, and a beautiful item at the end. It’s too nice to put away, make it into a wall hanging, and then when you want to replace it (if ever) you could make it into a bag or place mats. I think you really need to enjoy looking at it, it’s lovely.
Love and light
Sioux x
LikeLike
Fandabbydosey! Love the colours, John. I would make a bag, cushion or placemats or the centre of a throw or picnic blanket – Such a useful piece could be used for virtually anything! In fact, when I saw the pic of your lunch. I was thinking you were going to put your plate on it! Love the tutorials, John, Thank you. B :-) x
PS. Noe for all fellow followers; I was lucky enough to be drawn for the bag John had for a bag he had made. IT arrived this week and it is STUNNING, so keep on reading and following, cos who knows, you may me lucky to in one f John’s fantastic makes too. x
LikeLike
You come up with so many ideas John – As a suggestion how about using these to make table mat covers for the summer? best wishes Jackie xx
LikeLike
Again, very inspirational. Am going to have a go ( and the salad too ) You always pick great fabrics, makes such a difference!
LikeLike
MAGNIFIQUE
LikeLike
Love the real contrast of the delicate pale colours with the black. Just like cardmaking, add black and the other colours ping!
LikeLike
Too right! That’s what I was thinking. It looks really cool
LikeLike
I love your blogs John. I’ve only recently found your site but I’m a regular visitor now.
I have quite a lot of fabric strips left over from other projects so I’m going to have a go at making a scrappy version of braiding. I’ll still use a main colour to tie it all together. I love the way that you can ‘think on your feet’ and design and make as you go along.
Thanks.
LikeLike
Thank you & welcome!
Look forward to seeing what you make.
J :)
LikeLike
Don’t know where you get your ideas from but I would like to live in your head for a day this looks great thanks john x
LikeLike
Love the way it just evolves – very clever
LikeLike