
My collection of Tim Holtz Distress Inkpads has grown a fair bit over the last 12 months and until recently they have been stored in a plastic box which I have to wrench out from under other boxes in order to get to them.
After a recent craft stash avalanche, whilst trying to get to the inkpads, I thought that I would have a try at making some storage for these so that I can access them at anytime without causing a disaster each time.
The starting point for this was a quick trip around the internet. There were lots of tutorials and different ways of doing things.
Me being me, I did take in some of the info that I saw however I felt that I could maybe do it my way.
I did try a couple of attempts using lightweight card, but these were just not sturdy enough so I paid my local craft shop a visit and got a large (about A2 I think) sheet of foam board.
I measured, drew, doodled, drank coffee, ate a bag of mini cheddars, deliberated and eventually worked out a plan.
The plan was as followings…
- Cut 1 piece 25cm wide by 11.5cm high for the back.
- Cut 2 pieces 26cm wide by 7.5cm high for the top and bottom.
- Cut 2 pieces 7.5cm wide by 11.5cm high for the sides.
- Cut 3 pieces 25cm wide by 7cm high for the shelves.
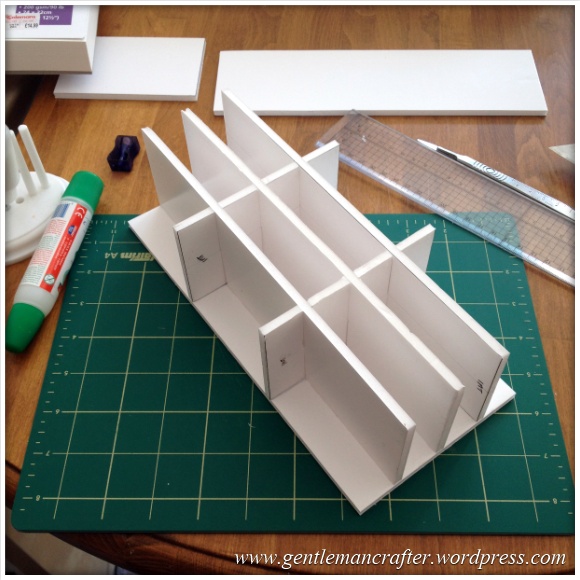
- Cut 2 pieces 7cm wide by 11.5cm high for the struts.
I transferred these measurements to the foam board, making sure to label each piece as I went so that I didn’t get confused. Here is how I laid out the pieces on the board.
- At the bottom you have the three shelves and backing panel.
- Next up you have the two side panels and two vertical struts.
- At the top you have the top and bottom panels.
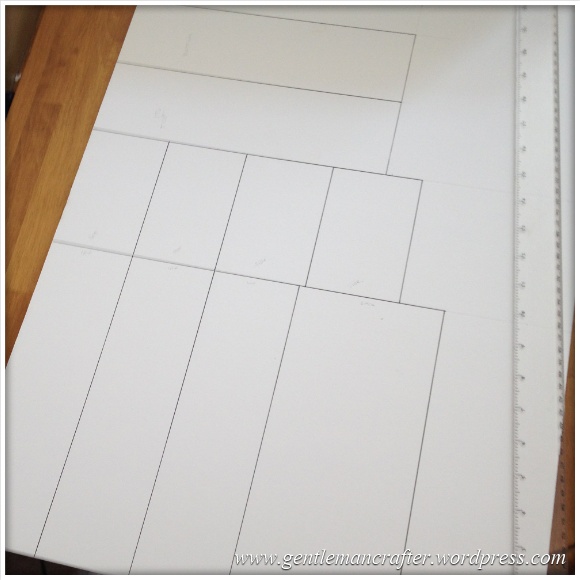
Not shown in this image is the addition of the slots that I needed to cut to fit it altogether so here is a quick guide for those.
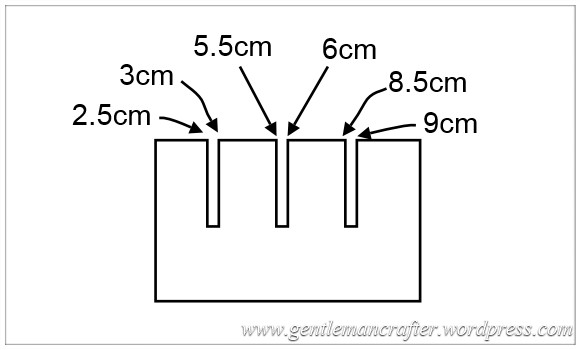
On the two vertical struts, I first made a line disecting the piece in half (in the longest direction). Then, from the left edge, I made marks at the following points – 2.5cm, 3cm, 5.5cm, 6cm, 8.5cm & 9cm and then connected that all up … oh hang on, this is getting a bit wordy isn’t it? Why don’t I just do a picture, that’ll probably make more sense won’t it?
Ok, *shakes magic glitter pot* – kapow!
 Better?
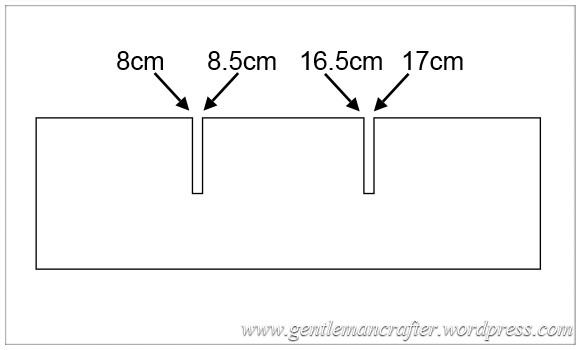
I did a similar thing for the shelves only this time the marks, from the left edge, are as follows – 8cm, 8.5cm, 16.5cm & 17cm. Another picture perhaps?
Ok :) Paff!
I then went on to cut these all out, and cut the relevant notches so that the shelves and columns could slide into each other.
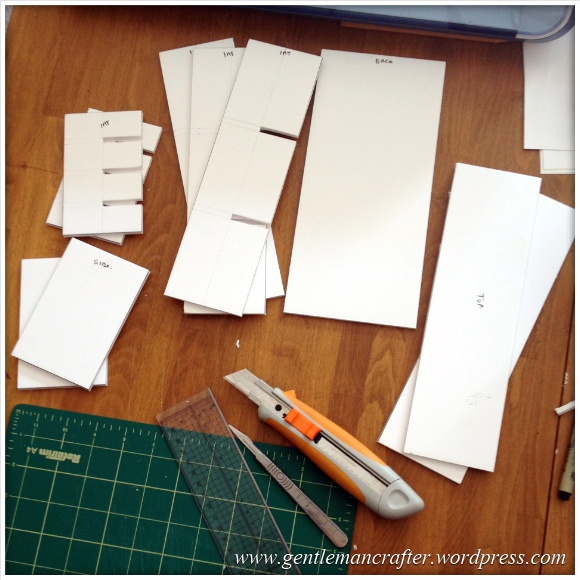
Ooo, I feel like I’m back at college doing a mock up of a 1980’s concrete block building (not something that I did but we did use foamboard to mock up building projects).
Anyway, from here it’s all down to gluing sticking and decorating, the measurements are over – *breathes sigh of relief*.
For the next stage I slotted the shelves and columns together, adding a little PVA glue at the joints and then stuck this to the back panel.
I then added the sides.
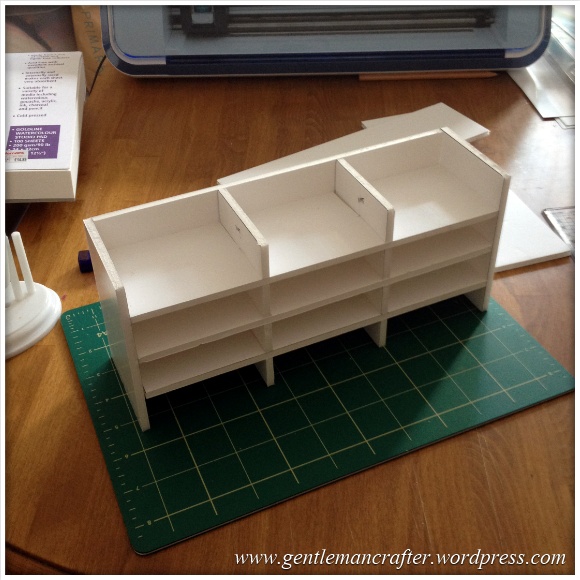
And finally the top and bottom pieces.
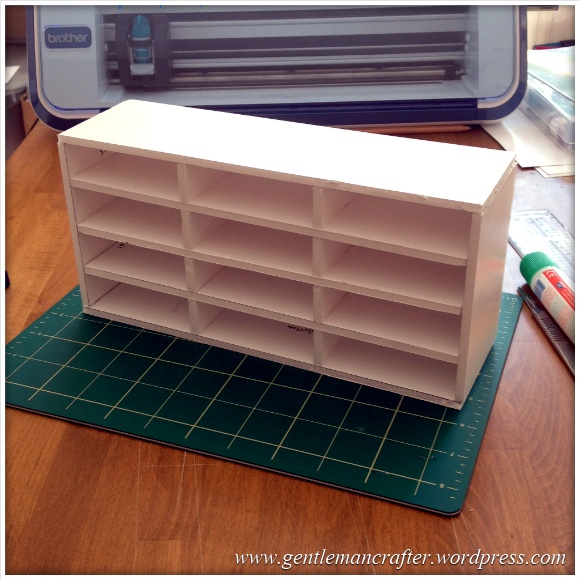
So that was the basic shell all made up.
I then decorated it by adding some docrafts Madame Payraud’s Tissue Paper with some Mod Podge and painted the inside of the shelves with black acrylic paint.
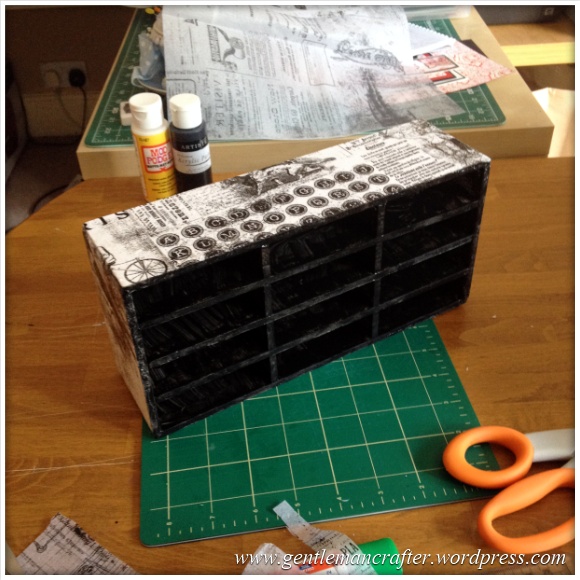
This did however need a second coat of paint, so I went in again after the first coat had dried. It probably would have been easier had I used black foam board, but hey ho, you live and learn, lol!
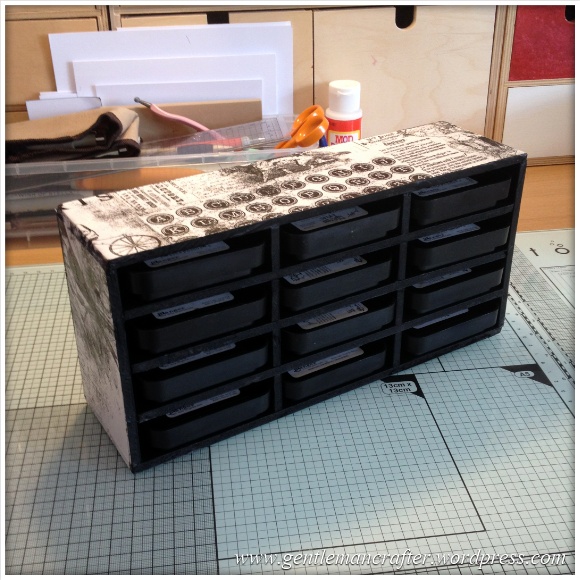
And that my dear friends is how I put together some storage for my distress inkpads. There is even enough room to pop a piece of cut n dry blending foam on top of each inkpad so that they are to hand and don’t cross contaminate.
This is only half of my collection of inkpads at the moment and I by no means have a full set. I understand that there are 48 in the range so I’m going to need to get collecting and am also either going to need to make 3 more of these or make one four times the size.
So this was just a little fun tester project for myself but I hope that you’ve enjoyed it.
How do you store your ink pads? I bet you’ve got lovely shelving and a labeling machine… ;)
Anyway, that’s it for this post. If you’ve any questions about this post, please feel free to get in touch via the comments section below.
See you again soon Monday Mashers!
J :)

This is absolutely awesome. Thank you so much for sharing! Last year (during COVID) a company was giving away some used pieces of foam board they had (not rubbing it in but they are black!!). There was absolutely NOTHING wrong with them except for a few tears of the paper where they had attached stuff to it. In any case, they were completely perfect for this project. I do have to make some minor adjustments. I recently completed acquiring the full set of ink and oxide pads as well as the re-inkers and when I make these shelves, I think I want to store the re-inker bottles next to the pads so I think I need to add about an inch as well as the thickness of the board times three. With the information you so generously have provided, it will be a cinch!
LikeLiked by 1 person
I have made three of these and love them… Your instructions are so easy to follow and I was amazed how everything fit so seamlessly. YOU are a genius! Thank you!!
LikeLiked by 1 person
1 inch is 2.5 cm
LikeLike
I loved ur directions but I do not use the metric system. Wish I knew how to convert to inches. Thank you.
LikeLiked by 1 person
Jackie – Google knows all!
LikeLike
2.5 inches = 1cm (10mm)
LikeLike
1 inch is 2.5 cm
LikeLike
Whoops, yes, I got them the wrong way around! Thank you.
LikeLike
Wow, impressive 👍🏻 I wonder how many of those you’d need to house your ink pads in 2021, I’d imagine you’ve gathered a huge collection since you made this video ❤️
LikeLiked by 1 person
Surprisingly I’ve not added many as those that I had are still going strong and I’ve not really needed to expand the pallette.
LikeLike
Hi John
Have you thought of making an S.V.G file so we can cut it out on our scan n cut
LikeLiked by 1 person
You’d not be able to cut the foam sheet with the SNC. Too thick.
LikeLike
I was thinking about greyboard 1mm thick then sticking 2 sheets together once pieces cut .
LikeLiked by 1 person
Do you have the measurements in inches? I’m an idiot when it comes to measurements. Cm and I do not her and haw. LOL
LikeLike
thanks for sharing your hard work and great design. i’ll be saving this!
LikeLike
Btw. A craft stash collapse is commonly known as a crapalanche in our house.
LikeLiked by 1 person
Fabulous John. Thankyou for doing all the faffing for us. More cash to spend on ink not shelves!
LikeLiked by 1 person
What a great idea , thanks for sharing the pattern and method.
LikeLike
This is exactly what I was looking for! Thank you so much for sharing.
LikeLike
Reblogged this on CraftyCAN's Blog and commented:
Great DIY Tutorial on making your own Distress Ink pad Storage Rack. Will need to pick up some supplies and get stuck into it. :) With copious amounts of coffee just for fun.
LikeLike
You are amazing how on earth did you figure that out.
Mine are in an A4 tray.Could never make anything like you have
LikeLike
Thank you Clare :)
LikeLike
I laughed when I saw this post john because it is exactly how my husband has made all my storage shelves for me. He used the foam board with brown Kraft paper on one side for the inside, and I printed some beautiful Paperstreet co-ordinating papers to cover the outsides. I printed onto sticky label paper the free sheet from Tim Holtz which gives you all the names of the distress inks, and cut them out with my scan n cut. My husband also left room for foam pads, so I keep one on top of each ink pad. I also have ones for my adirondack inks, my pro-markers and my complete set of spectrum noirs. It’s a cheap and very effective way of making storage for all sorts of craft materials.
LikeLike
Genius idea. Haven’t the dexterity to do it but bravo for all your hard work and yes the picture defo helped with the instructions ;)
Did the paint dry on the foamboard? I’d have thought it would stay tacky or does foam board have an absorbent surface? I keep mine in what WHSmiths called Disc drawers. Cardboard drawers two deep meant to store 3.5″ floppy discs (shows my age! but the drawers were around in the shop about 2008) SOme were kraftcard coloured so ideal to customise. I used a white marker to write the names of the ink on the black edges of their boxes. How come you are storing them upside down, are they well loved and elderly? Mine are so juicy if I stored them like that they would leak.
Did you get the idea from Mel heaton and her shelving boxy things she covers with Graphic 45 paper? This looks like a project for Ali Reeves hubby to make some new kits from MDF ;)
LikeLike
Got the idea because I was fed up digging them out of boxes. Weirdly I found a floppy disc in a cupboard the other day – no way of seeing what’s on it though lol :)
The paint dried just fine as dif the mod podge also.
LikeLike
On the OCD side you do know you can get Really Useful boxes is drawer versions ;) Not as customiseable though.
I’m with you on the avalanche moments, for stuff in boxes I open cupboard, look and think, I can’t face that battle and close the door again hehe
LikeLike
Ooo, will have to look those up :)
LikeLike
Foam board is also available at Hobbycrafts.
I had just bought a sheet of this & was trying to work out the measurements, when up popped you tutorial John, thanks a bunch!
LikeLike
You’re welcome :)
LikeLike
This is great John thanks nice cheap easy solution to a perennial problem! For the crafter asking about Spectrum Noir storage? I’ve got mine as a fabric wall hanging with dowelling threaded through the top to take the weight. Thick elastic placed vertically down it sewn horizontally at regular intervals so you just slide the pens into the gaps. If you prefer to store pens vertically then just turn the hanging sideways. For no sew crafters I’m sure you could do the same with mount board, elastic and 2 brads at each interval.
LikeLike
all mine are in ice cream tubs, empty of course x
LikeLike
You dear John are way too clever or you have far too much time on your hands!
LikeLike