For sometime now we have all known how to do the half cut technique with our manual die cutting machines and I have demonstrated one way of scanning in a ready made design and converting for use with the Brother Scan N Cut however I wanted to have a little play to see if this could be achieved with the Brother Scan N Cut Canvas as I hadn’t really seen a way to do it before.
The good news is, that it IS possible.
The even better news is that it appears to have opened up other possibilities – read on to find out more!
First things first, I should show you what I mean by the half cut technique.
It’s generally the cutting of a shape on a fold in a card or other project so that some of the shape sticks above the fold line – a bit like this …
No, I’m haven’t inadvertently started making the set pieces for a new horror film set in a graveyard you cheeky monkey.
I’ll grant you that they were fairly basic examples so here is one that has a little more ooomph.
Tweet isn’t it? Erm, I mean sweet. Sorry for the pun.
Anyway, as I mentioned, I did demonstrate one way of doing this on TV earlier in the year (by scanning a design) but I set about seeing if there was a way that I could do this with just the machine and software only.
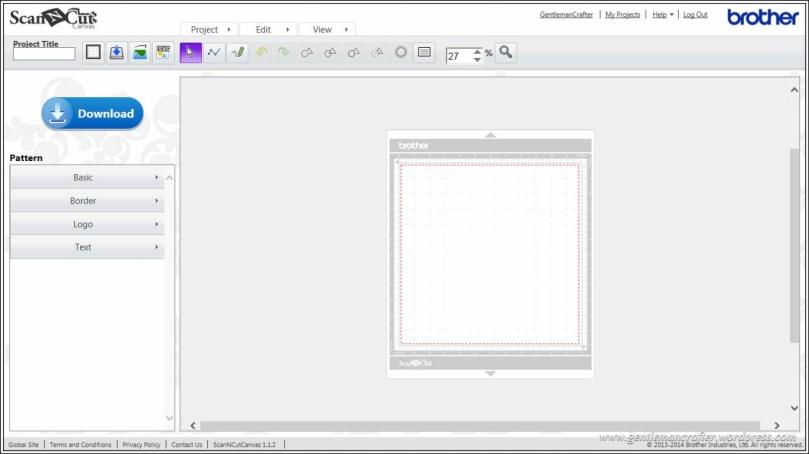
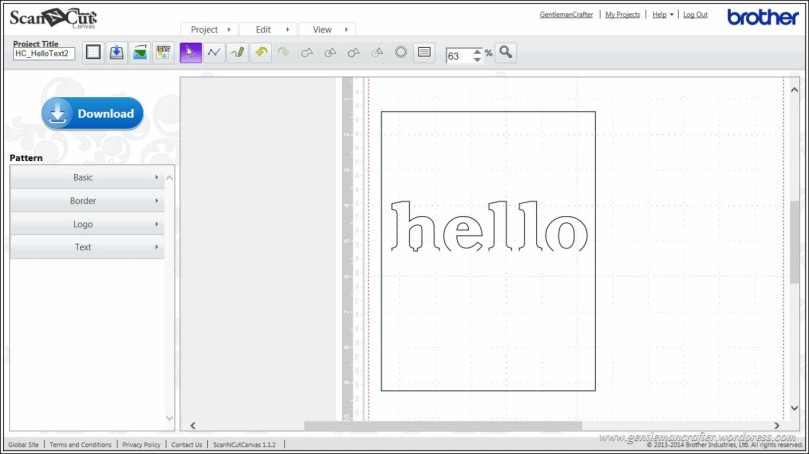
First I started a new project in Scan N Cut Canvas.
The beginning is oft a good place to start.
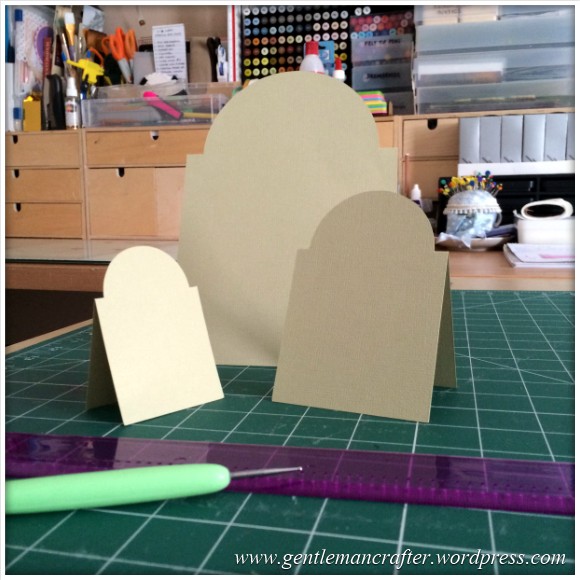
Then I opened the basic shapes and added three squares – all the same size.
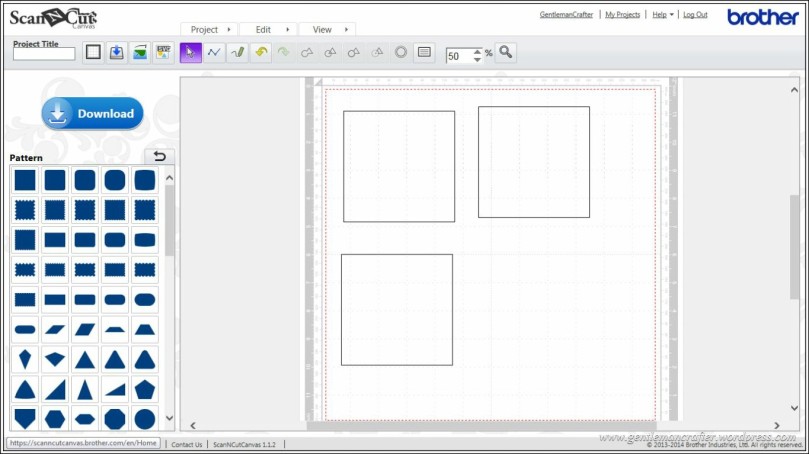
Just a quick hint here – if you are planning to resize the square, just drag one on to the virtual mat, resize it and then duplicate that one rather than trying to match the sizes between three different squares.
I then zoomed into the part of the design where the top two squares met and adjusted them so that the two shapes overlapped on one edge only. I made sure that there wasn’t a double thickness line by nudging it across using the arrow keys on my keyboard.
Finally I selected both shapes and used the Align>Middle function from the Edit menu.
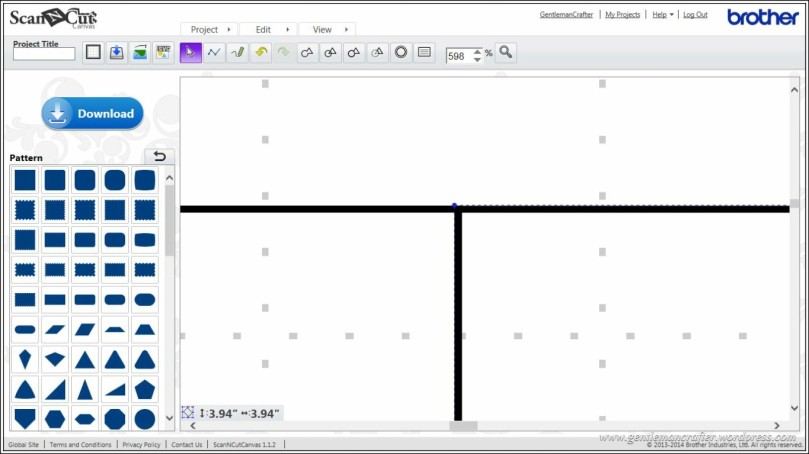
I then turned my attention to the lower square and brought it up so that it’s right edge was in line with the join of the two other squares. That zoom function really helps!
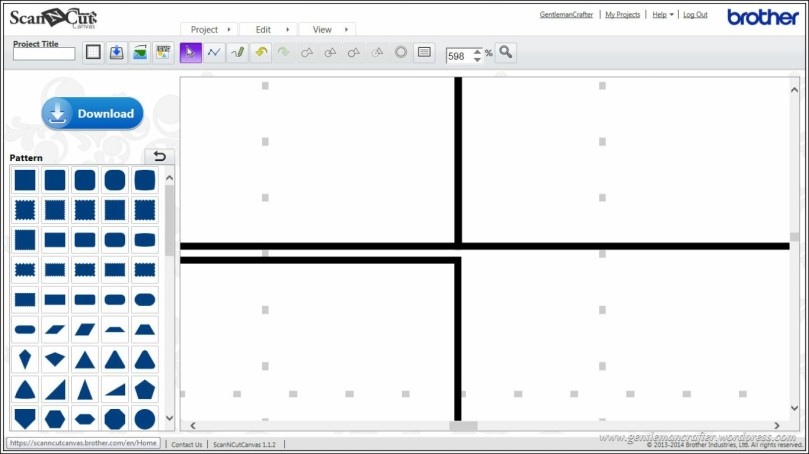
This is how my page is looking so far.
Why three squares? The top two squares are going to be my card base. The third square is going to act as a sort of punch.
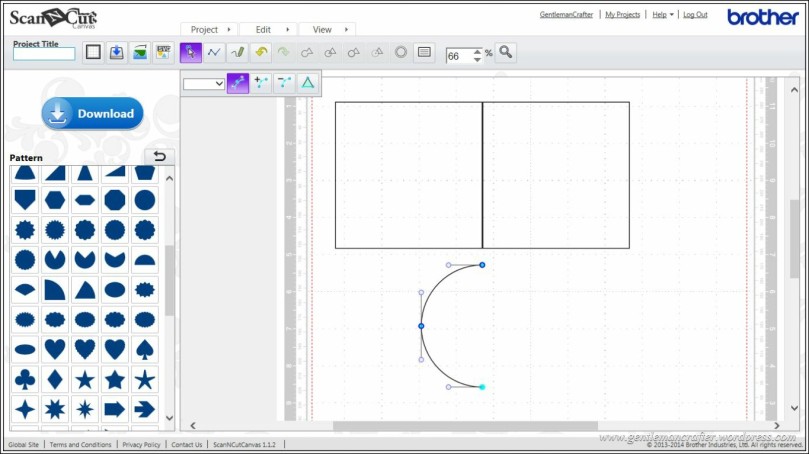
From my basic shapes section I then brought in a circle, scaled it down a bit and then made sure that it’s centre lined up with the right edge of the bottom square.
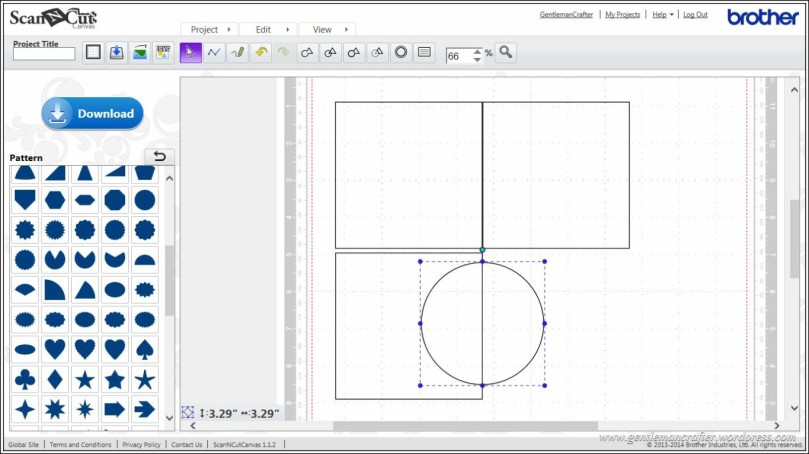
Then, after selecting both the circle and the bottom square together I clicked on the Divide button. Don’t know where the Divide button is? It’s one of the buttons above the virtual workmat – just hover your cursor over them and their name pops up – which is helpful when you forget, like me.
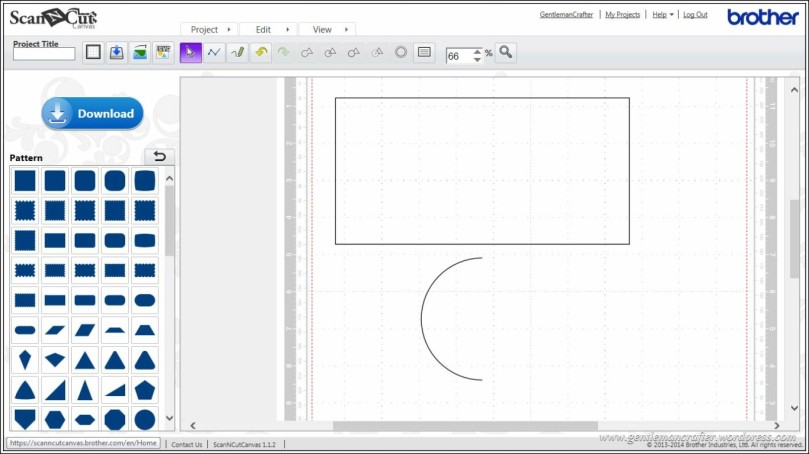
Nothing much appeared to happen on screen as you can see.

What had in fact happened though is that the overlapping parts of the circle and square were now individually selectable which meant that I could click on them and delete them and then end up with this.
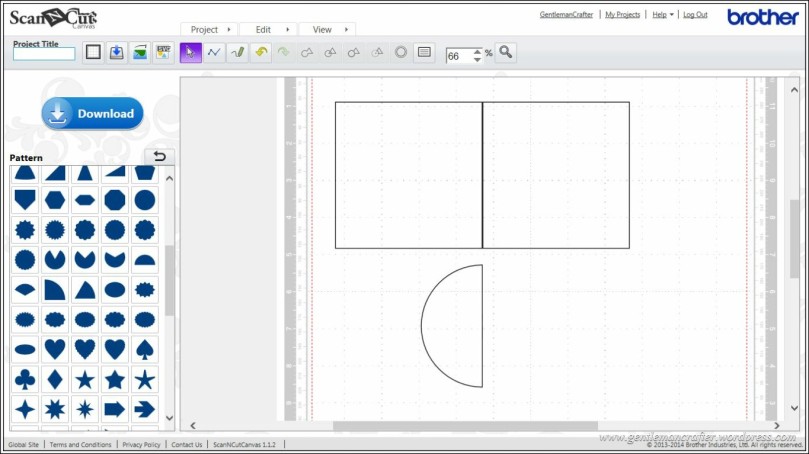
Now, this is a complete shape and the machine will only know to cut around the whole outline, which is not what I wanted as that would have given me an aperture, not a half cut shape.
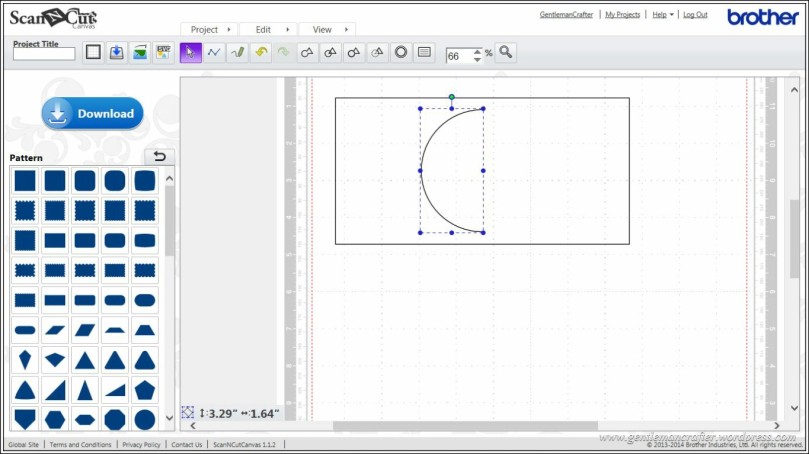
So, next I clicked twice on the semi circular shape so that it entered the line editing mode, which looks something like this.
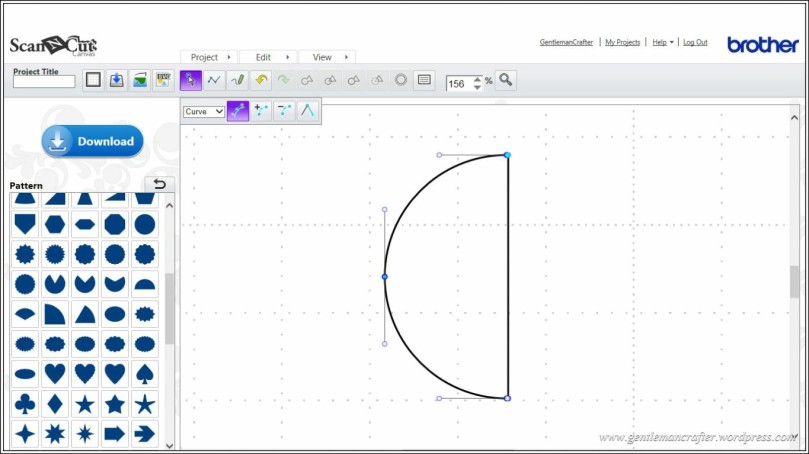
Now I could see that the line that I wanted rid off was not selected (it should be highlighted a light turquoise – one of my favourite colours!) so I dragged a small selection box over the tiny circular dot at the bottom of the semi circle and this then highlighted the line that I wanted to edit.
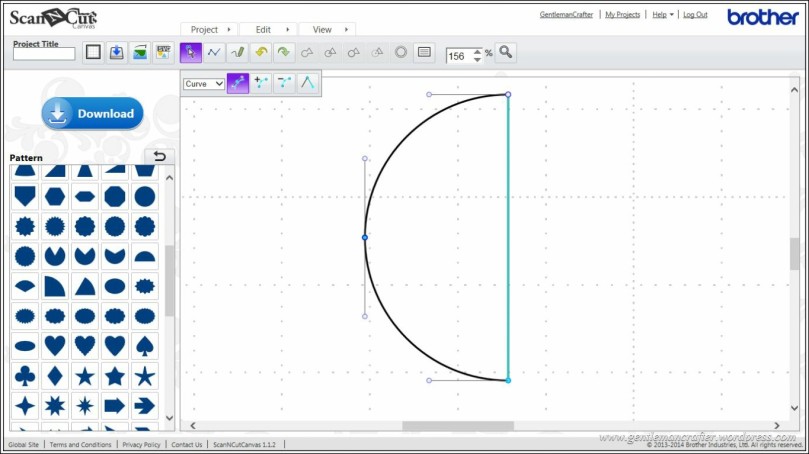
I then clicked on the Open/Closed Outline button that was in the line editing menu (that had appeared at the top left of my workspace when I had entered the line editing mode) and this got rid of that line.
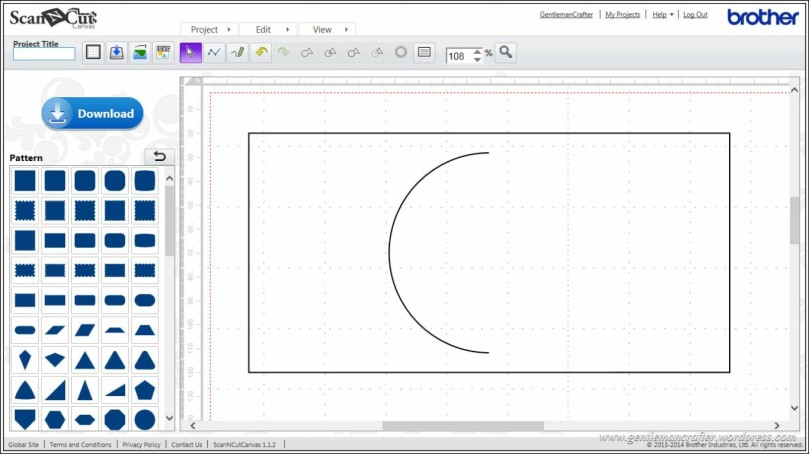
Perfect! Next, I needed to weld the square shapes at the top together to form my card so I selected both squares and clicked on the weld button.
Tip: You shouldn’t have a line running through the rectangle after you have welded. If you get this, click undo and stretch one of the squares a little over the other and then try welding again.
Then, to move the semi circle into place I dragged a selection box over it and then used the up arrow key on my keyboard to slide it up. As I already had it positioned so that it would sit on the fold line I didn’t use the mouse for this operation because I didn’t want to risk putting it out of alignment.
After moving the semi circle over the rectangle I then dragged a selection box around the whole group and used the Align>Middle function from the edit menu to make sure that it was in the middle of what would become the fold.
The final act was to group them together. This had two advantages – it meant that I could move it around screen without risk of knocking anything out of alignment and two, I could resize it :)
By the way, quick tip, if resizing anything in canvas and you don’t want things to stretch out of shape then hold down the shift key on your keyboard as you drag the little resize handles – works a treat!
Ok, so that’s the basic principal – now I did go on to ask myself if this would work with other shapes, designs and text but more on that in a minute. First, I’d better show you the result of this little cut – back to the graveyard – cue spooky music!
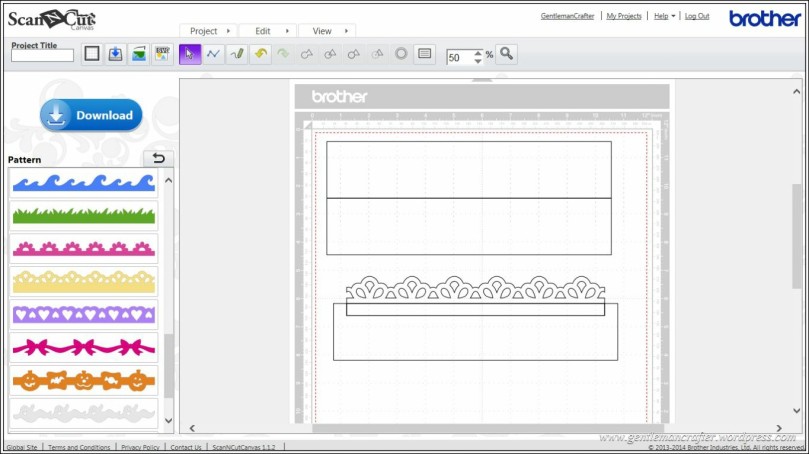
Next I tried some of the borders that were accessible from the Brother Scan N Cut Canvas software.
The design is built in much the same way.
However I did discover a couple of things whilst playing with borders.
Firstly, you may need to adapt the design by deleting some of the nodes in the line editing feature.
The zoom tool is your best friend with this!
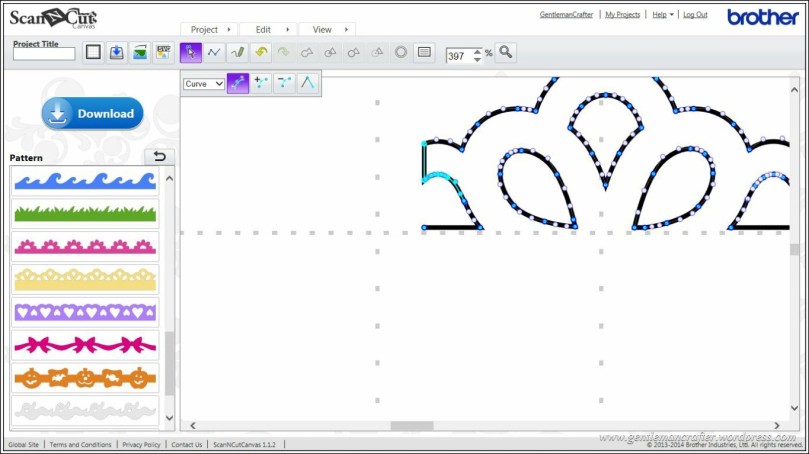
I could have gone in much further. You select nodes by dragging a selection box over the ones that you want to delete and then click on the icon that shows a line with a – symbol next to it on the pop up line editing menu bar.
Don’t panic, you do have an undo button :)
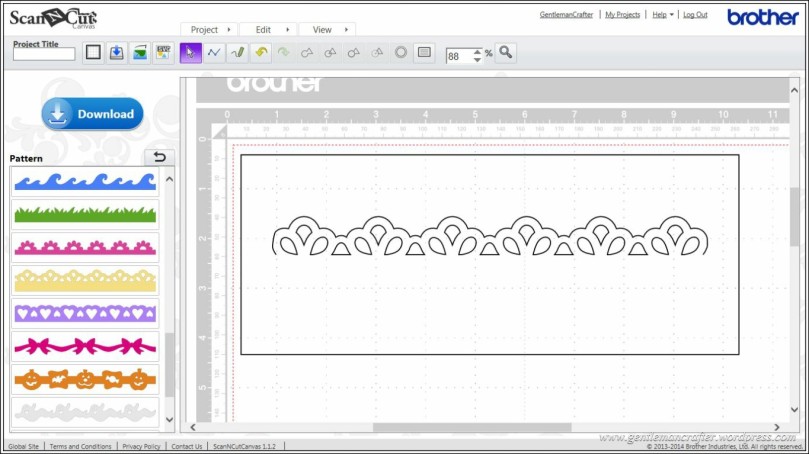
Here is the finished design using the lacey border.
I did notice that I hadn’t quite edited the lines at either end well but I can always go back in and edit these at any time, which is a nice feeling.
It wasn’t so bad when I cut it out though, so not rushing to get back in there and fiddle with me nodes.

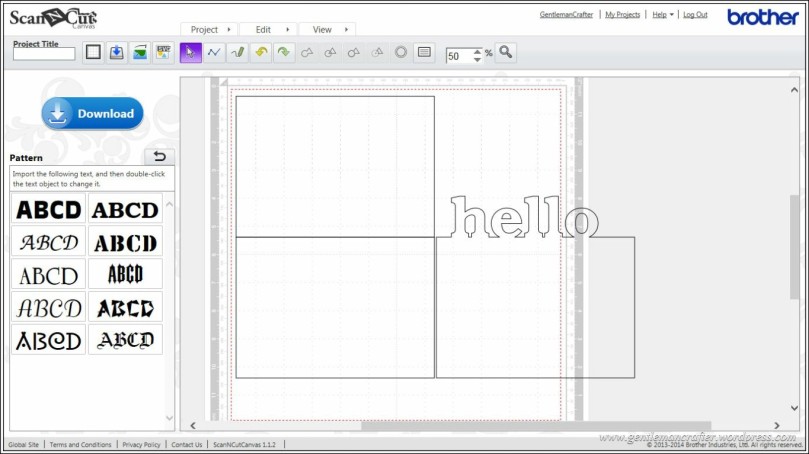
Next I asked myself if it worked with text.
Well, I knew that it could from my previous scanning experiments however this software was slightly different and required some lateral thinking when it came to text.
I first tried text in the way that I had been doing for the other shapes however I hit a snag. In the next image you can see how I have managed to get to the stage where I have “opened” one end of the letter h.
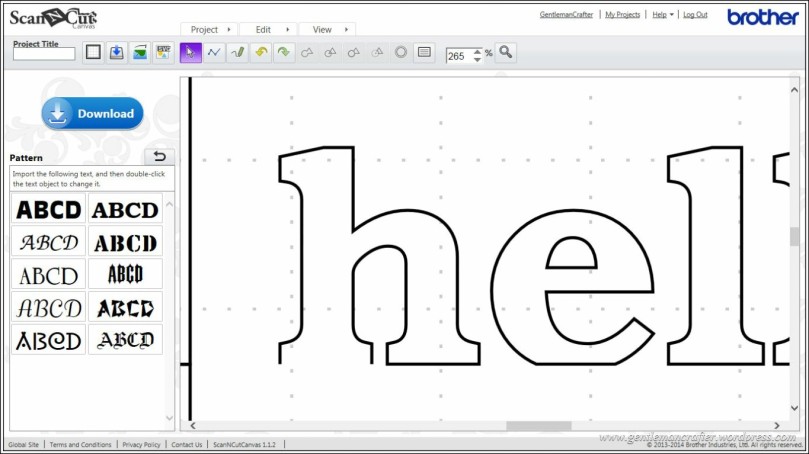
It turns out however that you can only have one open end. So I tried deleting nodes, but this just sent the shapes, well, out of shape.
So I tried a different approach. This time I welded the letters to the large shape first.
This ultimately meant that I could “open” the bottom of the box and then delete the connecting lines so I went ahead and ended up with this.
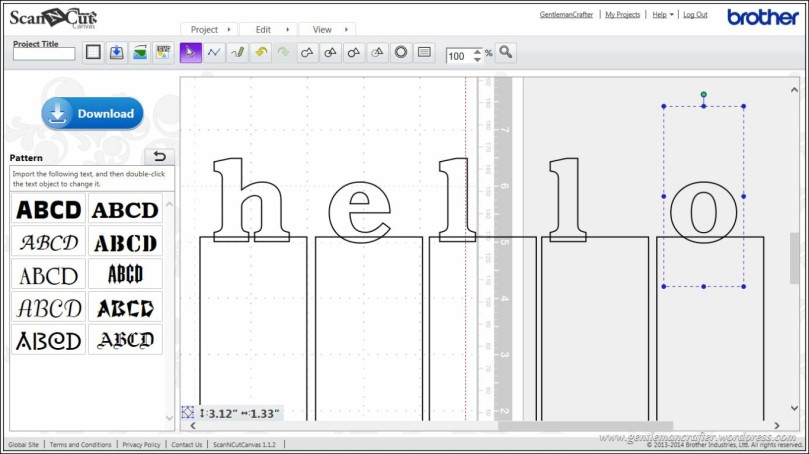
So that was closer to what I wanted however I couldn’t find a way to remove the cut lines inbetween each letter, which, when cut, gave me this.
That kind of was the result that I was after but I worried a bit about the stability of the card as it stood up as there was a lot of “empty space” at the fold line.
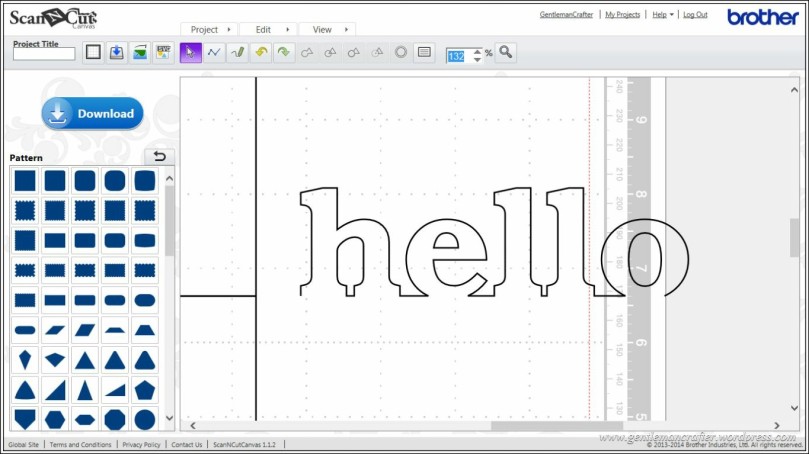
It did strike me as odd that I couldn’t separate the shapes but then an idea sprang up to me like a super excited puppy (I would love a puppy!) – I had loaded all of these letters as a group by typing them all at one time, perhaps if I loaded the letters individually they may act differently, so I ran with that idea.
I loaded up the letters individually and welded them as before but this time, each to their own block.
This got me closer to the desired result as I ended up with this.
Letters with a double leg, like the letter h still had the connecting bit in the middle however at least each of the letters were separate.
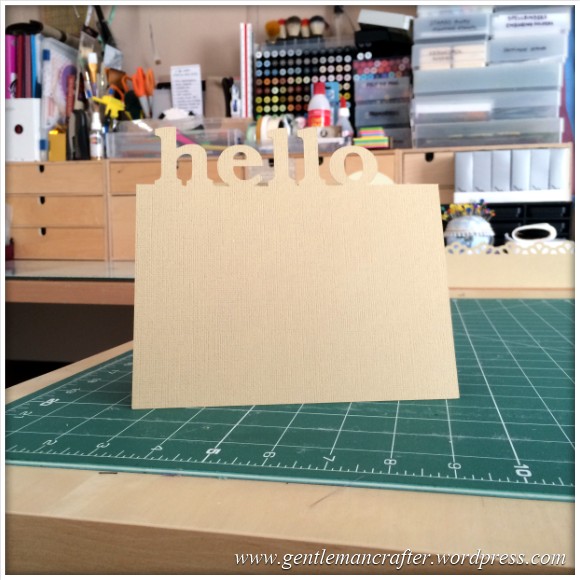
Anyway, here is what it looked like when it was cut out.
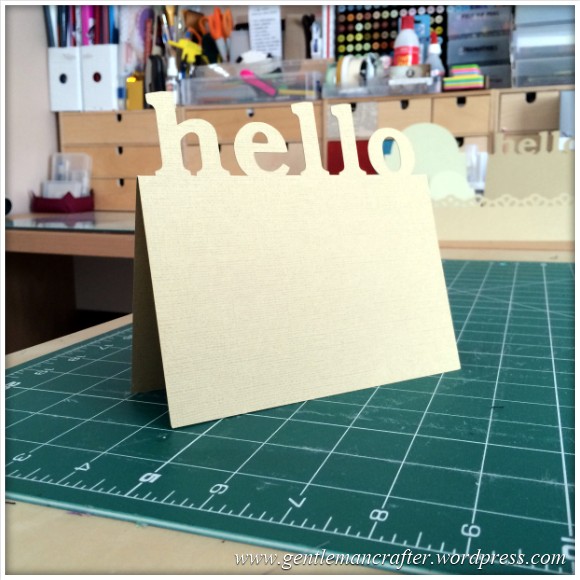
With text, it might just be easier to continue creating it on the PC and then scanning it, but I will see if I can refine this process in the future – if you have any gems of ideas, then please feel free to pop them in the comments section below along with any questions that you may have about this post.
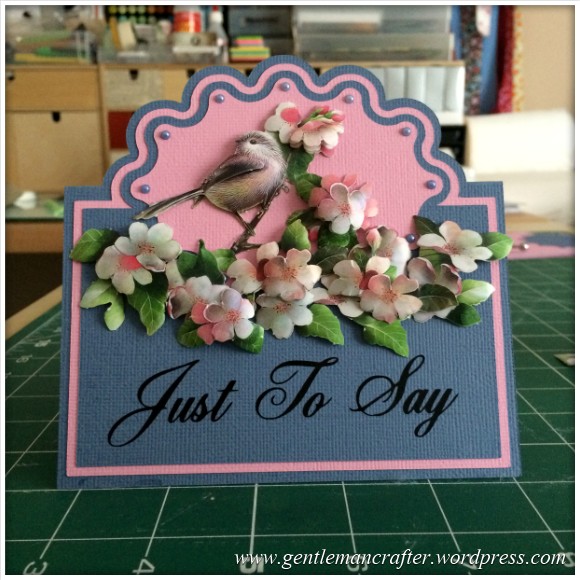
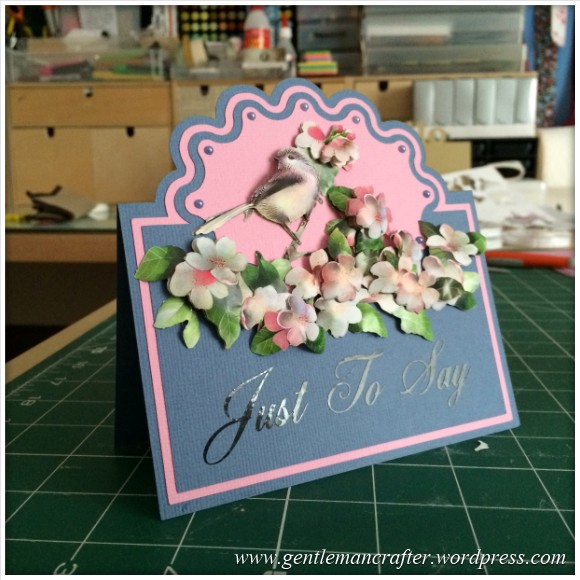
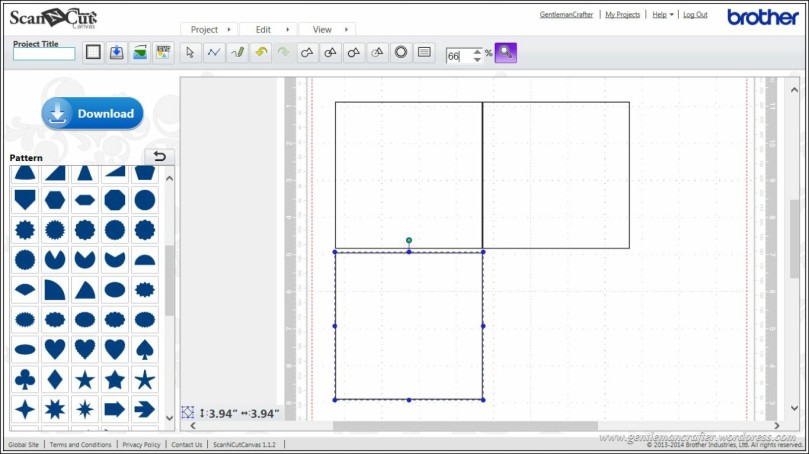
Anyway, with all of that in mind I set about creating a half cut scalloped-oval-topped-card from the basic shapes and then completed it with some peel off words, also made with the Scan N Cut, and then some decoupage that I already had.

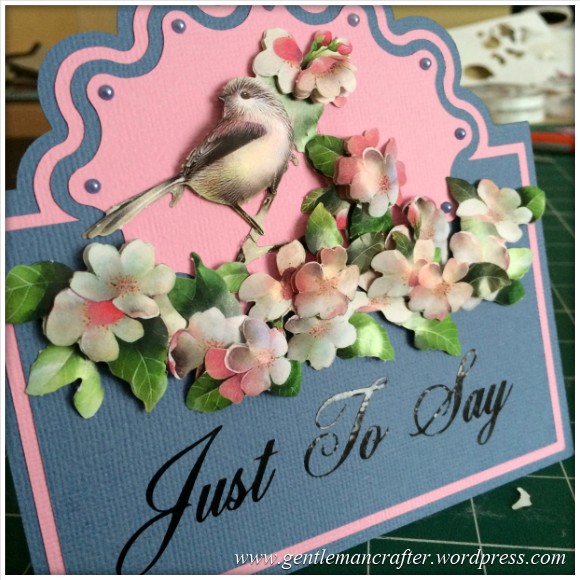
For the extra layers on this card I simply duplicate the topper shape and the card shape and used the offset feature to create layers smaller than the original and then welded successive sizes together. Simples.
Right, so you’ve got an idea of how to do it and what can be achieved why not go grab a coffee and then get cracking at designing some for yourself!
It takes a little while to get used to the way this software works but once you have learnt the technique you can start creating lots of unique designs over and over again – just have fun with it.
I’ll sign off now and leave you to your creativity.
See you next time fellow scanners!
J :)

Hello John. I’m rather new to my SnC and enjoy exploring it’s possibilities so your tutorial on half cuts was very welcome. In order to draw the (first) semi-circular line can’t you just draw a single line, highlight the draw points, set it as a curved line and then position the points till you get the right curve? I must admit I haven’t tried it your way yet, but I will soon.
Thanks for sharing your expertise; I’m really enjoying my new machine and using the Canvas software.
Thank you.
LikeLike
Hi John,
thank you so much for all your help with this machine, I like so many others am just starting and having problems. I have followed your instructions in this tutorial to the letter yet when I get to the bit where I have to remove the line from the semi-circle before I move it up onto the card it will not let me. I have placed the small box round the bottom small coloured circle making the line go turquoise but the open/closed box on top left will not take the line away. The cursor does not change to a hand when hovering over it, unlike the other 2 sections of that small group of directions in the top left hand when you open up the path buttons. Please, what am I doing wrong. I really am getting very very frustrated with the machine and the software. Its not quite as easy as it all looked!!! ;-)
LikeLike
If the steps have been followed it should work as described. I’m afraid that I can’t judge what is happening here.
Have patience and try one more time.
J :)
LikeLike
Hi John
I am having the same problem with a step at the beginning, when you highlight to delete the turquoise straight line on the semi circle, the open/ close box seems to fade and is not active.
I have tried every which way, but still not sure what I am doing wrong. Any help would be appreciated.
Thanks
LikeLike
Are you in the line editing mode when trying to select a node?
LikeLike
Thanks John
I think I am in the line editing mode – My screen appears to have the same settings as your screen shots and the line editing box is there, but the the open/ close box is not able to be clicked on.
LikeLike
Have you selected the node as described or only the shape?
LikeLike
The node as described.
LikeLike
Hmm. This is odd. I’m hoping to make a video of this soon so that it can be seen ‘as it happens’ but in the meantime it might be worth dropping the helpdesk a note to describe what’s happening and see if they have any suggestions.
LikeLike
Thanks for you suggestion John
I have tried everything, I did it once, so it must work. I then undid it to try and do it again but to know avail… it would be good to have a video on working with lines in SNC Canvas. Your videos and site are a great help and I am loving the ATC’s you are creating as well.
Cheers
Terrie
LikeLike
I am in Australia and I have had my scan n cut for a month, but it is still in the box. I have been mucking around with canvas, getting to know how to use it. Using your directions for the Half Cut Technique, I have designed a birthday card for my granddaughter, now all I have to do it cut it out. I did get caught on the open/closed outline button, however it is now a step that wont be forgotten.
Thank you for all your tutorials and for sharing your cut files. I have learnt a lot just watching the videos. :)
LikeLike
My pleasure :)
LikeLike
Hi John, I have just found your lesson on this half cut ! WOW – talk about great timing, I have been trying to do a Xmas card with Carol singers – half cut on a step card – I downloaded one with Christmas trees done this way, and wanted to change to carol singers – I failed miserably….BUT now I have printed out your instructions above – HOPE YOU DON’T MIND THAT – and I will be trying again…..Thank you so much for all your efforts and passing onto others your wonderful projects…Beautiful card by the way – will be trying that one too…..Thanks again – Sue – Australia
LikeLike
Following my very big age birthday yesterday I have a host of “Thank You” cards to make and your design is perfect. Thanks a million for the tutorial John it is very much appreciated.
Have a super day!
Marion in the UK
LikeLike
Happy birthday Marion :)
LikeLike
The card you used looks lovely nice texture. What card did you use? Some card I have tried has not cut cleanly which make do you suggest is best?
Julia
LikeLike
Julia, there are so many different types of cardstock our the it’s hard to state just one. I have tried quite a lot and you can see all of them in the list of cut settings that I made.
All brands that I use are also listed in the post and/or the tags on the posts.
Hope this helps :)
LikeLike
Hi John, I am from Australia, and I love my scan n cut. I also love your blogs. Could you please tell me what to use to do the lettering “Thinking of you” as I feel it would be great to do your own instead of buying them.
Thanks Trish
LikeLike
Not sure what you are asking here. Please can you explain a bit more?
J :)
LikeLike
Sorry John, you said you made th words “Thinking of you” on your scan & cut. What sort of sticky paper did you use as you said you stuck it on. Hope that explains it better.
LikeLike
Still a bit confused. The only sentiment on the card in this post is Just To Say – to which project or post are you referring to please?
J :)
LikeLike
Sorry John I was writing this without looking at the project. The saying is “Just to Say”. I want to know what you used for this as your article said it was peeled off words, also made on the scan and cut.
Hope I have explained it better this time.
LikeLike
I used peel off vinyl sheet. I have a blog post that shows this – it’ll be with all of the Scan N Cut posts if you’d like to know more.
J :)
LikeLike
Hi John hope you can help bought the cut scan 2 months back and hardly used ,but now my mat is not sticky I have cleaned it with water and still not sticky .am I doing something wrong ,or do I need to get new mat
LikeLike
Are you making sure to rub the cardstock down onto the mat with the back of the spatula. Contact adhesives work better the more contact with the cardstock they have – it might be worth trying that first; you shouldn’t need a new mat yet.
J :)
LikeLike
I loved doing this tutorial just now but I am struggling with making the extra layers – you say to duplicate the topper – before you move it into place on the card? and duplicate the card but when I try to weld it will not weld – open intersection – what am I doing wrong?
LikeLike
Not 100% sure there Margaret. Are the two sections overlapping?
LikeLike
Thank you John for sharing and helping, I think a lot of people sometimes need help but feel silly asking for it, so your ideas and easy to follow tutorials are fab, keep up the good work
LikeLike