
You may have recently seen in my post about UFOs that I had made a start with an idea that I had a while back about using the Inkadinkado Stamping Gear together with Parchment Craft.
This post will hopefully give you Inkadinkadoodlers another idea for using the system, and also help me clear another UFO.
First up, I should mention that I did have a couple of failed attempts that went wrong but this was mostly due to the inkpad that I was using. I hadn’t realised that it is better to use a permanent ink on parchment as pigment ink can take a long time to dry on parchment, and in some cases needs to be heat set, which in itself can warp the ‘paper’.
Anyway, having discovered this I went about trying to find a permanent white ink to stamp with. I found it in Stazon Opaque ink. You can see it here among some of the other tools that I used.
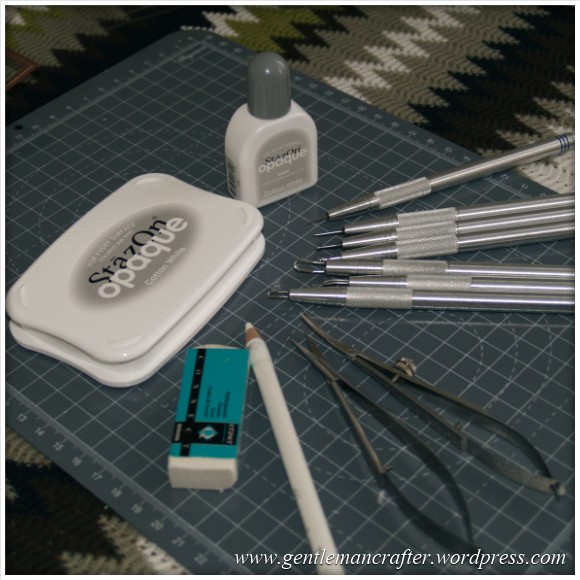
You’ll notice that there is an inkpad and a bottle of ink. This was because the permanent white inkpad does not come ready inked. I genuinely don’t know the reason for this; all that it meant was that I had to ink up the pad before I used it. Not to much of a bother – and weirdly made me feel a little special – no idea why.
Anyway, so that was that. Moving on with the project I found no difference in using the Inkadinkado Stamping Gear to create the stamped pattern – everything as normal.
In case you were interested the stamp that I used was from the Classic Ornaments Stamping Gear stamps set.
I then began using some of my PCA (Parchcraft Australia) shading tools to start to work up the design. Here is a pic of the beginning stages.

You can see the stamped outline in the image above, along with some of my initial shading work.
It took quite a number of evenings to complete the whole design but this is what it was like when I had done it.

I didn’t particularly want to leave it there and had recently purchased the Multi Grid No. 13 from the Pergamano range. It was a grid with circular designs on that I thought would work well with this pattern.
Here is a quick pic of the grid (and the base grid that I would also use later on).

I first added some detail to the centre of the design.

Then chose one of the corner designs that I thought would suit the main feature.

At this point I thought that the design was coming together quite well.

So I moved on to creating the border. I began working an embossed design around the outer edge and then worked a perforated edge on the outside of that.
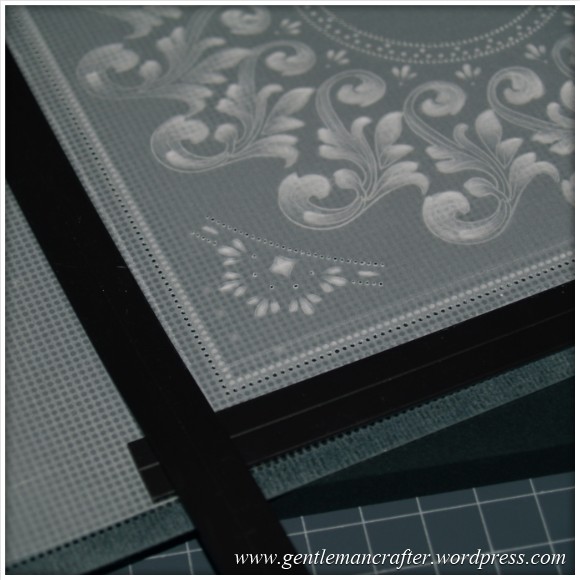
I then cut into each of the perforations, separating the design from the sheet and ended up with this.

I think that I need a little more practice at the edge snipping technique but I was pleased overall with how it turned out – and anyway, the edge wasn’t the reason that I started this project.
I have left the centre blank for now but have in mind to place a sentiment there as this will also help me cover the adhesive once I come to finish this off – ok, ok, so it will remain a UFO, but at least it is another technique that I can do with the Inkadinkado Stamping Gear.
Just so you know, the finished piece ended up at six and a half inches square.
One final thought did occur to me and that was that I didn’t even need to go on to emboss or perforated this sheet. The white outline would have been stylish enough on it’s own. Bit late now though, lol!
As ever, I have tried to anticipate any questions but if I have missed anything, please feel free to use the comments section below to ask anything that you want to know about this project.
Thank for you for reading.
J :)

Amazing combination…
LikeLike
Just bought this stamping gear havn`t played with it too much yet but had a practice on parchment and its great got to get some more fancy stamps but yours are great can`t wait to do some more
LikeLike
Wow, wow, wow. What is left to say????
LikeLike
Absolutely brilliant, another thing to put on the Xmas list!!! thought the stamping gear was a gimmick until I saw this.
LikeLike
Hi John, a fabulous piece of art work.. Unfortunately i don’t have the patience for parchment. Hope you will get this framed.
LikeLike
Hi John Fantastic work you can use VersaMagic and Brilliance ink pads to stamp onto parchment I find them much easier to work with.
LikeLike
Lovely project John, you do have a lot of creativity and patience! Not to take anything away from the end product but as you said the initial stamping and shading looks great too. The Stazon white ink pad now goes on my ever increasing shopping/ wish list.
Cheers
Sue
LikeLike
That’s gorgeous, you must have a lot of patience! Thank you for sharing x
LikeLike
Hi John,
Really, is there nothing you can’t turn your hand to? I am amazed at this latest project and will have to give it a try one of these days. Thanks so much for sharing your own journey and allowing us mere mortals to have a look in and get some inspiration.
All the very best!
Carol
LikeLike
What can I say John – WOW – you are clever!!
LikeLike
I always end up with mistakes on my parchment work, I’m a bit too heavy handed unfortunately. Yours is a beautiful piece, thanks for sharing.
LikeLike
Thanks John for the amazing tutorial – this is really beautiful! Strangely enough I’ve just bought parchment paper as I like the look of parchment craft and to be able to use my stamping gear to produce something like this is a real bonus! x
LikeLike
A beautiful creation John I do have all the pergamarno tools to do parchment craft but because I don’t practice enough my techniques are very basic but I do love the idea might just have to have a go x
LikeLike
Fantastic – absolutely beautiful project John. Pat x
LikeLike
It’s lovely John. I’m a real newbie to idd stamping gear and am still struggling to get an even layout to the stamps. Every attempt so far has ended up as backing paper! Any hints on getting no big gaps or overlaps? Gail
LikeLike
GREAT STUFF XX
LikeLike
John this amazing! So beautiful and your instructions are always so clear and easy to follow thank you.
LikeLike
This is just lovely thanks for sharing x
LikeLike
Oh my word John, this is fantastic and well worth the time taken to produce it – fabulous x
LikeLike
Wow, this is fantastic John, it looks beautiful, such a lot of work has gone into it! x
LikeLike
What a lovely creation John, a real labour of love and you must be so pleased with the result. Best wishes Jackie
LikeLike