
I’m seeing single layer stamping in a number of places right now, so I thought that I’d give it a go and see what I could come up with.
Here is an overview of what I did and how I did it.
First, I am guessing that some of you will know what is meant by single layer stamping, but for those that don’t it’s basically stamping and decorating on the actual card, rather than using any matts, layers or embellishments and building things onto the card.
Here is a card that I made to illustrate that point.

Not sure if you can tell, but there are no layers, matts or other add on embellishments. All of the design comes from the stamping and inking that I worked straight onto the card.
Anyway, I hope that you got the idea.
I chose this “panel” style really so that I could make a clean and contemporary card with a flash of something in the middle. Worked out well I think.
Here is a quick overview of how I achieved it.
First, I drew two parallel lines on the front of the card.

(That picture is in for a prize as being the best picture ever – not)
I drew them in pencil as they are merely guidelines.
I then masked off the outer area leaving the centre panel showing.

I then chose three different distress inks (Spun Sugar, Worn Lipstick and Ripe Persimmon and began blending on the lightest – Spun Sugar.
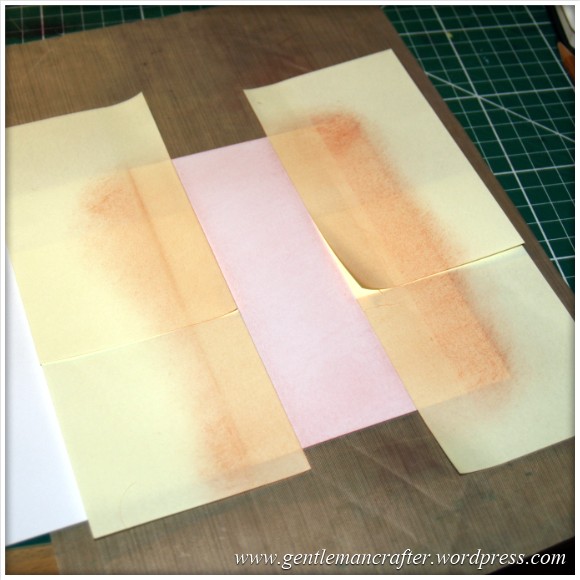
And then the mid tone colour – Worn Lipstick. I didn’t shade the whole area with this, but starting creating a vignette.

And then finally the darkest tone – Ripe Persimmon. Again, only the other edges were done with this colour.
I also added a little Aged Mahogany but just over the corners of the central panel, mostly to accentuate the shading of the other three colours and complete the vignette look.

I then grabbed a large script background stamp (from Hero Arts in case you were wondering) and used the Ripe Persimmon distress ink to plonk a patch of text right in the middle of the panel.


Now it was time for the Inkadinkado Stamping Gear to get involved. I chose the circular wheel and a flower petal stamp. Using the Aged Mahogany distress ink I stamped into every fourth notch (because it was quite a wide petal).

I then moved the wheel to the other end of the panel and repeated this design.
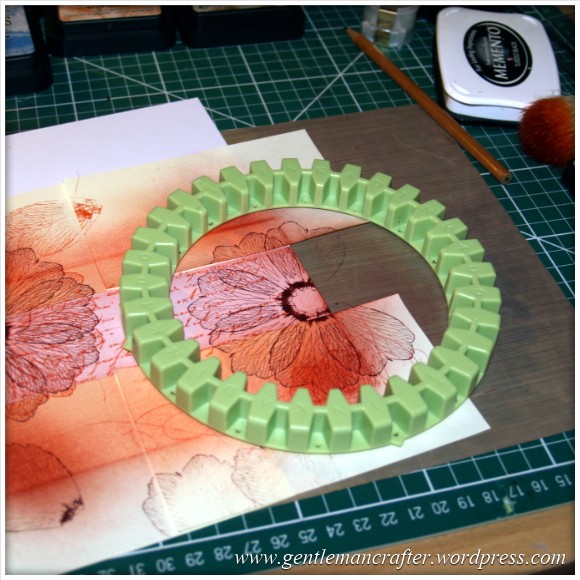
So that was all of the stamping on the centre panel done. Time to remove the masks.

Not bad, but I felt that it needed something to “frame” the centre panel. Now, I could have used a black micron pen to draw two lines across the design but I wanted something a little bolder and that worked with the colour scheme so I searched my Spectrum Noir collection and found that the DR7 pen was a good match for the Aged Mahogany distress inkpad so I used that to draw the two lines.
Here is what it looked like.

Right, just a sentiment to finish I think. Because I had used a scripty background I searched my stash to find some text that had a font to match, or at least not look out of place.
I like to do that as it ties the design together a little more.

So there we have it. A fairly quick and trouble free project.
Oh, I’m an idiot, I forgot to tell you the size again. This one was an A6 card (UK sizings here), but I see no reason why the style could not be adapted to suit any size of card.
Here is another look at this one finished and stood up.
And here are a few more experiments that I made using this technique.


By the way, it did cross my mind as I was making these cards that there are advantages to doing things this way.
First, I could invest most of my money (if I were just a rubber stamper) in the stamps and inks as the only base card that I would need is white.
The second is that it really does fire up the imagination – which is the part that I enjoyed.
What do you think – is this your style of project? Do you like the idea of a creative challenge like this?
Well, that’s about it for now. As ever, if you have any comments or questions, please feel free to use the box below.
Thanks again for reading.
J :)

[…] Also, I had it in my head that I wanted to do something with Distress Inks. I found a pin from Gentleman Crafter and liked the style, and that became my inspiration for this set. Finally, I decided that using […]
LikeLike
Your cards are so subtle and beautiful! I You have inspired me to open up my package!
Thanks for the tutorial. They are lovely. Again thank you for sharing your time and talent.
LikeLiked by 1 person
Love this but John I did see sometime ago an Inkadinkado card done with brown card and white ink. Do you still have this on your website for me to look at?
LikeLike
All of my Inkadinkado cards that I have blogged about are still here. Just use the menu, keywords menu or post tags to find them all. :)
LikeLike
I loved this simple card & the different designs you achieved with different colour combinations. Can you remember the flower stamp you used for the card please? Also what blending tool did you use?
LikeLike
A bit confused by the question Pat. As the post describes I formed the flower from a petal stamp from the Inkadinkado Stamping Gear range. Is that what you meant?
J :)
LikeLike
Hi John, yes that was what I meant as I couldn’t find that particular stamp in the Inkadoo selection that I have recently bought. I bought all the sets on your recent shows with the new stamping bar.
LikeLike
Your cards are beautiful!! The colors are so inviting. One layer cards are easy to whip up and no extra postage. Well done:)
LikeLike
[…] second card was made in almost the same way and was inspired by a technique for single layer cards that I found on John’s blog. First, I stamped the word dream using the String Inspiration […]
LikeLike
Great tip using shaving brushes. I’m just getting into stamping and recently saw a tutorial on how to make the blending brushes but these are even better. Can’t wait for my square gear set to arrive.
LikeLike
Stunningly effective cards, definitely going to try this, thanks for the tutorial. I bought my shaving brushes Wilkos only 60p each :-)
LikeLike
[…] a selection of that sort. The Bordered Sentiment idea came from Splitcoast Stampers and the Single Layer idea from The Gentleman […]
LikeLike
[…] Inkadinkado Stamping Gear sets. I just had to have a go at the single layer cards that John made here as I thought they would be great for a set of […]
LikeLike
Hi John, love these cards I am trying to do more CAS cards and will definitely be having a go at something similar. I noticed you use shaving brushes for your Distress Inks and I was just wondering where you buy them as I am having trouble sourcing them.
LikeLike
I got the shaving brushes from my local pound shop.
LikeLike
Great idea John – I do love it when I have the dies/stamps/whatever in question, so that I can get started straight away. I am just lacking a sentiment at the moment, but I have a ‘Just for you’ stamp on it’s way as I type (I’m hoping it will arrive today).
LikeLike
Hi John
Beautiful samples. I too have been playing with a more CAS approach to my cards. Its quick,cost effective and stylish and I am now a convert.
Thanks for the new ideas.
Ang x
LikeLike
Once again some brill cards. Very classy look. Must give this ago. Keep up the good work, John
LikeLike
Love this technique and your cards are fabulous. Thanks for tutorial, can’t wait to try it out.
LikeLike
Thank you for all of the kind and positive comments. Some really good points re saving on postage – I hadn’t even thought of that when I was making these but it’s definitely a consideration these days isn’t it?
J:)
LikeLike
These cards are really classy John, it’s a technique I really must try, thank you for sharing x
LikeLike
Great card and colour mixtures – all to inspire. Thanks John something else to put on the ‘to do’ list.
LikeLike
Lovely cards John, could you tell me the colours you used on the blue card please x
LikeLike
Hi Vanessa, The colours that I used for the blue card were Dusty Concord and Peacock Feathers.
Hope this helps.
J :)
LikeLike
Brilliant, I love cards without all the pizza toppings. Brilliant. You need to do more teaching on create and craft. Postage is also an issue now and all though large cards are wonderful and I make them it cost me 90pence to post. Anyway great tutorial.
LikeLike
Lovely idea
LikeLike