When stamping a single image you generally have enough time to work with slow drying inks and heat embossing powders, but creating repeat designs can sometimes be difficult. As a result of the speed at which you can create complex repeat patterns with the Inkadinkado Stamping Gear system you can still us this fantastic technique.
Heat Embossing is a very versatile technique. The heat embossed area can be the focal point, a border, a topper or a feature in the background.
Heat Embossing is created using the following basic rubber stamping tools and materials:
- Pigment Ink.
- Embossing Powder. There are a variety of colours and finishes available so you will have no problem finding one to match your project.
- Heat Tool.
- Cardstock.
- Anti-static bag.
Here’s a quick run through of the technique.
- Stamp your design using a clear, tinted or coloured pigment ink. It’s important to use a pigment inkpad as it dries a lot slower than other inks and gives a good amount of “sticky” for the embossing powder to adhere to. It’s also important to stamp all of the design that you want to emboss before applying the powder. Tips: Rub the area that you plan to stamp with an antistatic pad and try not to touch areas that are to be embossed with your fingers as the grease can cause the embossing powder to stick to areas that you don’t want it to.
- Apply the embossing powder. Sprinkle the powder liberally all over the area that you just stamped. Tip off the excess onto a piece of paper and then tip this back into the pot.
- Gently heat the embossing powder area of your card until it starts to melt and then slowly work around the whole design until all of the embossing powder has melted.
There are other techniques and special requirements for certain types of cardstock however this post was intended to cover just the basics.
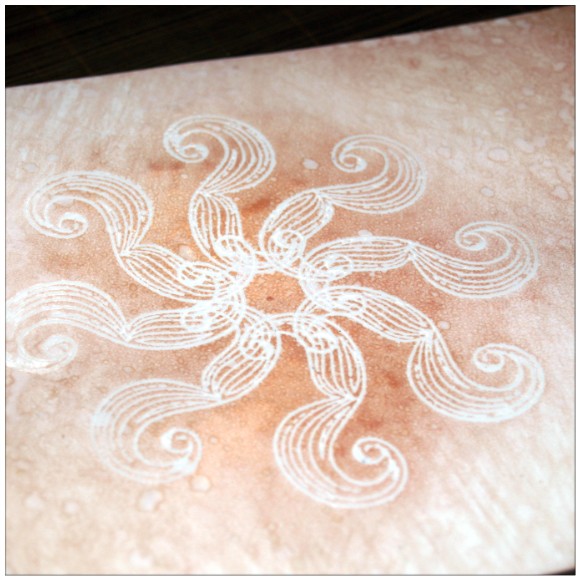
So I didn’t start out sensibly to be honest and just did clear embossing powder on clear ink.
Not a bad result though. There were no gaps and the ink was still wet enough that the embossing powder stuck to the whole area.
After that, I got to thinking of various combinations that I might like to try and therefore just HAD to have a play ;)
Here are a few of the results…

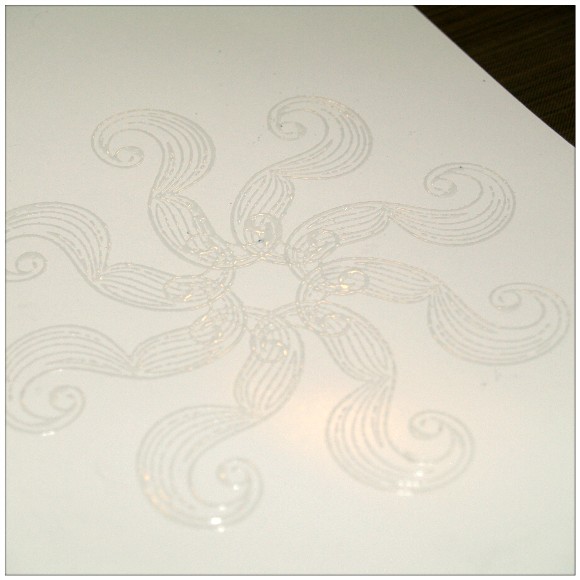
By using the clear on clear method, the colour of the paper underneath will show through what you started adding inks, mists or sprays. For anyone who doesn’t know, this is often called the resist technique. Lots of potential there I think.
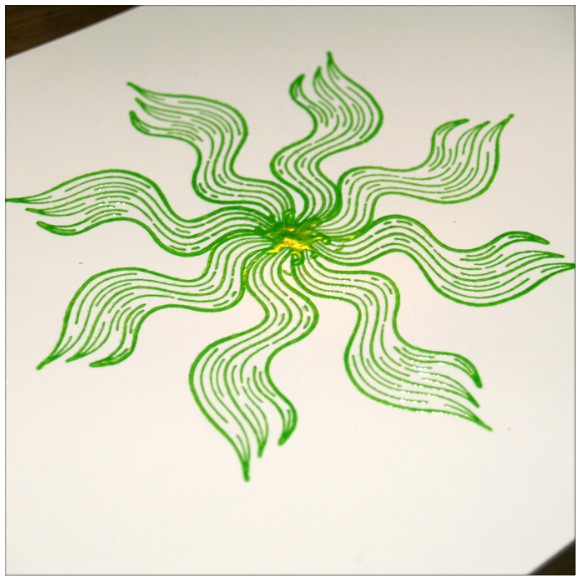
Next, just by changing the colour of the ink that I used I got a totally different result. With so many colours and types of pigment ink available, I guess that the sky is the limit when it comes to options.
Then, having tried out the resist technique on the clear ink, I wondered what it would look like with the coloured ink …

The colour of the ink was quite intense after I’d added the darker colours of top. But this worked for me as it made the design ‘pop’. I’ll probably use different colours next time though and possibly tone down the main image a tad. After-all, nothing say “Happy” more than an acid green sunburst, lol!
After this, I thought back to the basic Inkadinkado Stamping Gear techniques and decided to try heat embossing with the Ombre technique. The ombre technique uses two colours of ink on the stamp each time an impression is made and I wondered if the extra time spent inking the stamp would affect the ability to do heat embossing as it might dry before I had finished stamping.
I am glad to say that it didn’t affect it at all – yaaay!

I couldn’t really make out the embossing glaze on this image (probably you can’t either?). To prove that it is, I tried the resist technique again. I love this result!

Still couldn’t make out the glaze? Trust me, it’s there :)
Having had all of this fun I wondered if I would have to go and buy a black embossing powder. I didn’t really want to to be honest as I was having a good run in the craft cave so I tried using embossing powder with a black pigment ink (and obviously did the resist thing again, lol). I also applied a little extra ink direct to the sun rays and the embossing acted as a well, which opens up a whole other range of techniques (but not here, not now). Anyway, here it is.
I plan to put a strip of card across the middle of this so as I was stamping I didn’t really pay any attention to the central points, hence why they appear wonky. The lines were created by using the rectangular Inkadinkado Stamping Gear cog and laying it across the card – simply, but it makes for great borders!
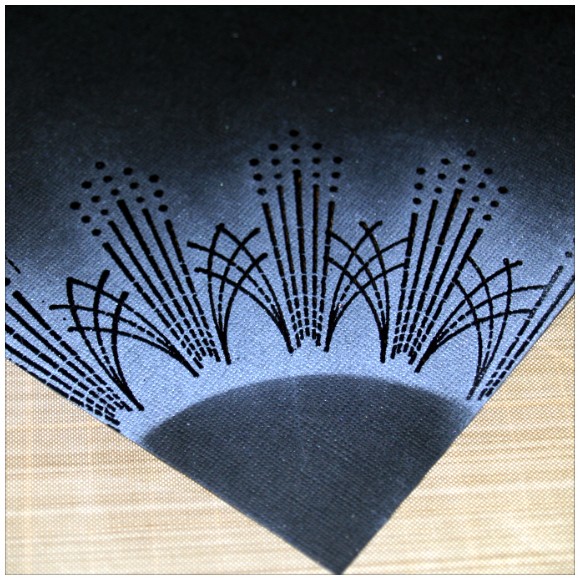
Whilst we are on the subject of black, I know that it is a colour that is popular in card making at the moment so it would have been remiss of me not to have tried out a couple of ideas.
The first took me back to the beginning of this post and I used a clear pigment inkpad with a clear embossing powder.
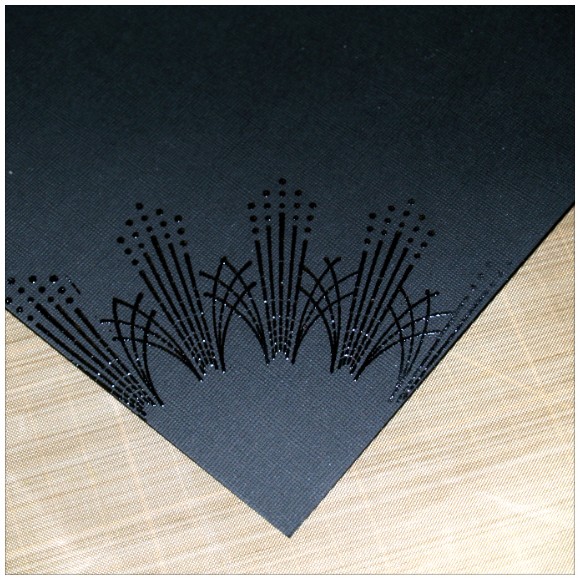
I really like the way that this technique takes the colour of the cardstock and gives it glossy detail. It’s almost as if I bought it that way.
Yes, I obviously did the resist technique on this one too :) This time however I used a white inkpad, a circular mask and made sure to blend it well so that it almost looked as if the design is a gigantic piece of wrought iron being lit from below on a foggy night (yep, I do have an active imagination).
Anyway, this was just a quick one to give you a few ideas on some of the techniques that are possible with the Inkadinkado Stamping Gear system a couple of rubber stamping techniques.
I hope to be able to use most of the testers above to make cards over the coming week, so look out for those.
As ever, please feel free to pop any questions or comments below and I’ll do my best to reply asap.
Thank you for taking the time to read this post.
John :)

Hi John,
I’m quite new to stamping and I saw how well your gorgeous black card was, I am hoping you can help.
I have Jet Black card and I am trying to heat emboss with WOW Opaque Bright White Superfine as the writing on my stamp is quite small. I’ve tried both clear & white pigment inks (Versa) and also WOW Clear GLOSS & WOW White Superfine embossing powders, if I don’t use an Anti static pad, I end up with lots of specks showing everywhere, I’ve also tried using a used drier cloth for the specks but it didn’t seem to help, so I used my antistatic pad which coated my lovely fresh crisp black paper with a white dust, I then started my stamping, then embossed, only to find that there was no embossing powder specks, BUT, the antistatic pad has left a dust all over my Jet Black card. I have tried blowing it, wiping it, it would not go away.
So, after my long winded moan Lol, does anyone have a solution to my question, how do I get rid of anti static pad residue off jet black card.
I would be most grateful for any suggestions.
Thank you so much,
Karen x
LikeLike
Hi John can I ask with these techniques is it best to heat from the top or from underneath? Katie-Louise
LikeLike
It will depend on the type of powder and heat gun you are using. Try it different ways and see what works best with what you have available.
J :)
LikeLike
Hi John, thank you for all these inspiring experiments. I love the black card embossed with clear embossing powder and inked in white, it’s my favourite of all your work on this post.
LikeLike
Hi John, have watched you a few times on C&C with the stamping gear set. Your demonstrations are inspiring! I’ve been having a play with my set and really love it .Can you please help.. I have a few pan pastels that I haven’t really used yet and was wondering which way to use them. Do you use the pastels first or stamps and what is the best ink to use? (apart from versamark). Thanks for your help. Beryl
.
LikeLike
Hello Beryl,
Thank you for the compliments about the on-air demonstrations. It’s great to hear that you are having fun with the Inkadinkado Stamping Gear set and that the simple techniques that I have shown are inspiring you to have a go too.
In answer to your question about Pan Pastels I have to say that for the techniques that I highlighted on air I just used the Pan Pastels as a background colour, and so applied it to the card stock first. I then used a black Memento inkpad on top of the chalked area.
I have only really used the Pan Pastels briefly for that purpose so haven’t fully explored all of the techniques possible however I know that there are many different ways of using them. They are definitely something that is on my “playtime” list.
I’m hoping to have a day free soon where I can try out a variety of the techniques. I do plan to pop pictures of the results of these experiments in a future blog post so do make sure that you follow the blog (or follow me on my facebook page or twitter as I often post about new blog posts there).
Take care and have fun crafting :)
J.
LikeLike
LOVE LOVE LOVE THE BLACK ONE. JUST BEAUTIFUL JOHN.
LikeLike
Hi John. Gosh you have been busy, thanks for sharing. My stamping gear equipment still in its box as been too busy with Zentangle, etc. I don’t recognise the stamp used on the last two demos, did it come with one of the sets or is it one of your own please. Anyway, thanks again, you have really inspired me now. SueL
LikeLike
I have been playing with some of the new stamps that will be launching next week. ;)
LikeLike
So you are teasing us ,I still haven`t got my sets out of the box must really is there any chance of telling me how to use clear stamps on this as I have loads .Thanks in advance .Melanie
LikeLike
Two choices Melanie. You can either add a piece of foam ‘cling’ to your clear stamp or adapt the ‘paddle’ with layers of acetate. I’ll try and get a post done on this before next week. :)
LikeLike
Thank you this would be great tutorial for everyone .melanie
LikeLike